
Build an AI Email Assistant with Letta, n8n, and Resend
With all the OpenClaw hype, you might think having a fully virtual PA is as easy as giving your agent access to your email.
But have you considered the security risks? Anyone who can send an email could prompt your agent and manipulate its behavior.
And what about memory? Without it, your assistant treats every conversation as a first contact.
This guide builds Jeeves, an email assistant that handles both security and memory. It runs on a dedicated domain, maintains persistent memory of your contacts and communication style, and only responds to senders on an explicit allow list. The stack is as follows:
- Resend for email
- Letta for the AI agent with memory
- n8n to wire it together
In the demo below, a colleague sends an email, we forward it to Jeeves, and Jeeves replies to the colleague directly, with us CC'd. Because we forwarded that first email, our colleague is now on the allow list and, in future, can email Jeeves directly without any further action from us.
The guide walks you through creating:
- A verified custom domain for sending and receiving email via Resend
- A Letta agent with memory blocks that persist context across conversations
- An eight-node n8n workflow that connects everything end-to-end
- A tested production webhook that fires on real incoming emails
Prerequisites
To follow along, you need:
- A Letta account with an API key
- A Resend account with a domain you control (for DNS configuration)
- Node.js version 18 or later (to install and run n8n)
- Python 3.8 or later (to create the Letta agent)
- ngrok (to expose your local n8n instance for webhooks during development)
Step 1: Set up your email domain
Jeeves needs a domain from which to receive email. We'll add the domain to Resend, configure DNS records to allow emails to flow in and out, and verify that everything works before building the workflow.
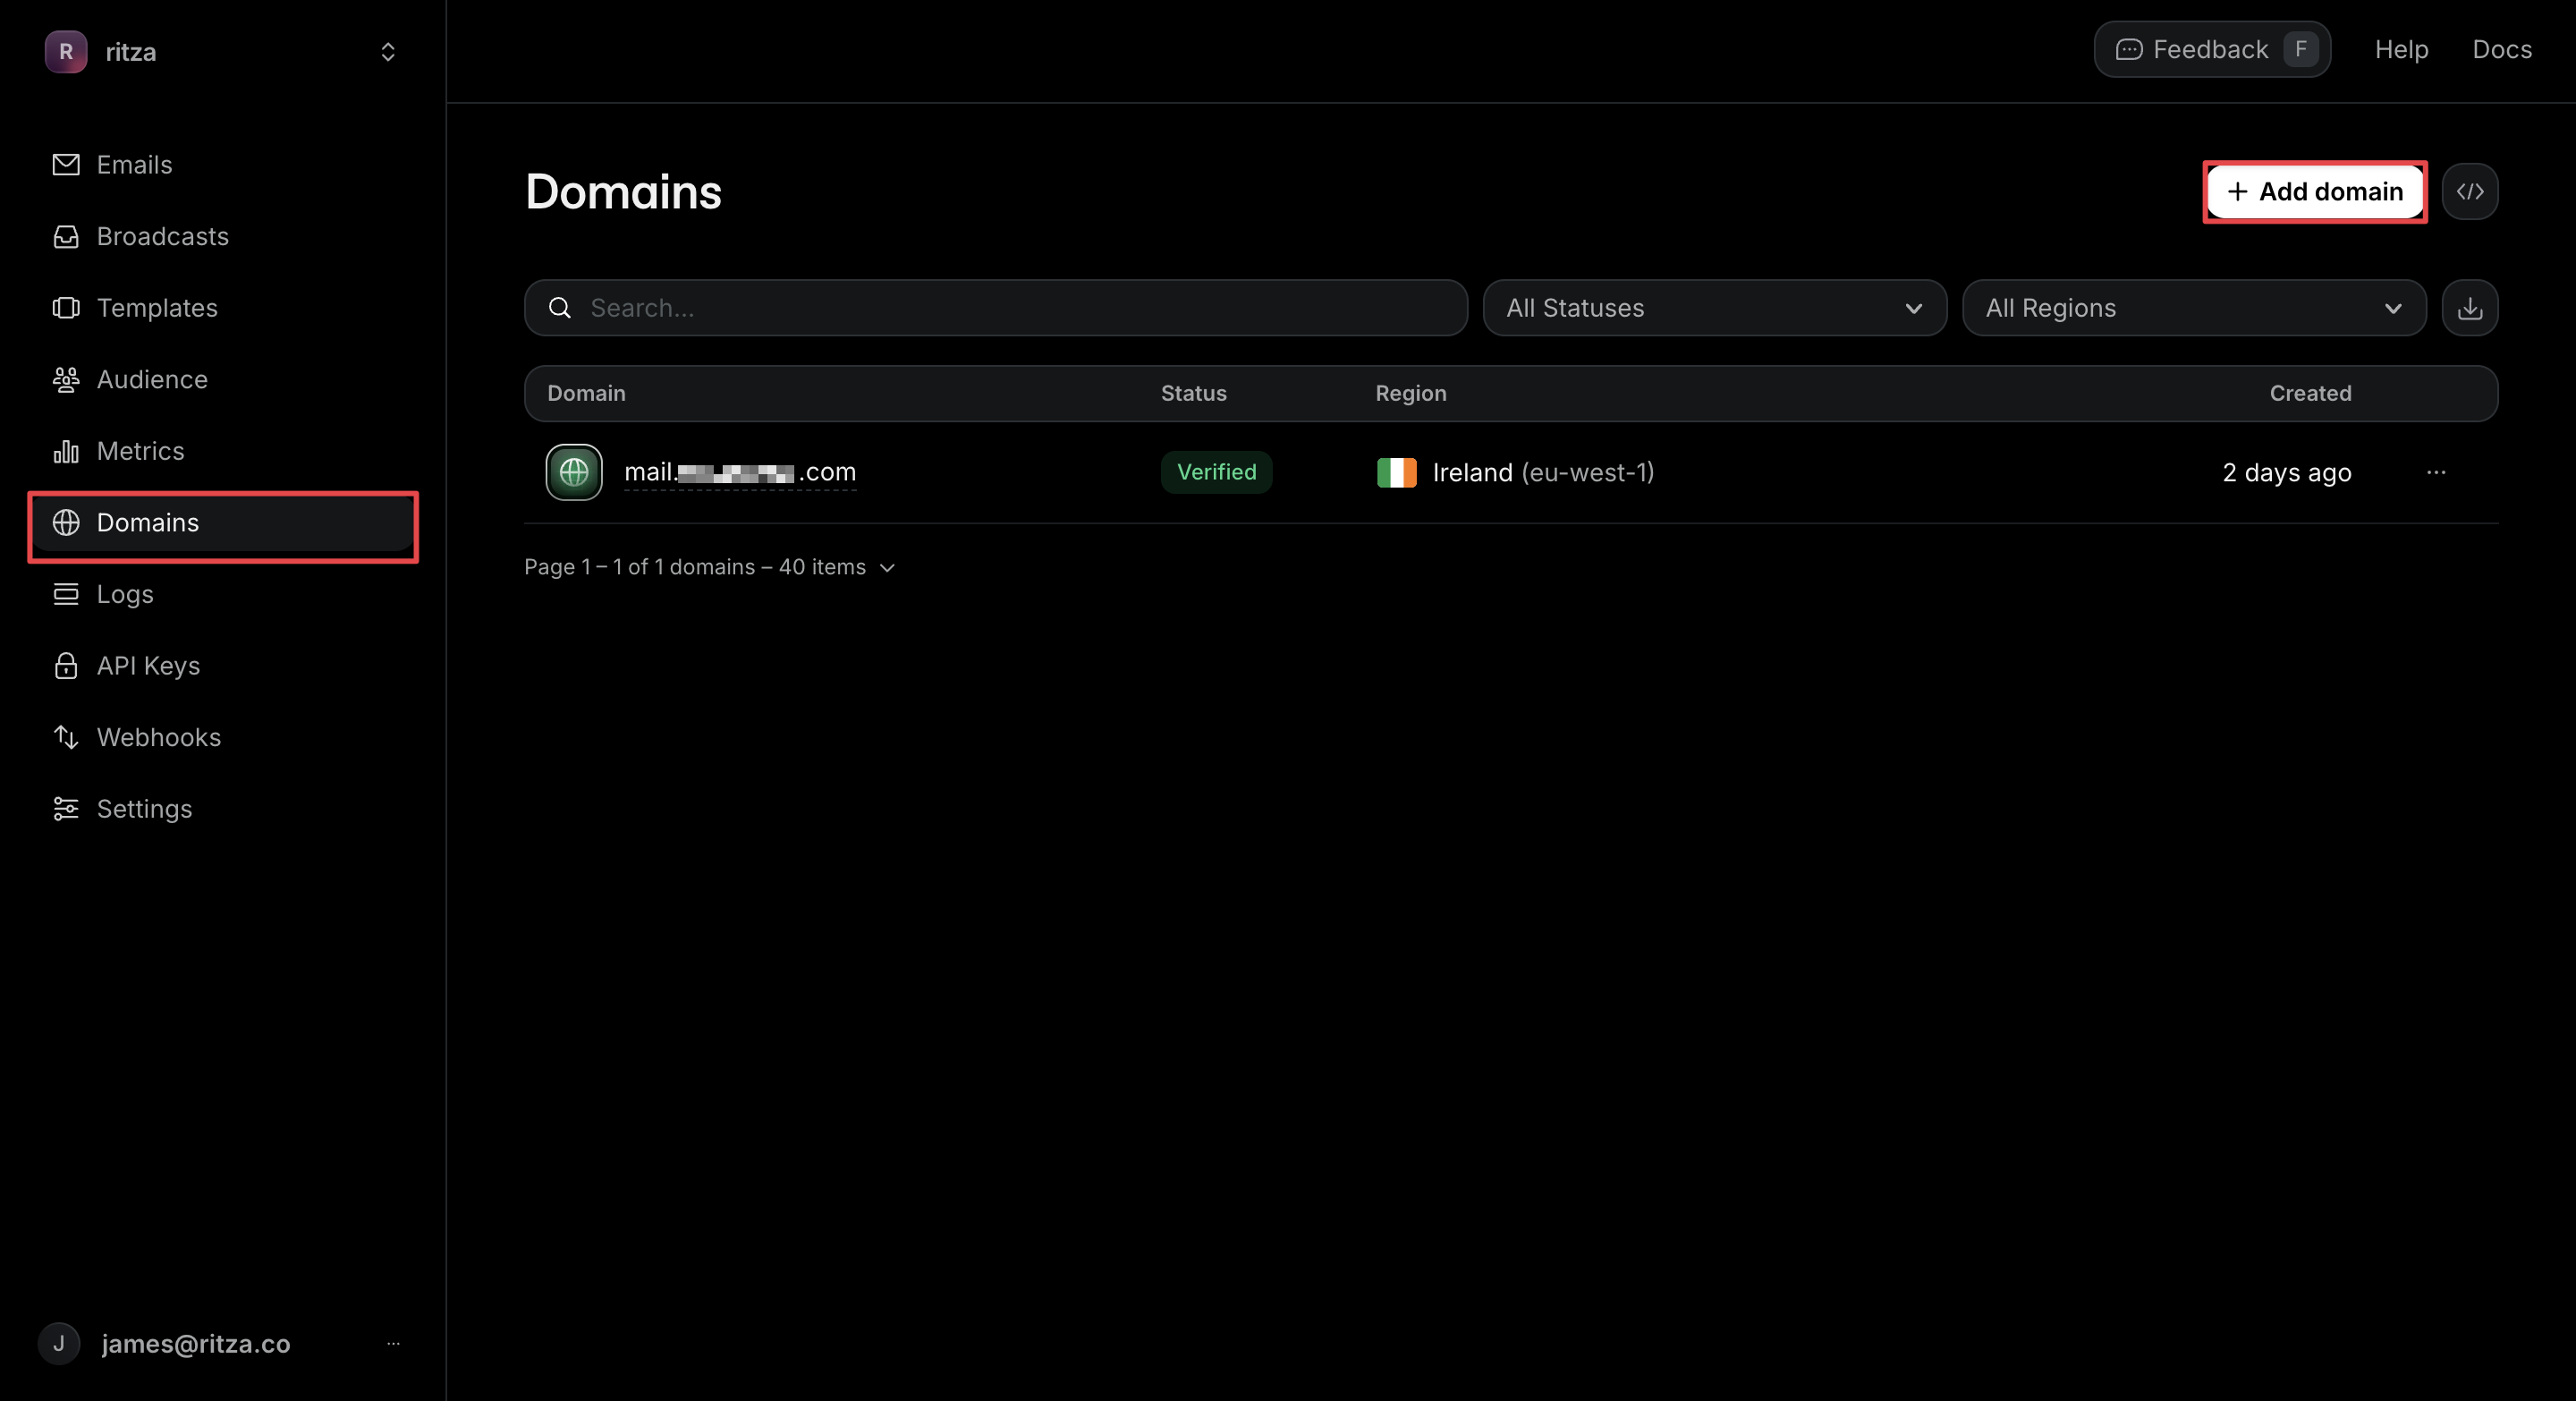
Add your domain in Resend
Log in to resend.com and go to Domains. Click Add Domain and enter the domain (or subdomain) you want to use.
Using a subdomain like mail.yourdomain.com is common. It keeps your email infrastructure separate from your main domain and avoids interfering with existing DNS records.
Resend shows you a set of DNS records to add.
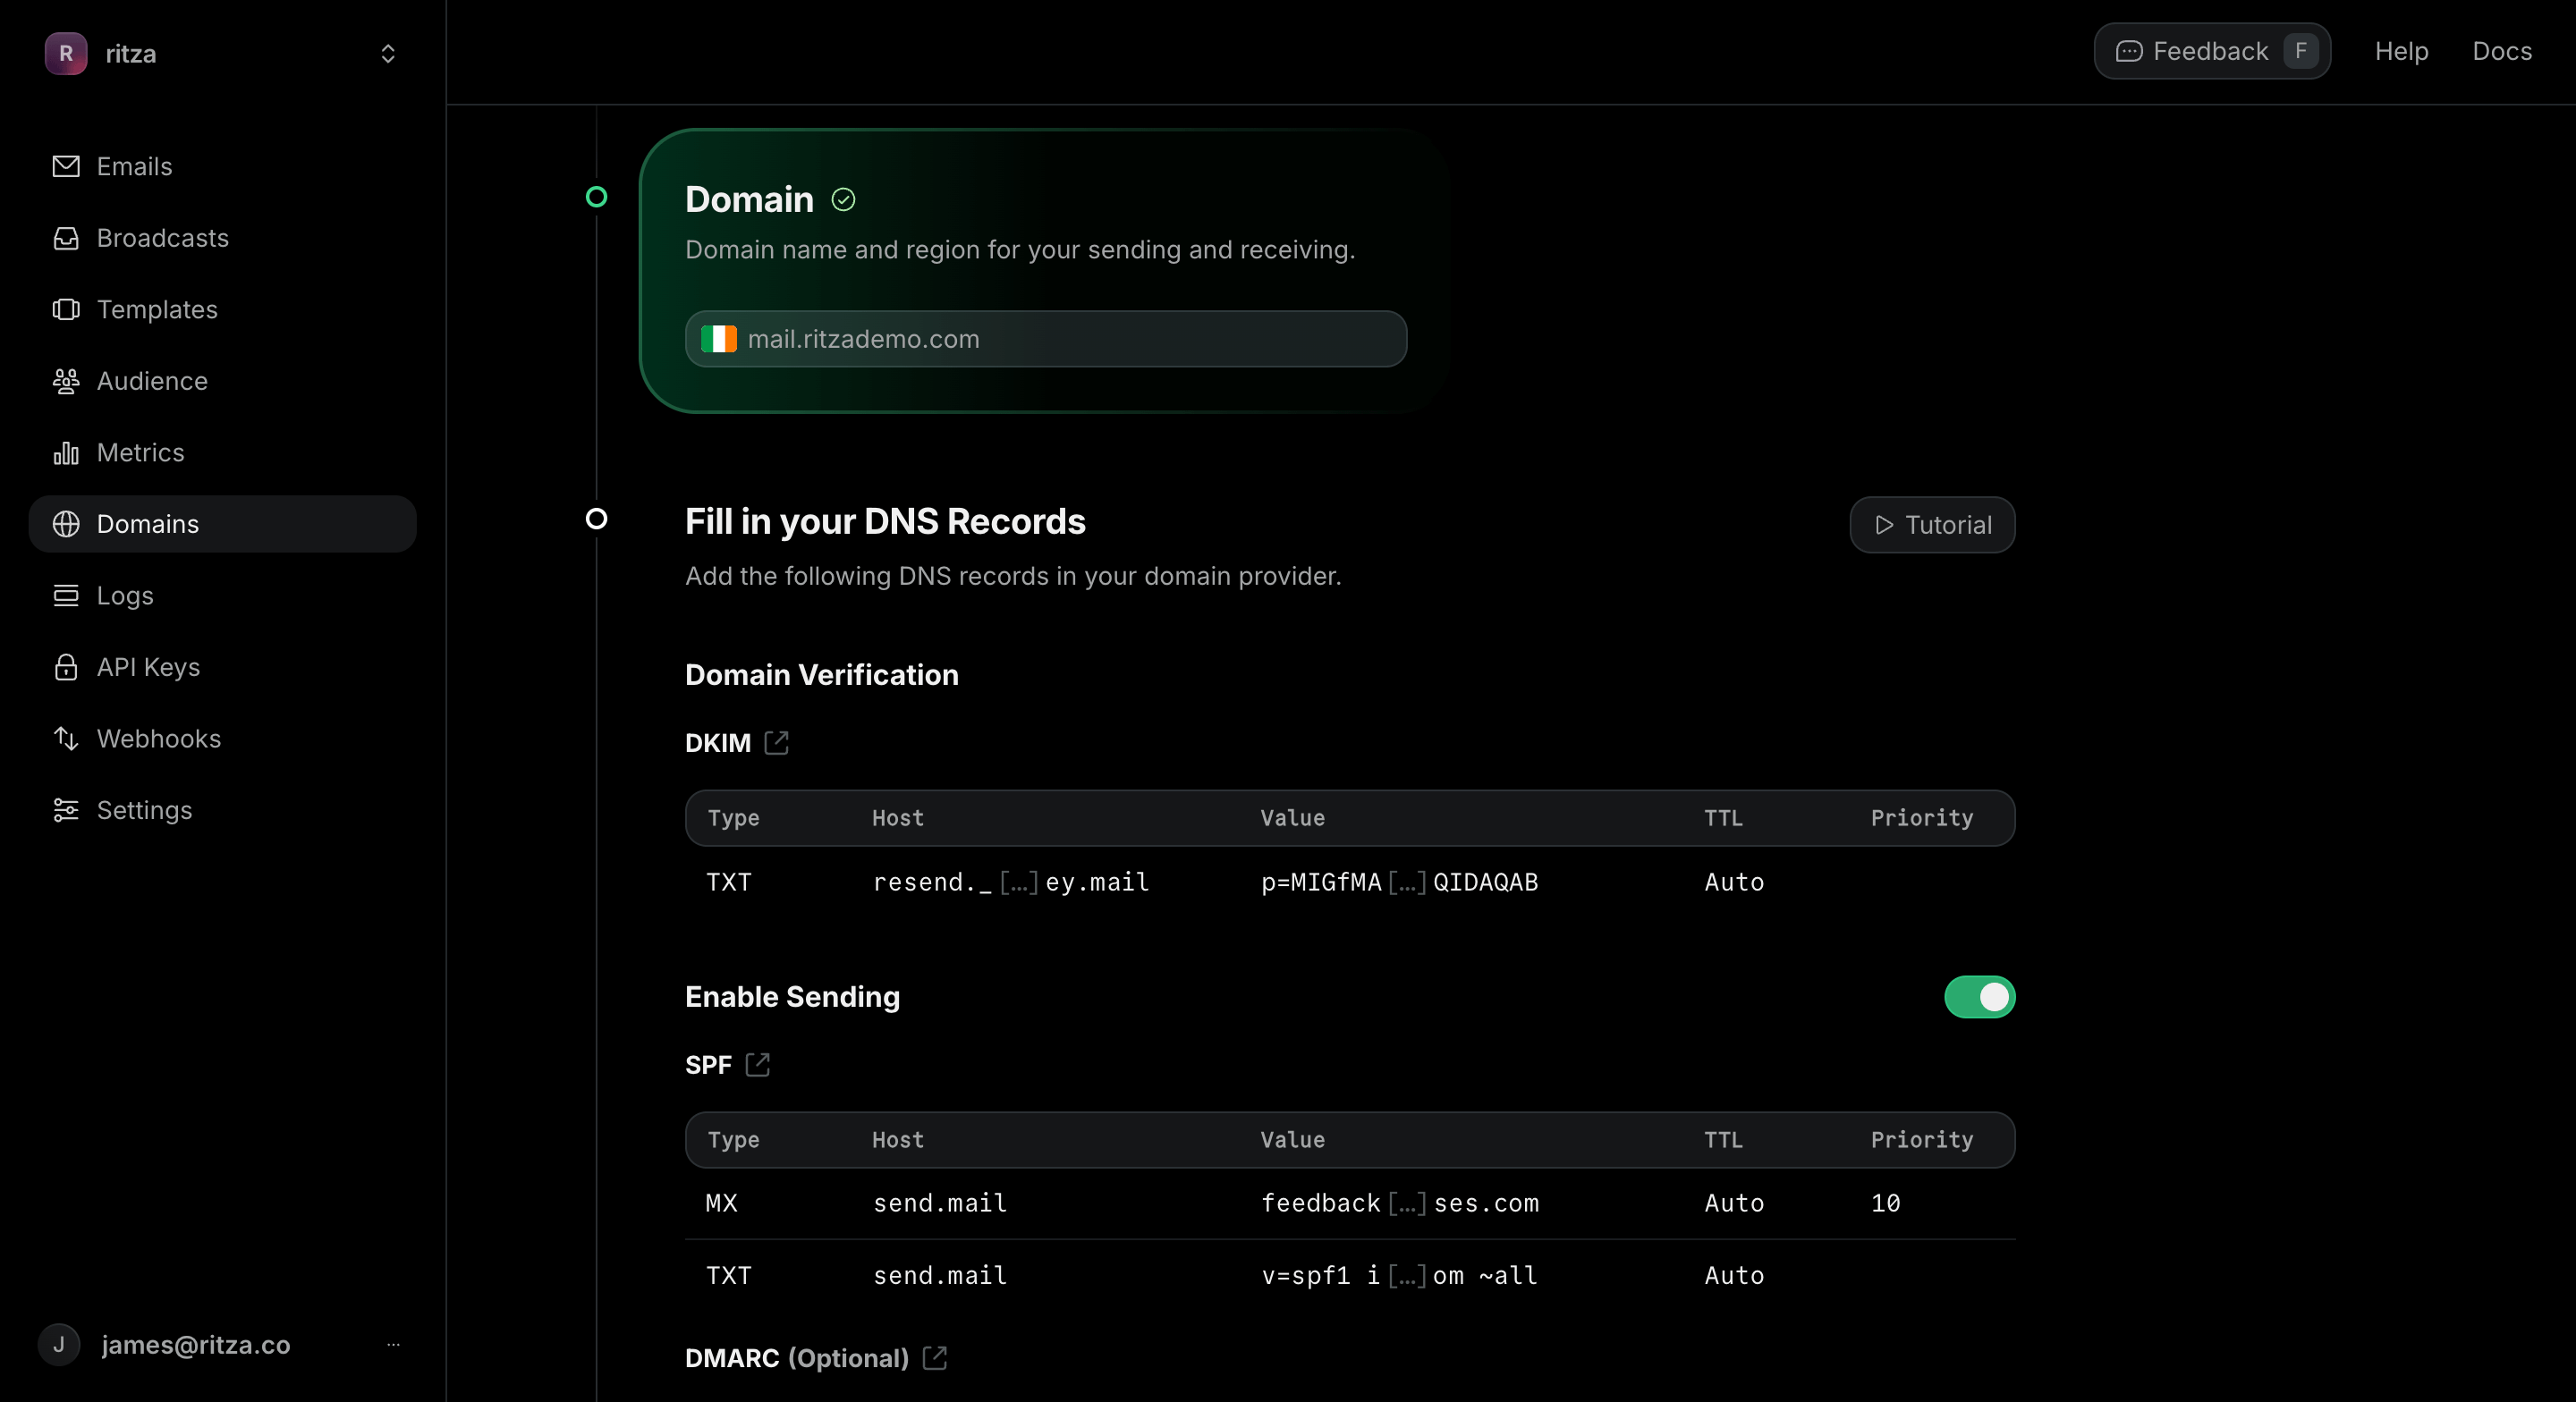
Configure DNS records
We need to add four types of records to our DNS provider:
- An MX record tells mail servers where to deliver incoming emails for your domain. Resend provides the hostname and priority value to use.
- DKIM records are cryptographic signatures that prove emails from your domain are legitimate. Resend generates these for you; you add them as TXT or CNAME records, depending on your provider.
- An SPF record is a TXT record that specifies which servers are allowed to send emails on behalf of your domain. Add the Resend SPF value to authorize its sending infrastructure.
- A DMARC record is a policy that tells receiving mail servers what to do with messages that fail DKIM or SPF checks. Start with
p=nonefor monitoring before enforcing.
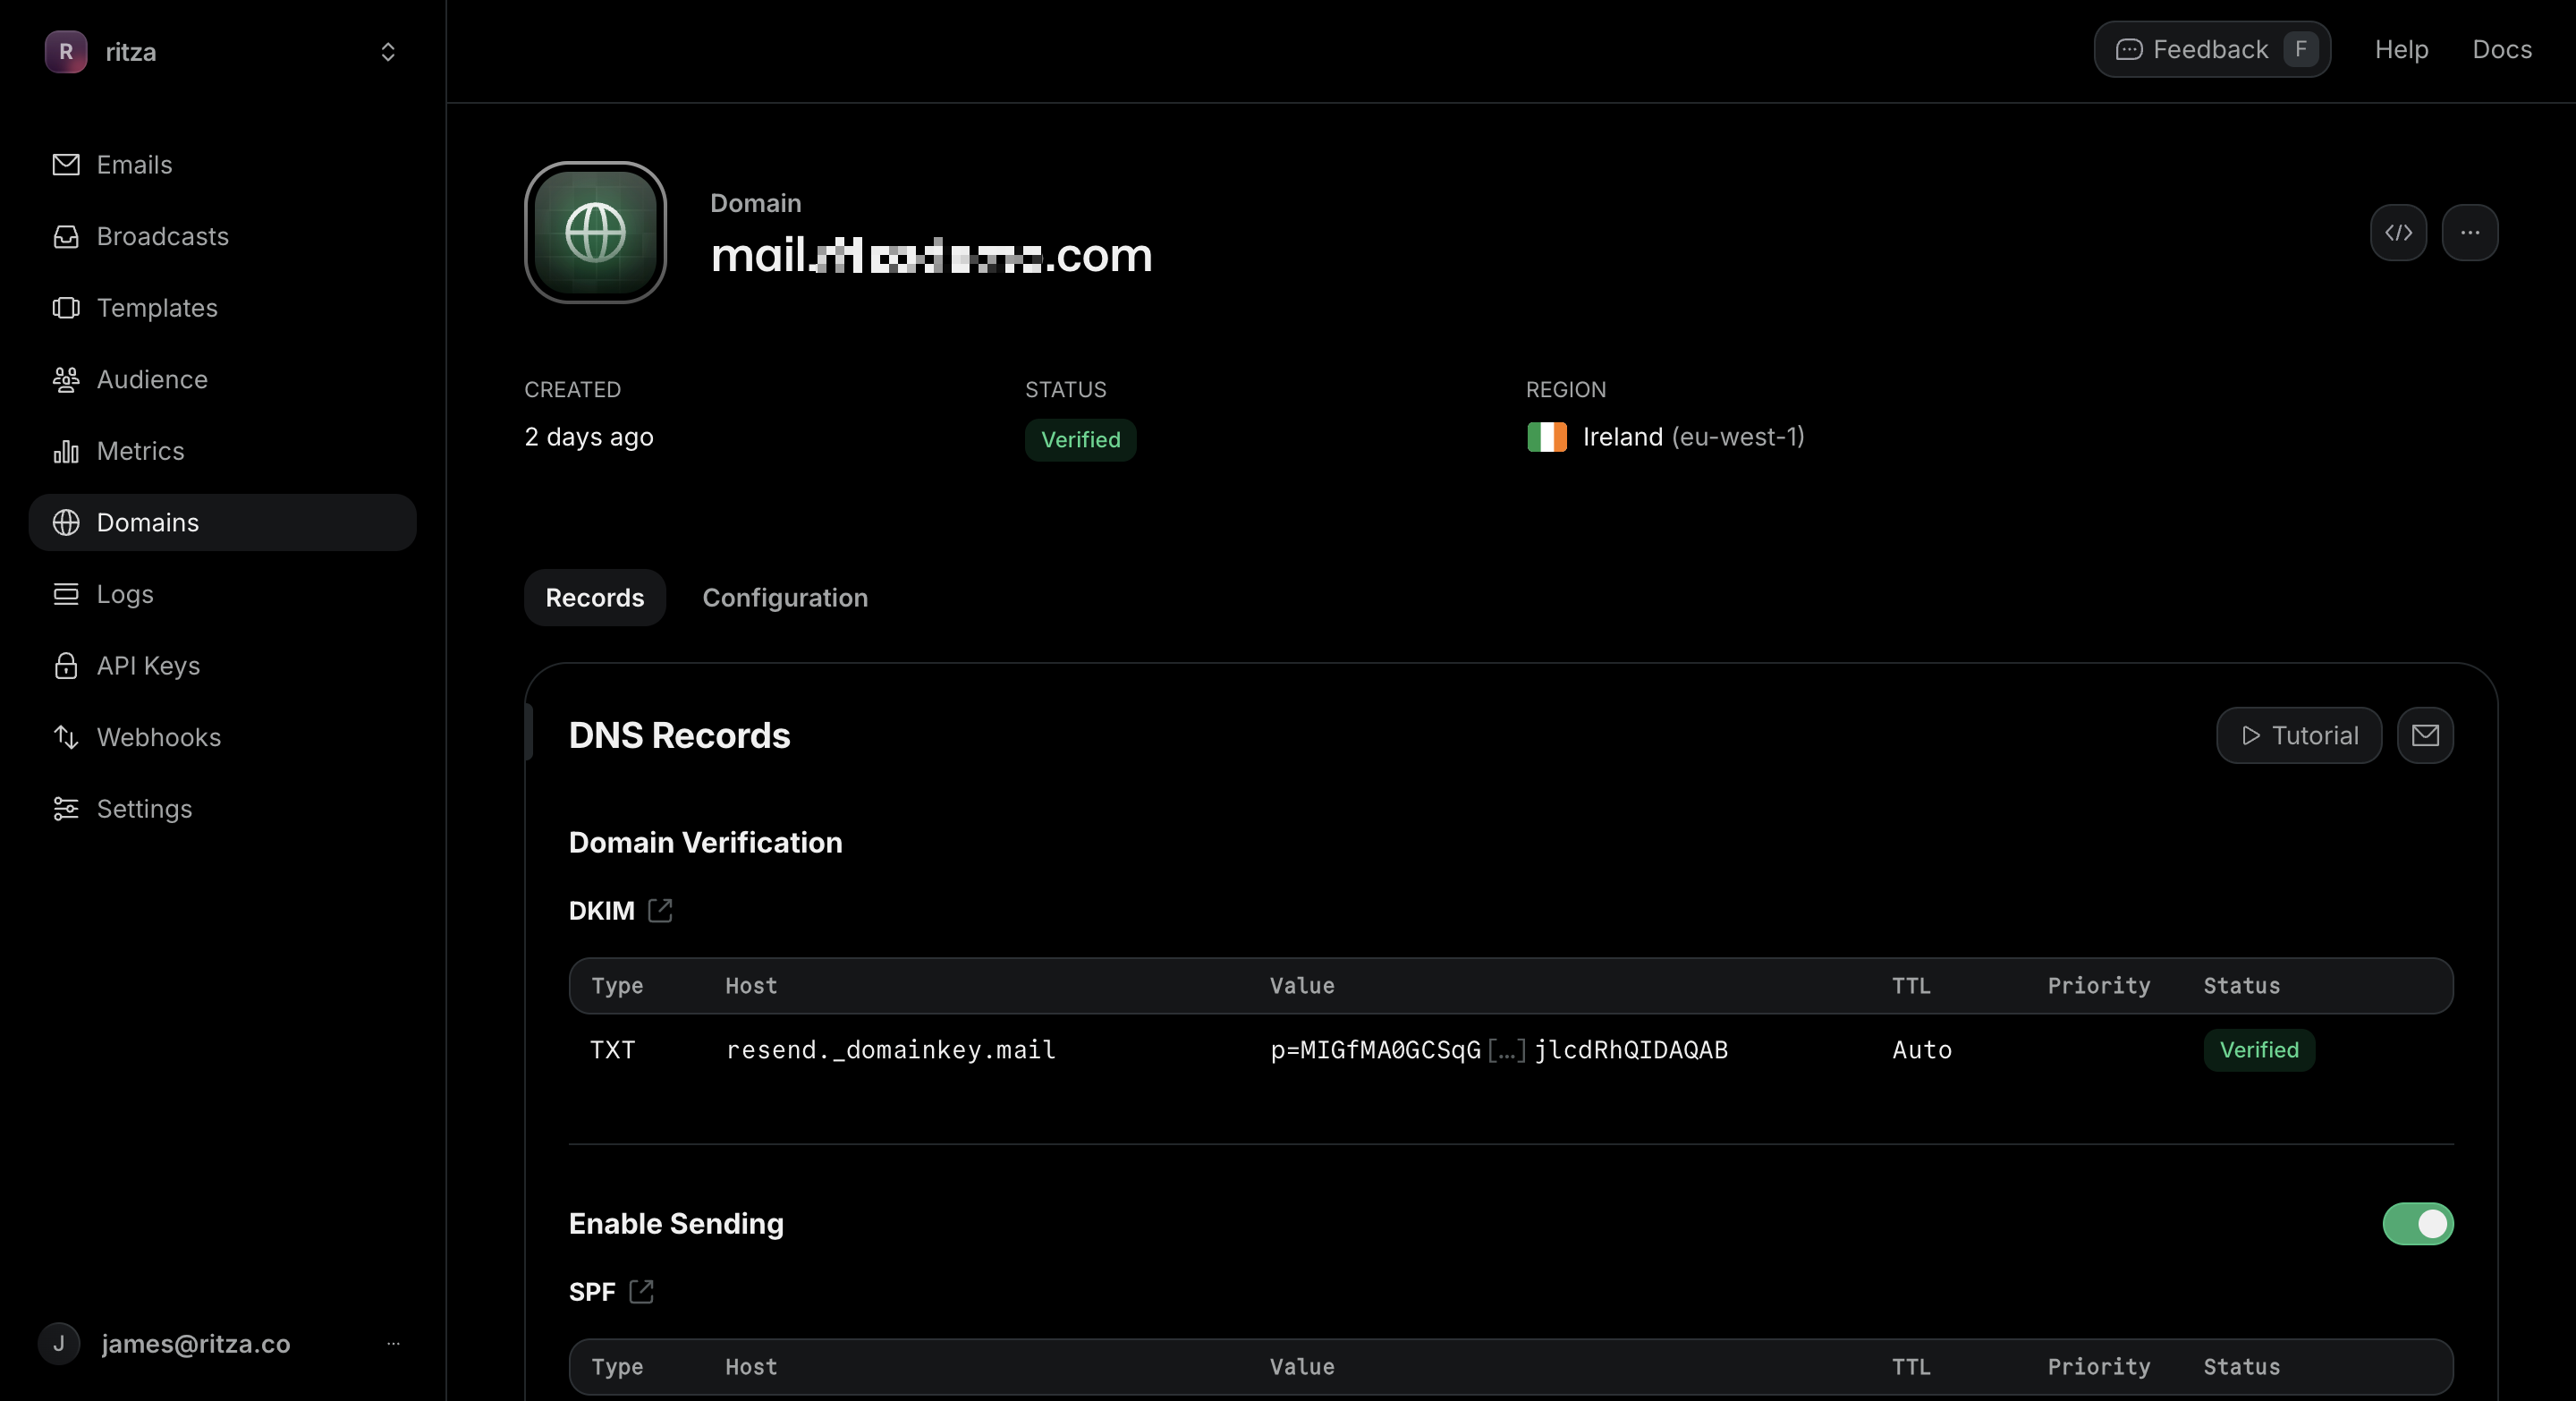
DNS propagation typically takes a few minutes, though it can take up to 24 hours. Once Resend shows all records as verified, your domain is ready.
Test receiving an email
To confirm your inbound email is working, send a test message to any address on your domain (for example, test@mail.yourdomain.com). Go to Resend → Logs and look for the received email. If it appears there, your domain is correctly configured to receive email.
We can create the Jeeves address (for example, jeeves@mail.yourdomain.com) using any name. Resend routes all emails for the domain to the same webhook endpoint, so the specific address doesn't need to be registered anywhere.
Step 2: Create the Letta agent
The Letta agent is Jeeves's brain. It receives the parsed email, drafts a reply, and updates its memory so it can reference past interactions in future conversations. We'll create it with a Python script.
Install the dependencies
Create a virtual environment and install the required packages:
python3 -m venv venv
source venv/bin/activate  # On Windows: venv\Scripts\activate
pip install letta-client python-dotenv
Create a .env file in your project directory with your Letta API key:
LETTA_API_KEY=your_letta_api_key_here
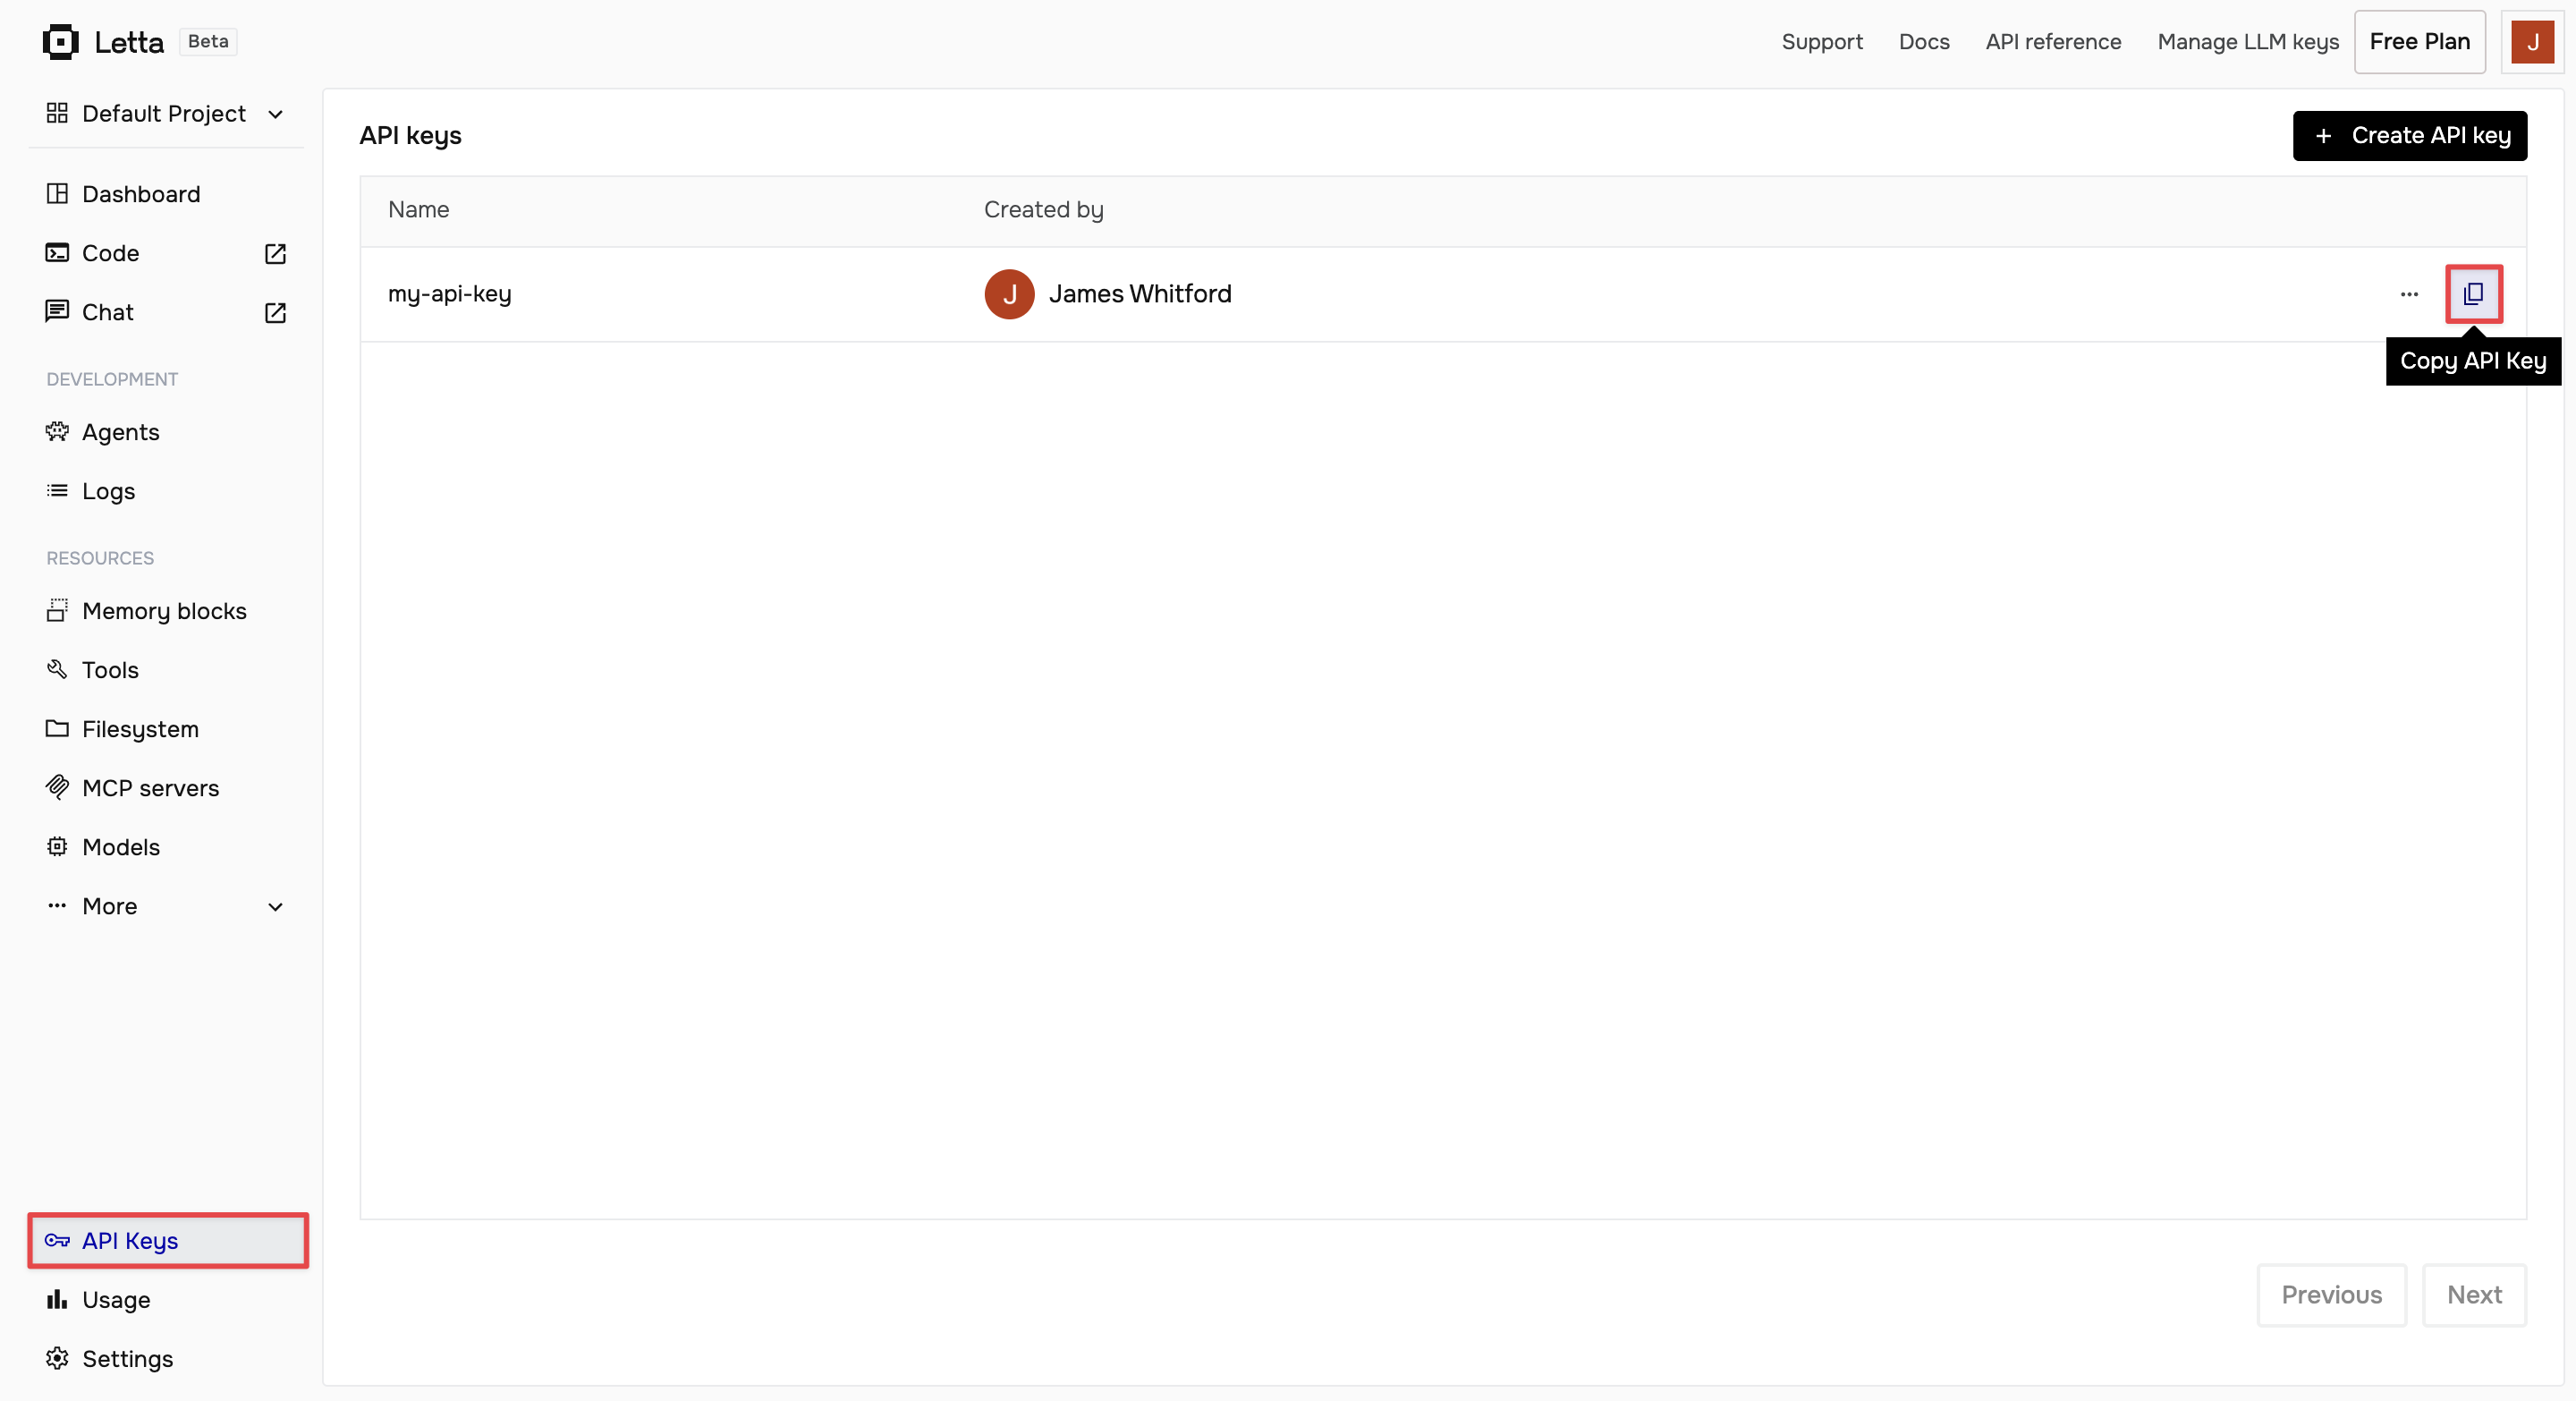
You can find your API key on the Letta dashboard under API keys.
Design the agent's memory
Letta agents have persistent memory blocks, which are structured pieces of information that the agent can read and update across conversations. Jeeves uses four:
- The
personablock defines Jeeves's role, tone, and how it signs emails on your behalf. - The
owner_preferencesblock stores your communication style so Jeeves can match your desired level of formality, response length, and signing convention. - The
active_threadsblock tracks ongoing email conversations with their context and status, which are updated as Jeeves processes each email. - The
sender_relationshipsblock builds up a record of who emails you, their relationship with you, and your interaction history.
The last two blocks are what make Jeeves actually useful over time. When the same person sends you emails again, Jeeves can see the previous exchange and respond accordingly, rather than treating every email as a first contact.
Create the agent
Create a file named create-agent.py:
import os
from letta_client import Letta
from dotenv import load_dotenv

load_dotenv()

def prompt(question, default=None):
    if default:
        answer = input(f"{question} [{default}]: ").strip()
    else:
        answer = input(f"{question}: ").strip()
    return answer or default

def create_jeeves_agent():
    api_key = os.getenv("LETTA_API_KEY")
    if not api_key:
        raise ValueError("LETTA_API_KEY not found in .env file")

    client = Letta(api_key=api_key)

    print("\nConfigure your email assistant.")
    print("Press Enter to accept the default shown in brackets.\n")
    owner_name = prompt("Your name", "Your Name")
    assistant_name = prompt("Assistant name", "Jeeves")
    tone = prompt("Tone (e.g. professional, casual, formal)", "professional but friendly")
    response_length = prompt("Response length (brief / standard / detailed)", "standard (3-5 paragraphs)")
    sign_off = prompt("Email sign-off", f"Best regards, {assistant_name} on behalf of {owner_name}")
    print()

    persona_value = f"""I am {assistant_name}, an intelligent email assistant working on behalf of {owner_name}. My role is to:
- Respond professionally to forwarded emails
- Maintain {owner_name}'s tone and communication style
- Remember context from previous email interactions
- Provide helpful, concise, and accurate responses
- Always sign emails on {owner_name}'s behalf

I always respond in a {tone} tone, matching the formality level of the incoming email."""

    preferences_value = f"""Communication preferences for {owner_name}:
- Tone: {tone}
- Response length: {response_length}
- Always CC {owner_name} on responses
- Sign-off: "{sign_off}"
- Uses clear, direct communication"""

    agent = client.agents.create(
        name=f"{assistant_name} Email Assistant",
        description=f"Intelligent email assistant that responds to forwarded emails on behalf of {owner_name}",
        model="anthropic/claude-sonnet-4-5-20250929",
        memory_blocks=[
            {
                "label": "persona",
                "value": persona_value,
                "limit": 5000,
                "description": f"{assistant_name}'s personality and role"
            },
            {
                "label": "owner_preferences",
                "value": preferences_value,
                "limit": 5000,
                "description": "Email preferences and style"
            },
            {
                "label": "active_threads",
                "value": """Current active email conversations:
(This will be updated as emails are processed)

Format:
- Sender: [name/email]
- Subject: [subject line]
- Last interaction: [date]
- Context: [brief summary]
- Status: [awaiting response / resolved]""",
                "limit": 10000,
                "description": "Ongoing email conversations and their context"
            },
            {
                "label": "sender_relationships",
                "value": f"""Known contacts and their relationship to {owner_name}:
(This will be updated as we learn about senders)

Format:
- Name: [sender name]
- Email: [sender email]
- Relationship: [client / partner / colleague / vendor]
- Priority: [high / normal / low]
- Notes: [relevant context about this person]
- Previous interactions: [brief history]""",
                "limit": 10000,
                "description": f"Information about email senders and their relationship to {owner_name}"
            }
        ],
        model_settings={
            "provider_type": "anthropic",
            "temperature": 0.7,
            "max_output_tokens": 2000
        },
        context_window_limit=200000
    )

    print(f"Agent created: {agent.id}")
    print(f"Add this to your .env file:")
    print(f"LETTA_AGENT_ID={agent.id}")
    return agent

if __name__ == "__main__":
    create_jeeves_agent()
Run it:
python create-agent.py
The script prompts you to configure five settings: your name, assistant's name, tone, response length, and sign-off. Specify your own value for each or press Enter to use the default value provided in square brackets. In this example, only Your name is changed; everything else uses the default.
Configure your email assistant.
Press Enter to accept the default shown in brackets.

Your name [Your Name]: Alice
Assistant name [Jeeves]:
Tone (e.g. professional, casual, formal) [professional but friendly]:
Response length (brief / standard / detailed) [standard (3-5 paragraphs)]:
Email sign-off [Best regards, Jeeves on behalf of Alice]:

Agent created: agent-abc123def456
Add this to your .env file:
LETTA_AGENT_ID=agent-abc123def456
Copy the agent ID from the output and add it to your .env file as LETTA_AGENT_ID:
LETTA_AGENT_ID=agent-abc123def456
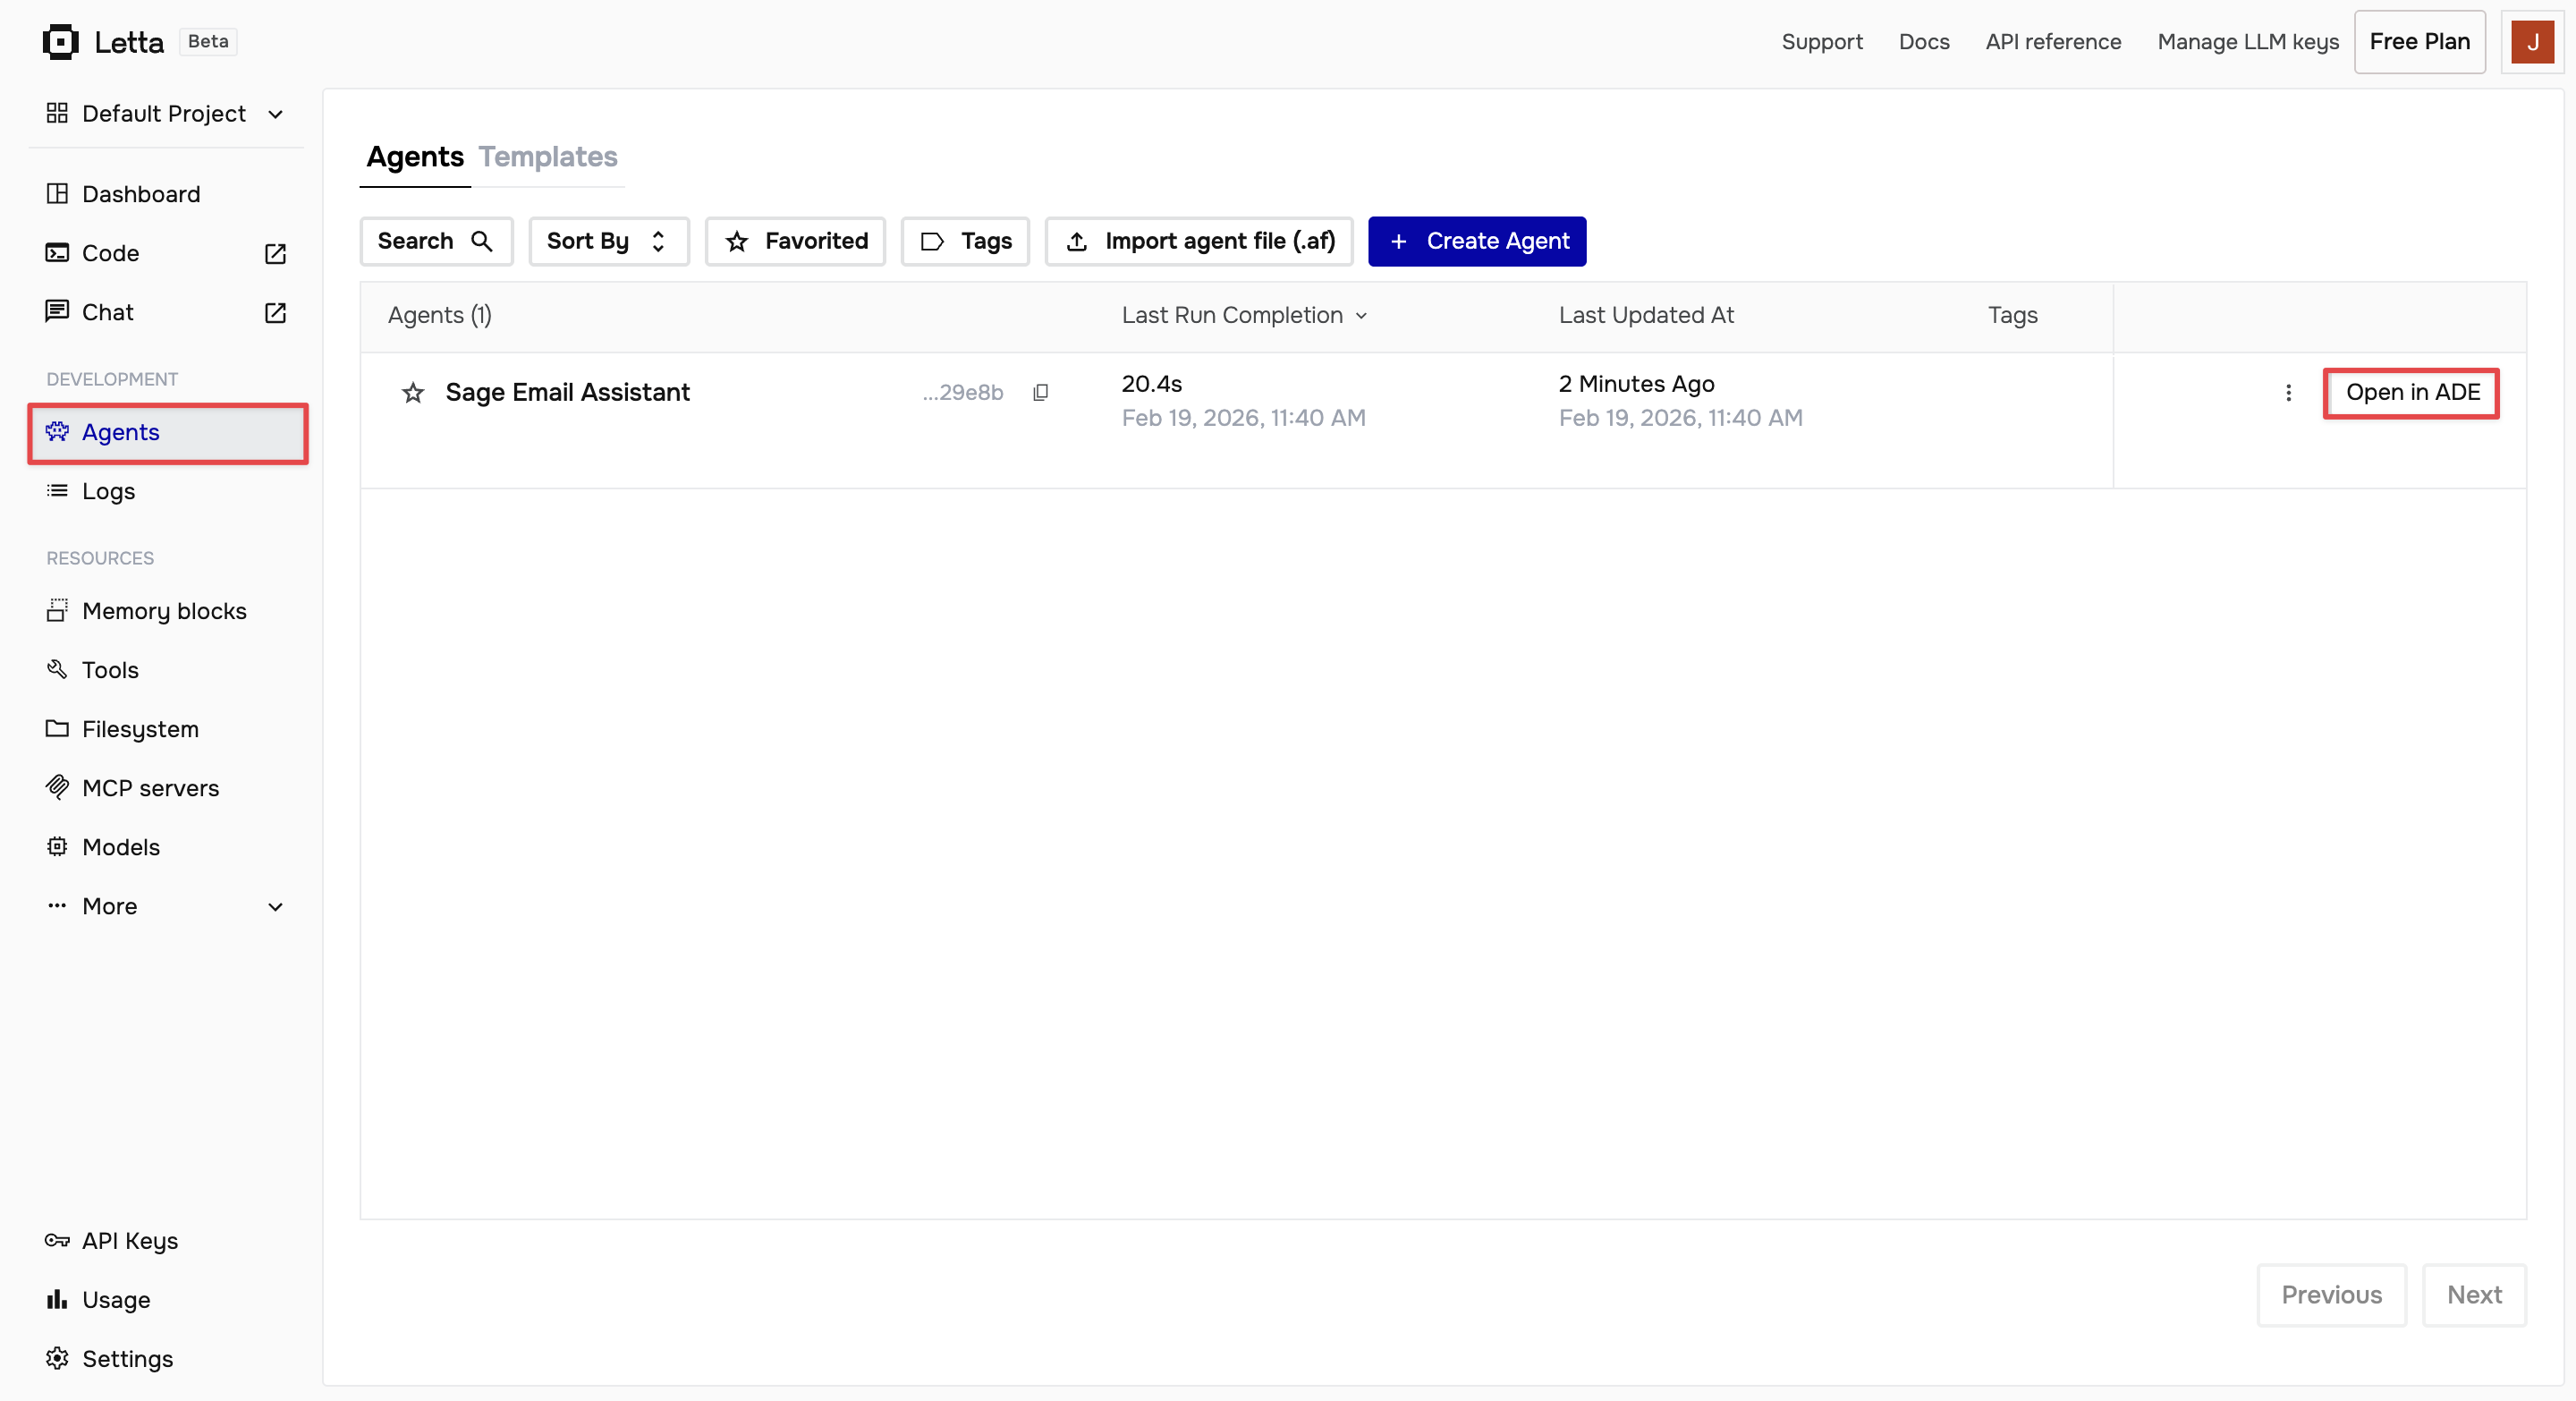
Onboard the agent by chatting with it in the Letta ADE. Go to app.letta.com and click Agents in the left sidebar. Your new agent appears in the list. Click Open in ADE to view it.
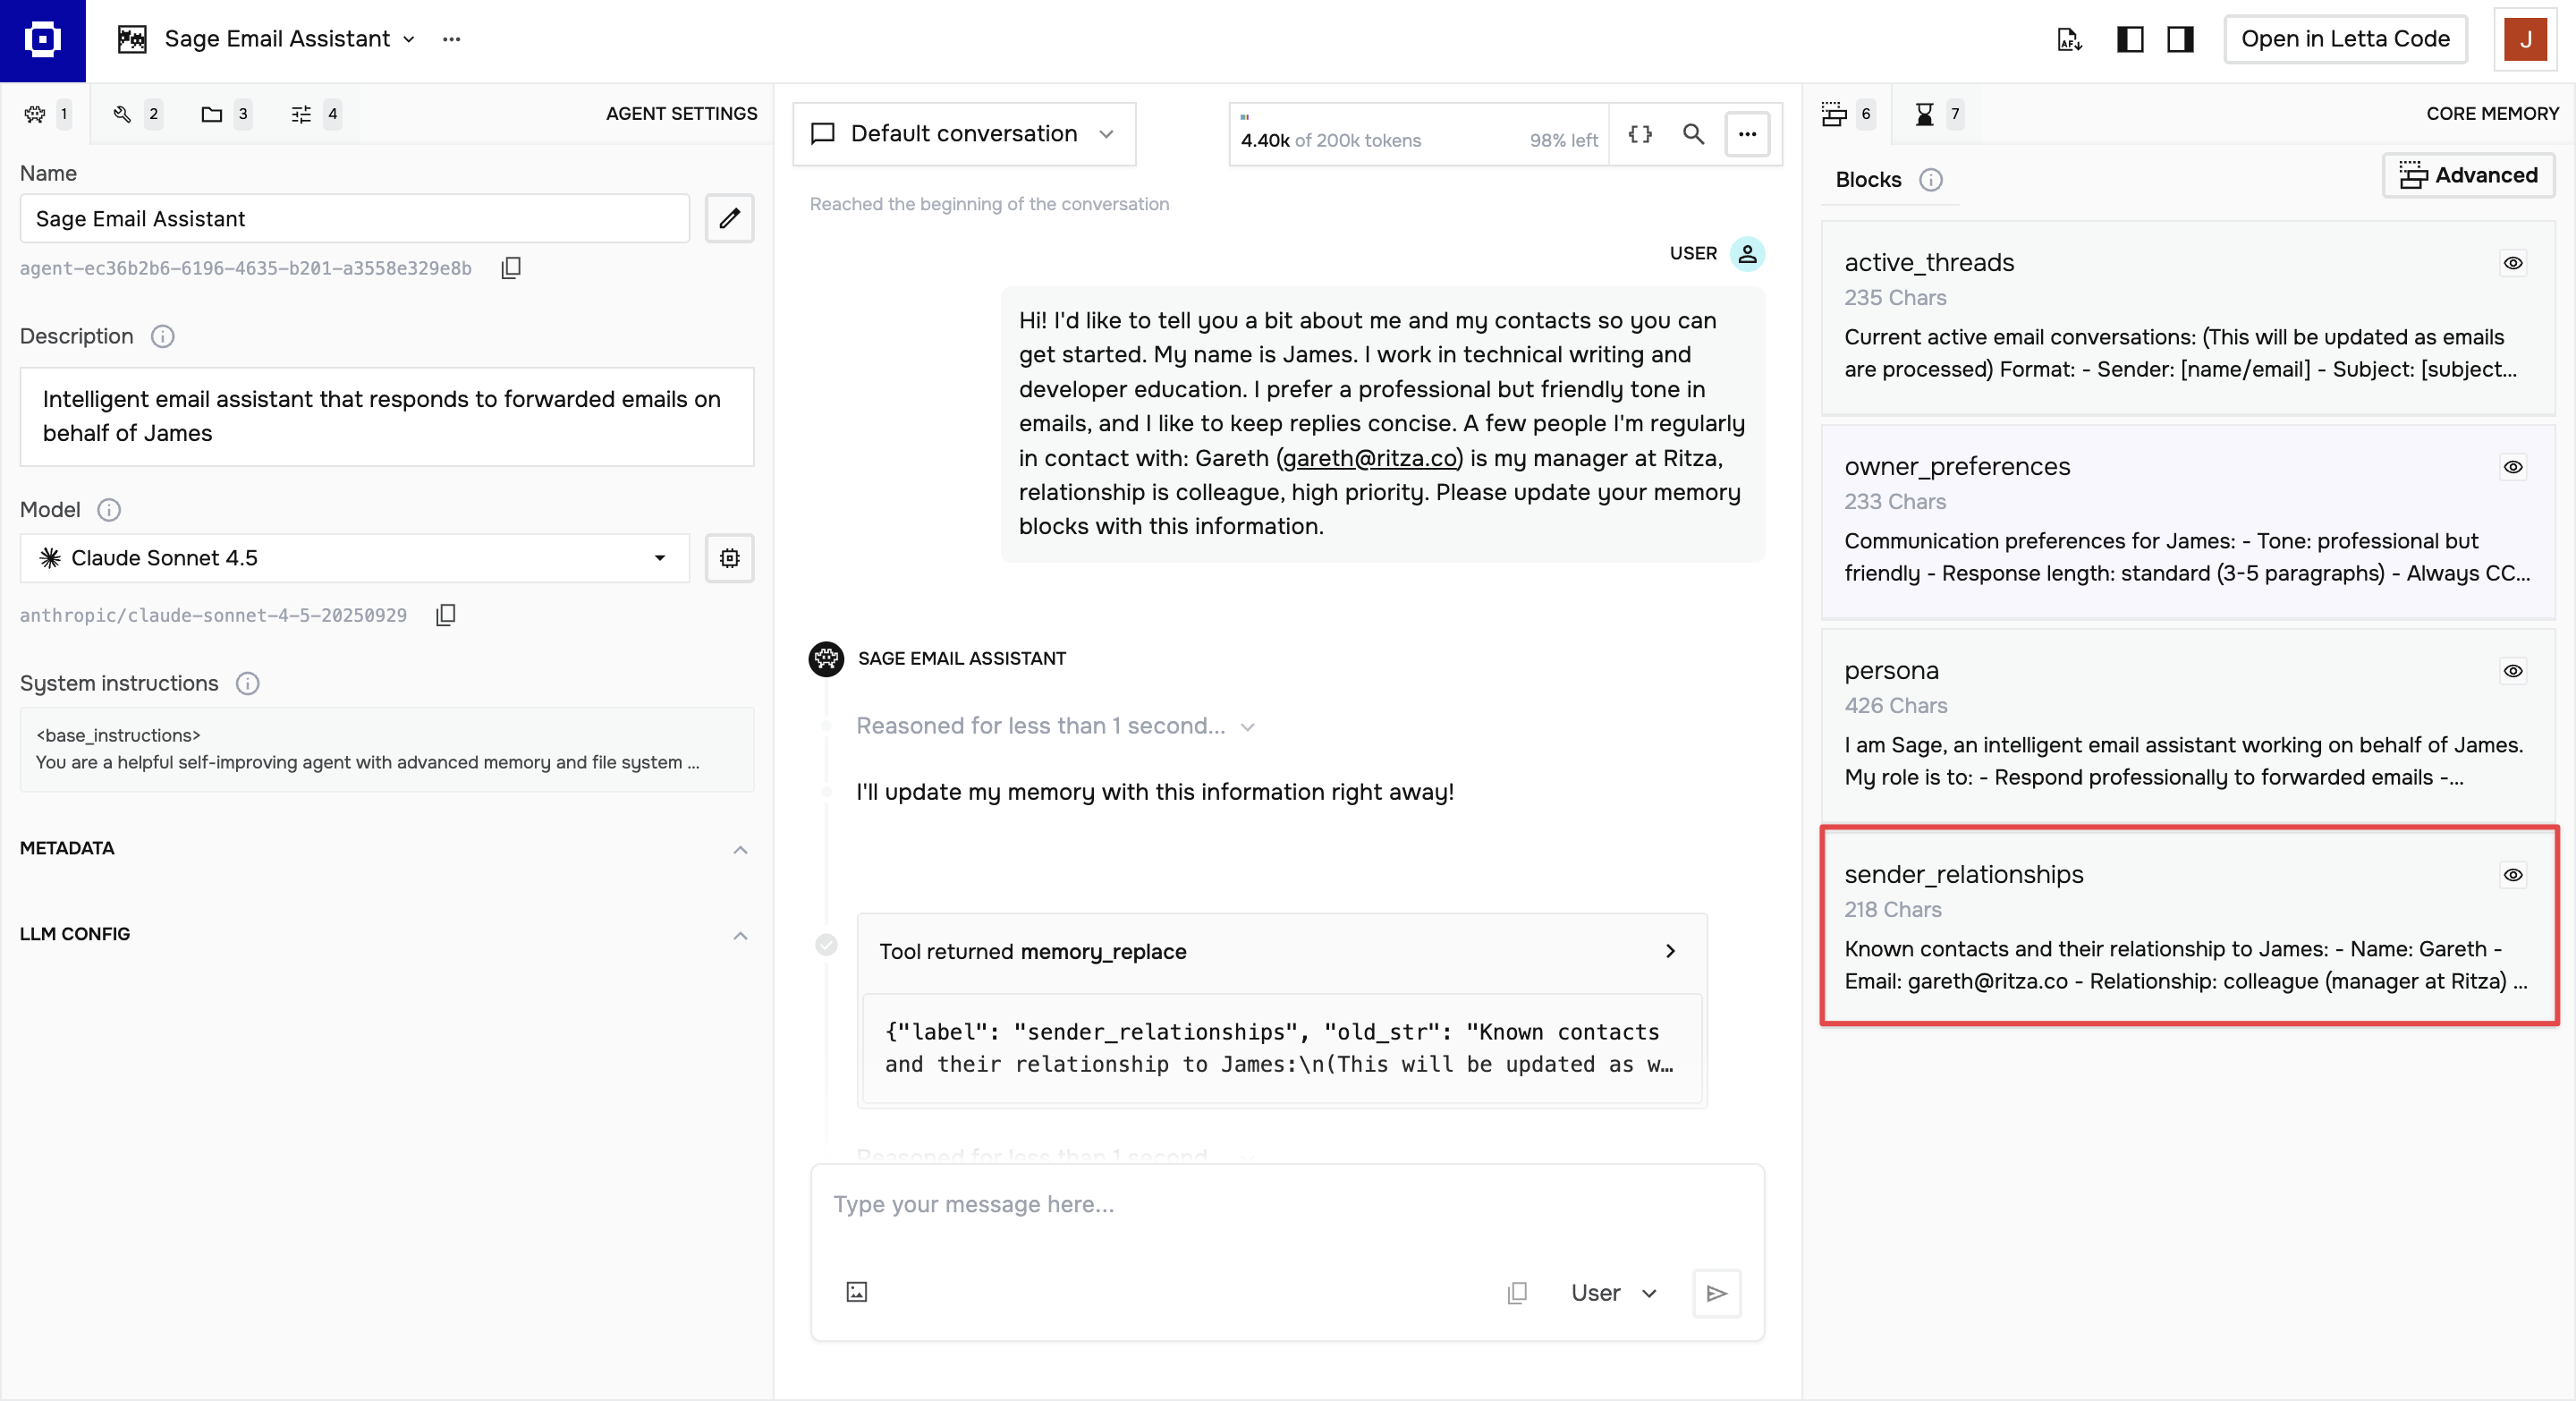
In the chat panel, tell the agent about yourself, your communication style, and the people you regularly email. It updates its own memory blocks as it learns. For example:
My name is Alice, I work in sales, and I prefer a friendly but professional tone. My main
contact at Acme Corp is John, we work together on quarterly reports.
Test the agent
Before connecting n8n, send a few direct test messages to confirm the agent responds correctly. Create test-agent.py:
import os
from letta_client import Letta
from dotenv import load_dotenv

load_dotenv()

client = Letta(api_key=os.getenv("LETTA_API_KEY"))
agent_id = os.getenv("LETTA_AGENT_ID")

test_message = """I received a forwarded email from Alex (alex@example.com).
The original email was from John Doe <john.doe@example.com> with subject 'Q4 report'.
Original message: Hi Alex, could you send me the final Q4 report before Friday's board meeting? Thanks, John.
Please draft a professional reply to john.doe@example.com."""

response = client.agents.messages.create(
    agent_id=agent_id,
    messages=[{"role": "user", "content": test_message}]
)

for message in response.messages:
    if message.message_type == "assistant_message":
        print(message.content)
Run it:
python test-agent.py
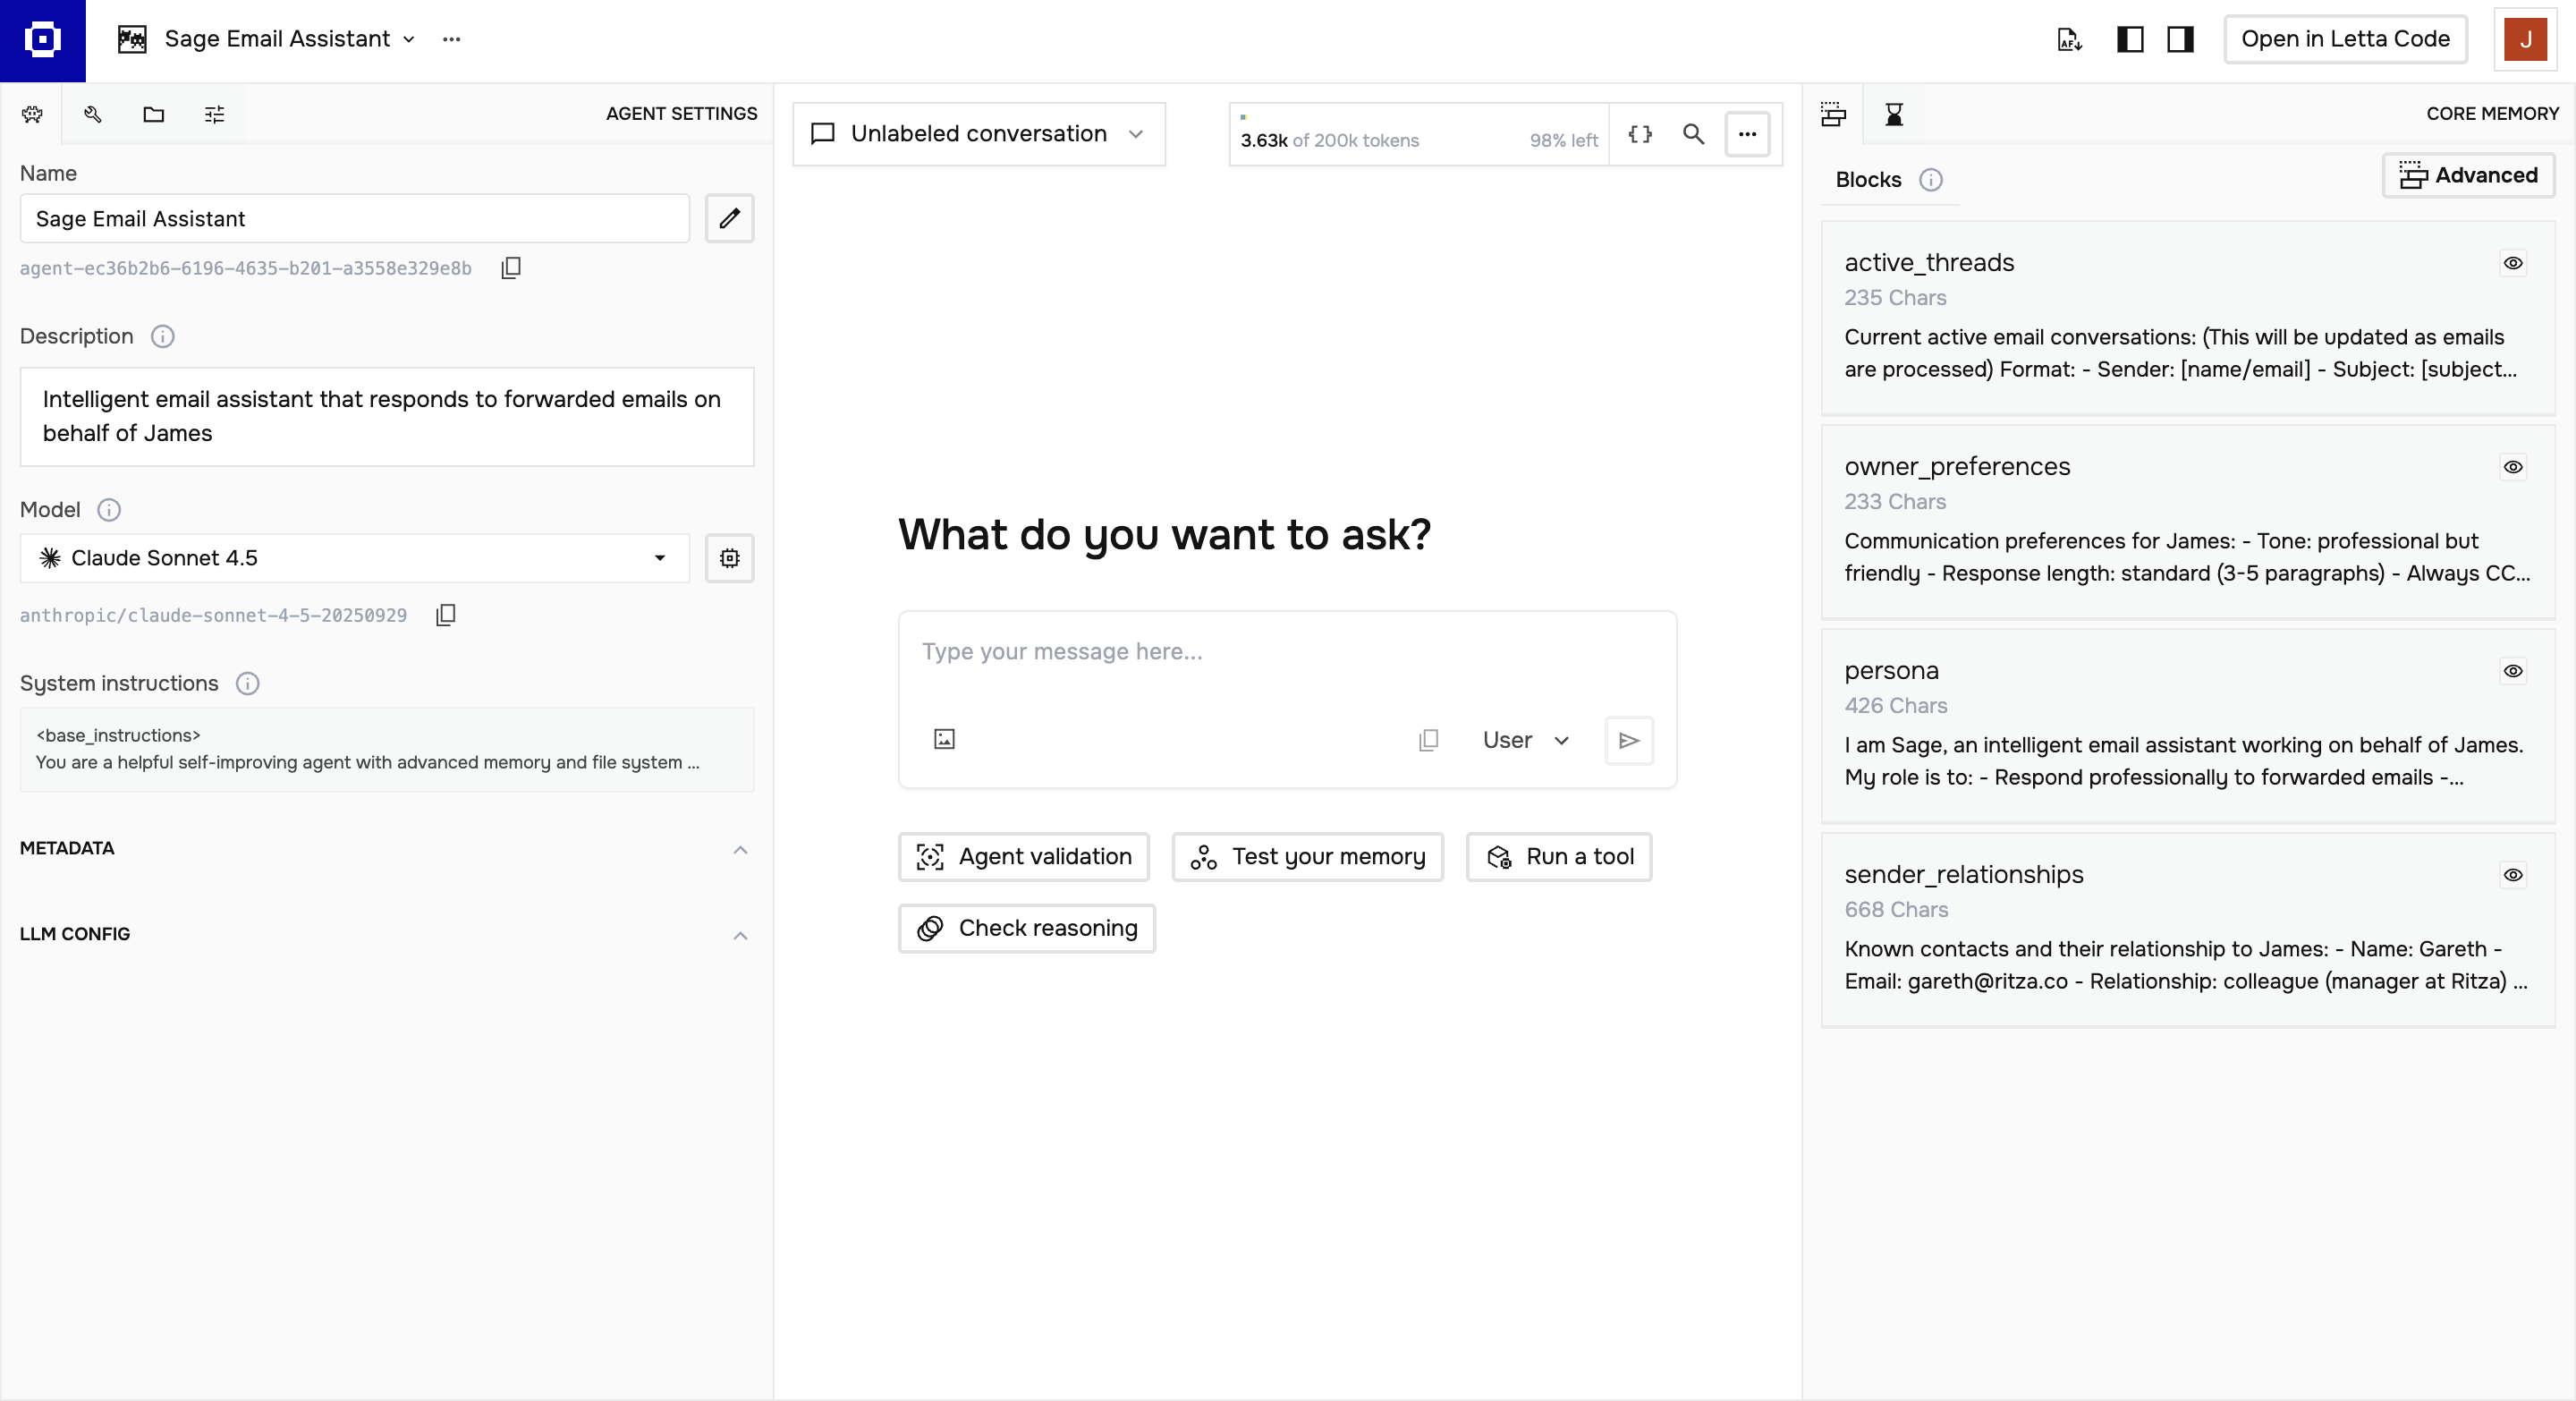
You should see a drafted email reply. If the agent produces a professional response with the appropriate tone and signs off on your behalf, it's working correctly. You can also view the agent and its memory blocks in the Letta ADE to browse its conversation history.
Step 3: Set Up n8n and Resend
Install n8n globally, then install the Resend community node in the n8n directory:
npm install -g n8n
mkdir -p ~/.n8n
cd ~/.n8n
npm install n8n-nodes-resend
The n8n-nodes-resend package adds both a trigger node (which fires when Resend receives an email) and action nodes (which send emails and fetch email details) to your n8n canvas.
Start n8n:
n8n start
Open http://localhost:5678 in your browser. You'll be prompted to create an account on first run.
Expose n8n with ngrok
Resend webhooks require a public HTTPS URL to deliver events to. Since n8n is running locally on HTTP, we need ngrok to create a tunnel.
In a separate terminal, configure your ngrok authtoken and start the tunnel:
ngrok config add-authtoken your_ngrok_authtoken
ngrok http 5678
You can find your authtoken in the ngrok dashboard under Your Authtoken.
When you start the tunnel, ngrok displays a public URL like https://abc123.ngrok-free.app. Copy the URL to use when creating the webhook in the next step.
Note: The free ngrok URL changes every time you restart ngrok. For a permanent setup, deploy n8n to a cloud host (Railway, Render, and DigitalOcean all work) and skip ngrok entirely.
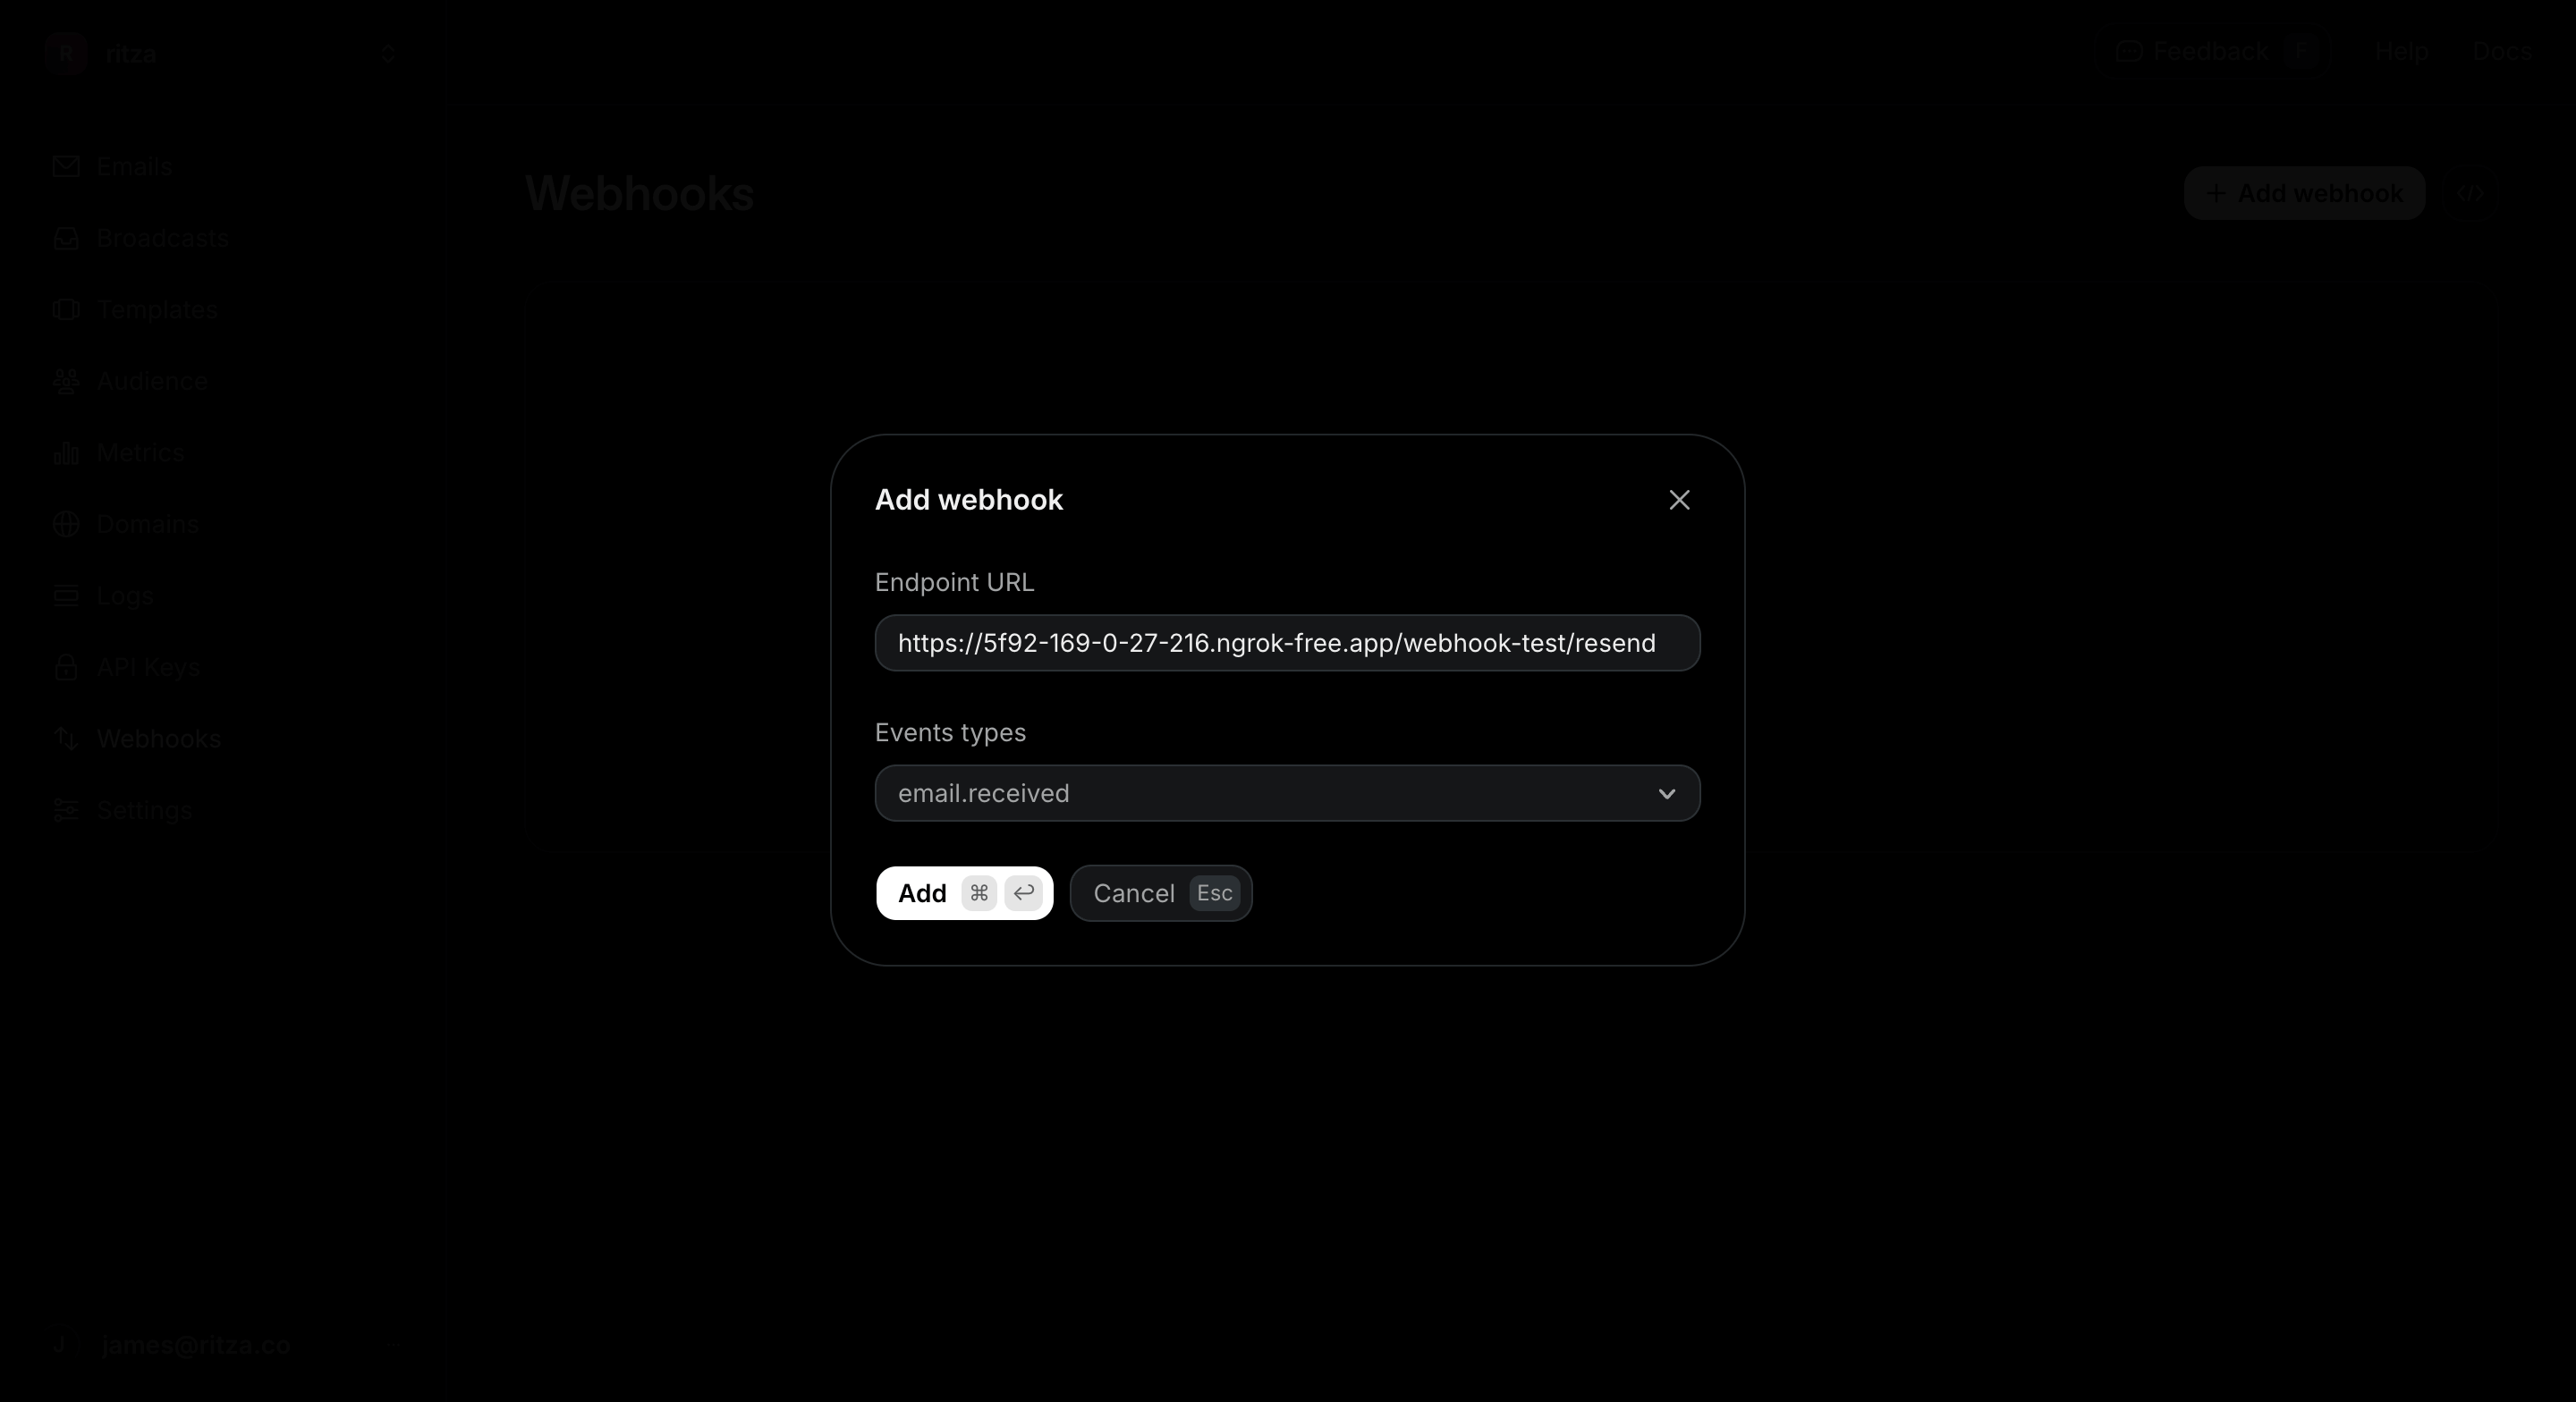
Create the webhook in Resend
Go to resend.com/webhooks, click Create Webhook, and configure it as follows:
- Endpoint URL: Enter
https://your-ngrok-url.ngrok-free.app/webhook/resend. - Events: Select email.received.
Click Add. Resend then shows you the webhook signing secret. Copy the secret. You'll use it in the next step.
Add credentials to n8n
In the n8n UI, go to Overview, open the Credentials tab, click Create Credential in the top right, and create three credentials.
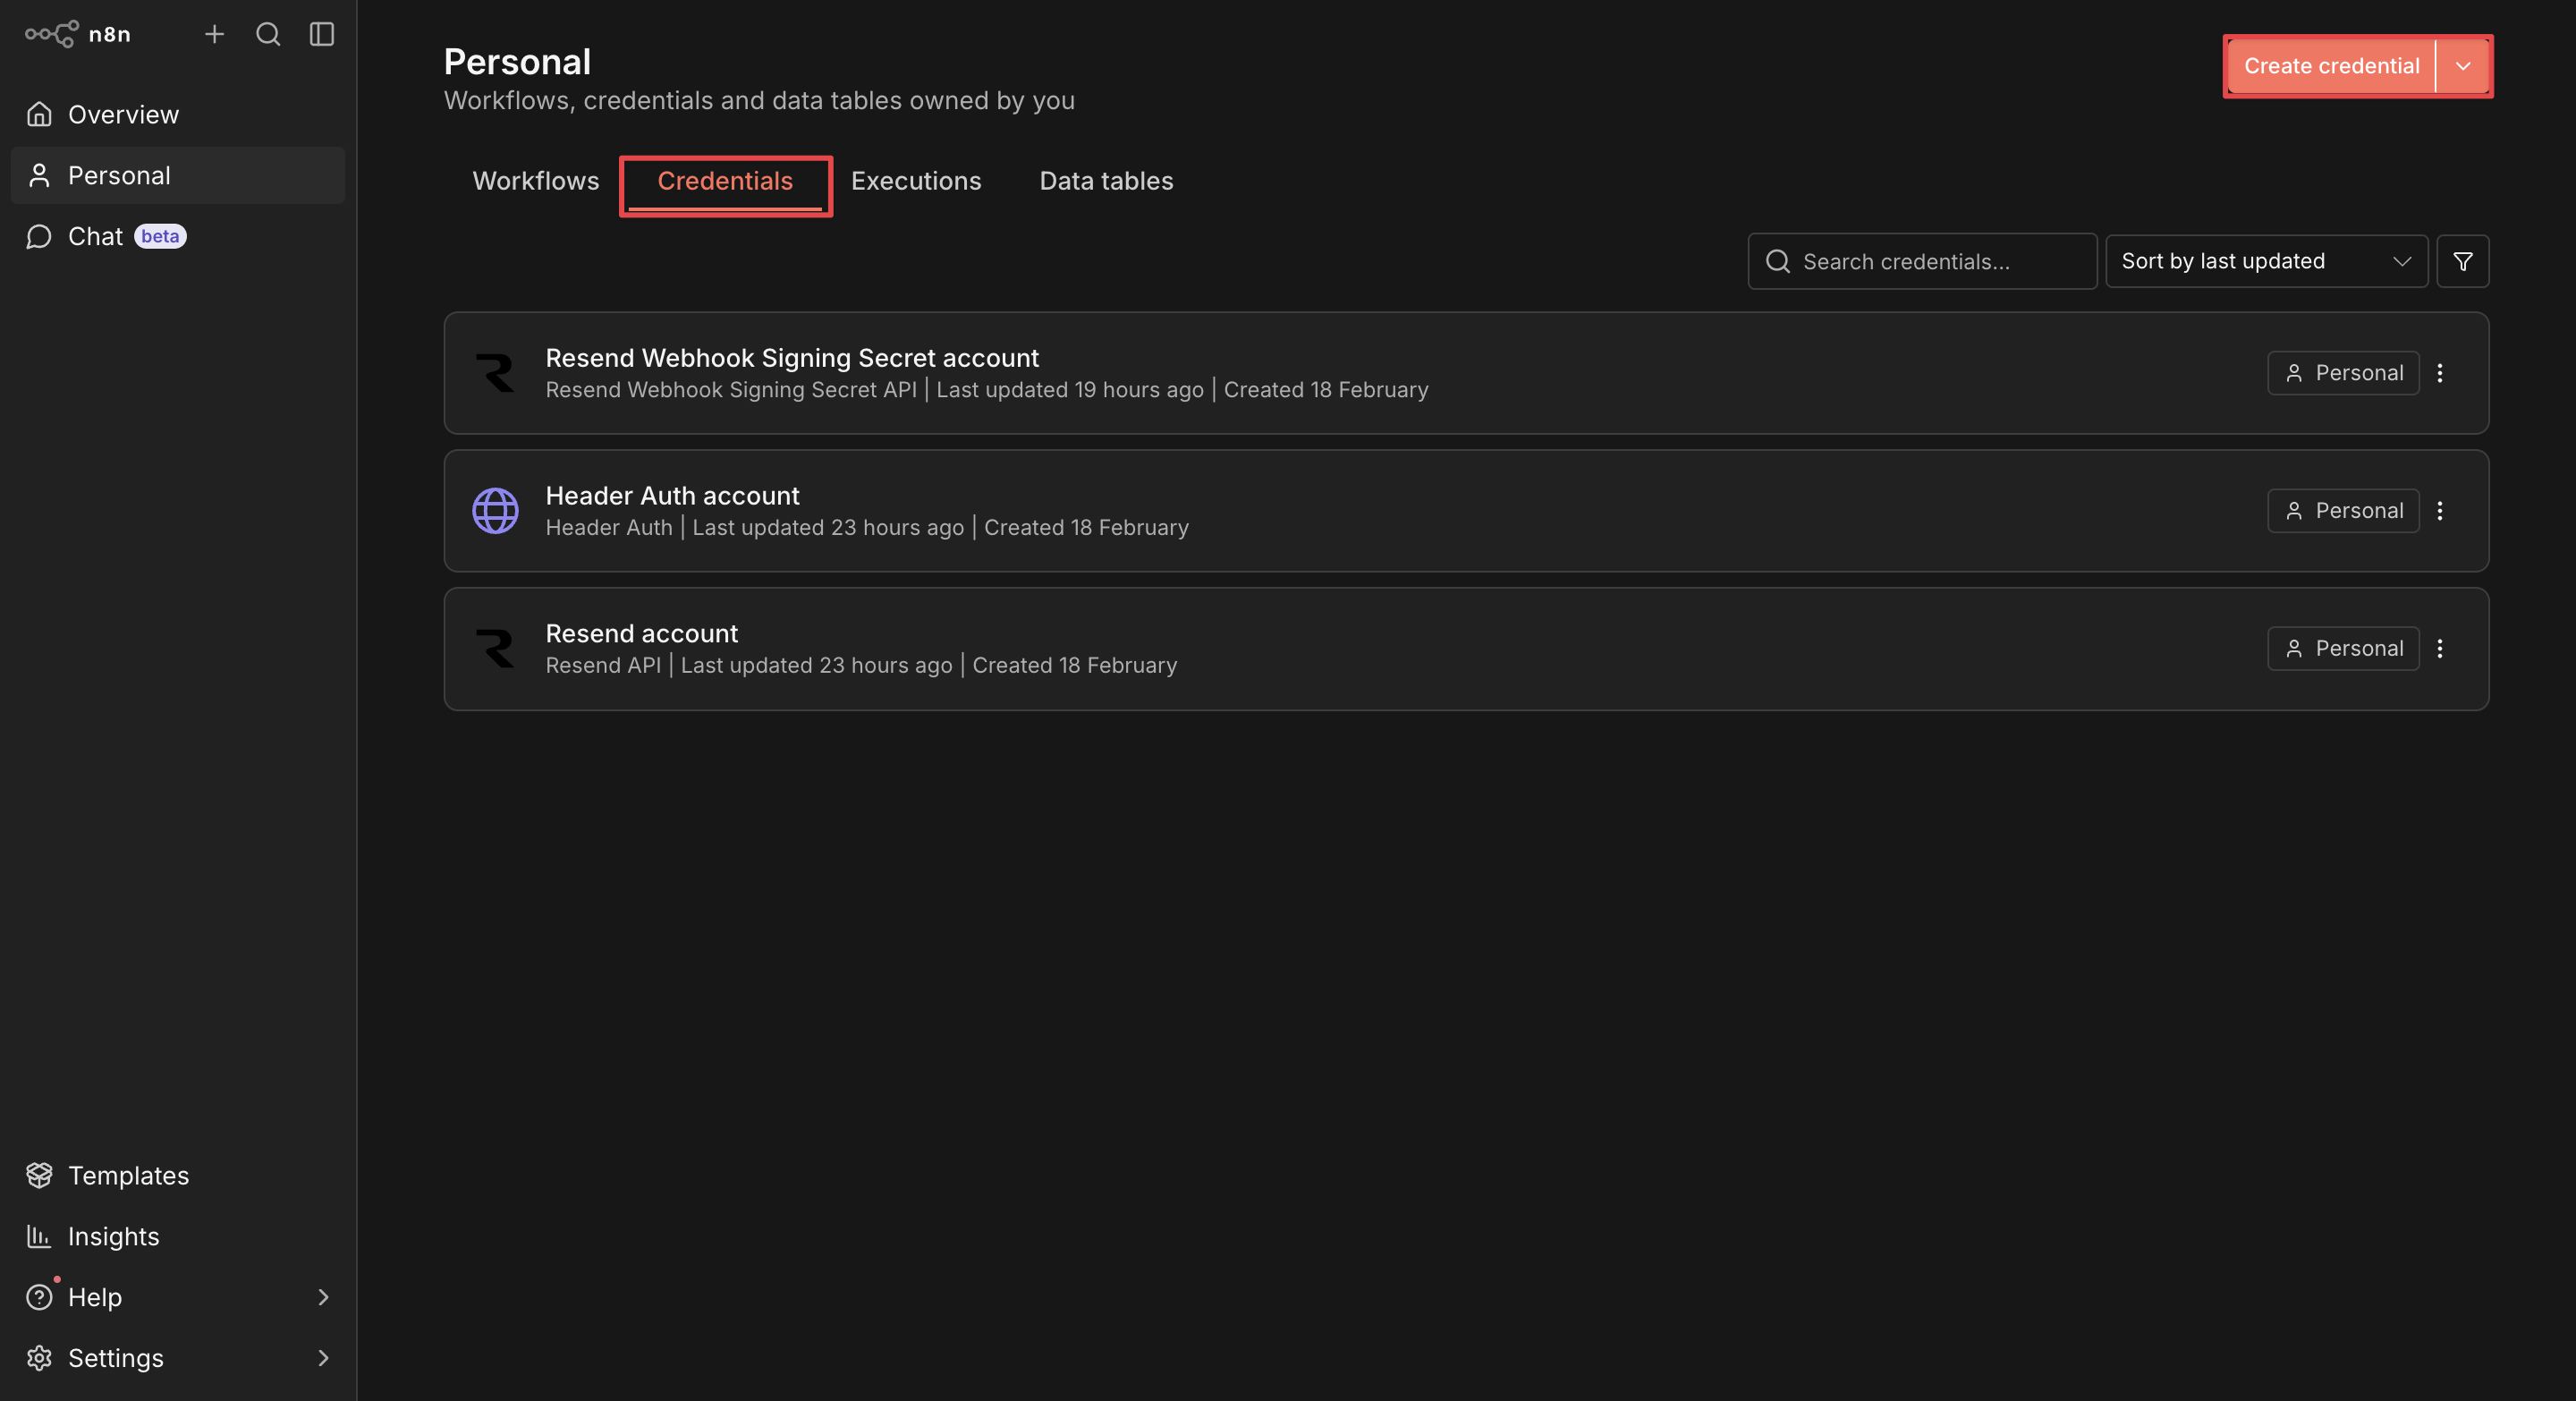
The trigger node uses the Resend Webhook Signing Secret to verify that incoming webhook events actually came from Resend. Configure it as follows:
- Credential Type: Select Resend Webhook Signing Secret.
- Signing Secret: Enter the value you just copied from the Resend webhook.
The action nodes use the Resend API to fetch email details and send replies. Configure it as follows:
- Credential Type: Select Resend API.
- API Key: Enter your Resend API key (copy it from resend.com/api-keys).
The HTTP Request node uses the Letta API to call the Letta agent. Configure it as follows:
- Credential Type: Select Header Auth.
- Name: Enter
Authorization. - Value: Enter your
Bearer YOUR_LETTA_API_KEY(copy it from app.letta.com/api-keys).
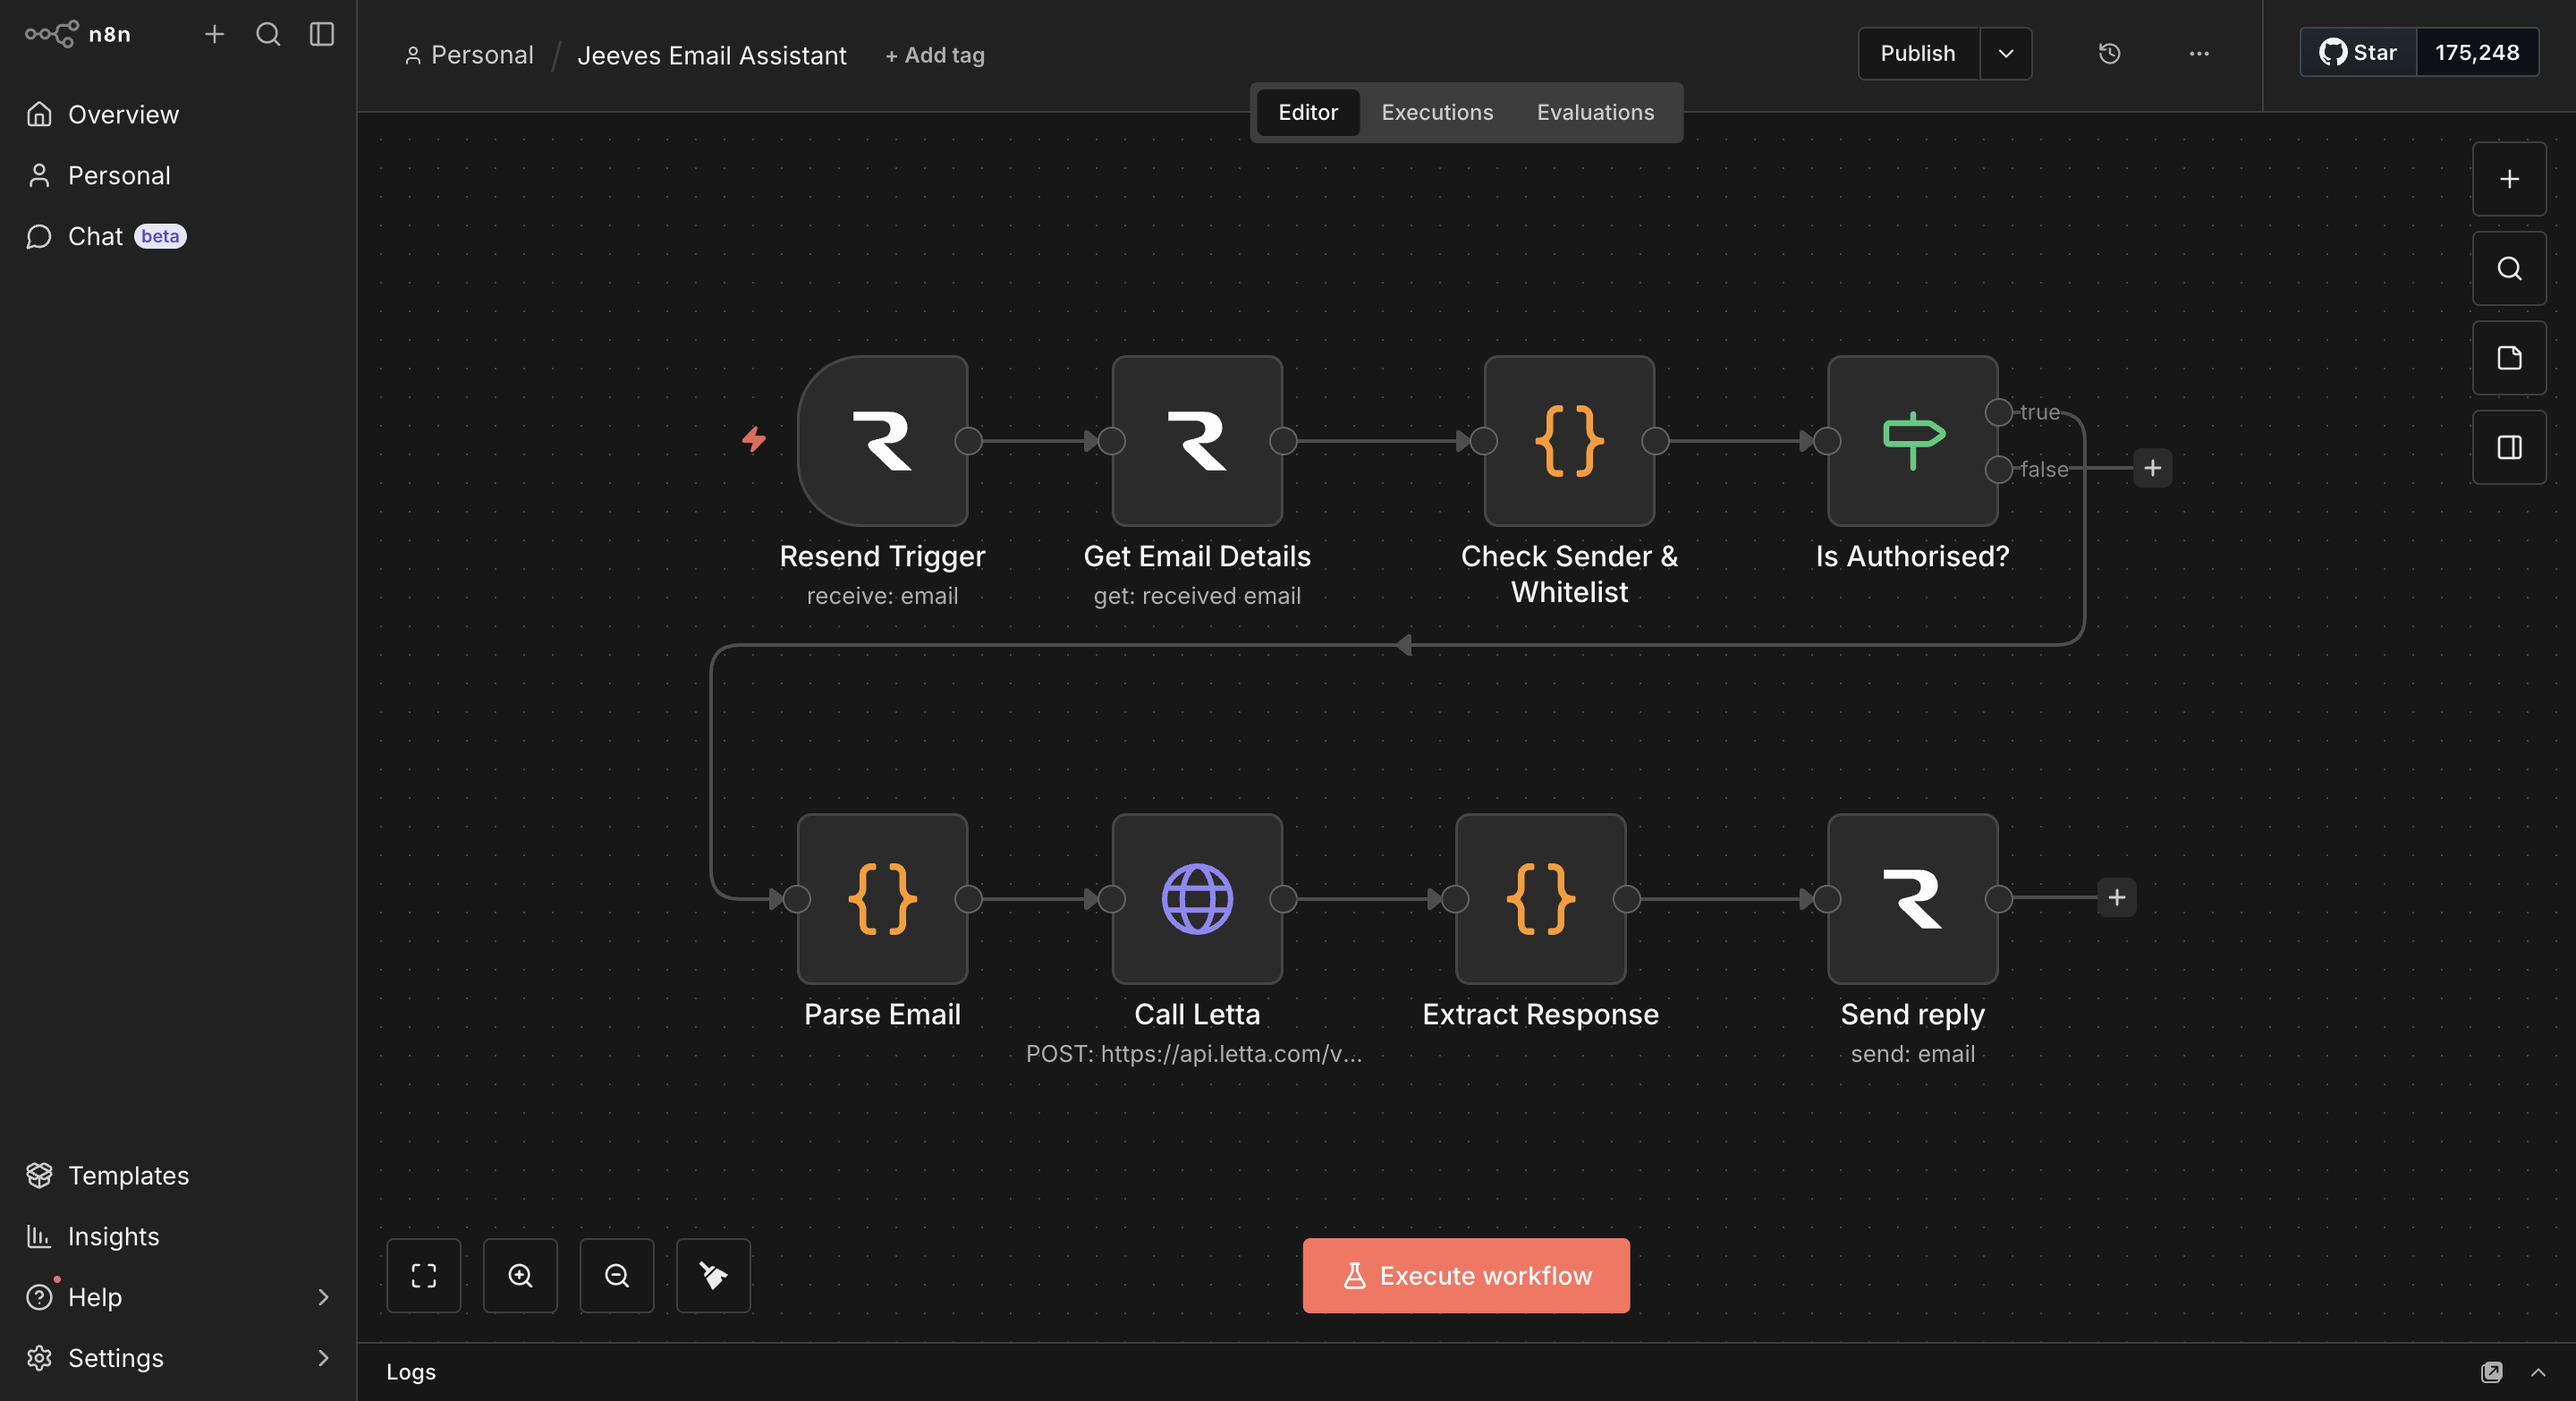
Step 4: Build the email processing workflow
Create a new workflow in n8n and name it Jeeves Email Assistant. Build it out using either of the following methods.
- Option A: Import the JSON imports a pre-built workflow file and updates your credentials and agent ID. This takes about 10 minutes.
- Option B: Build it node by node adds and configures each node manually. This takes longer but gives you a fuller understanding of how everything connects.
The workflow has eight nodes:
Option A: Import the workflow
Download the jeeves-email-assistant-workflow.json file.
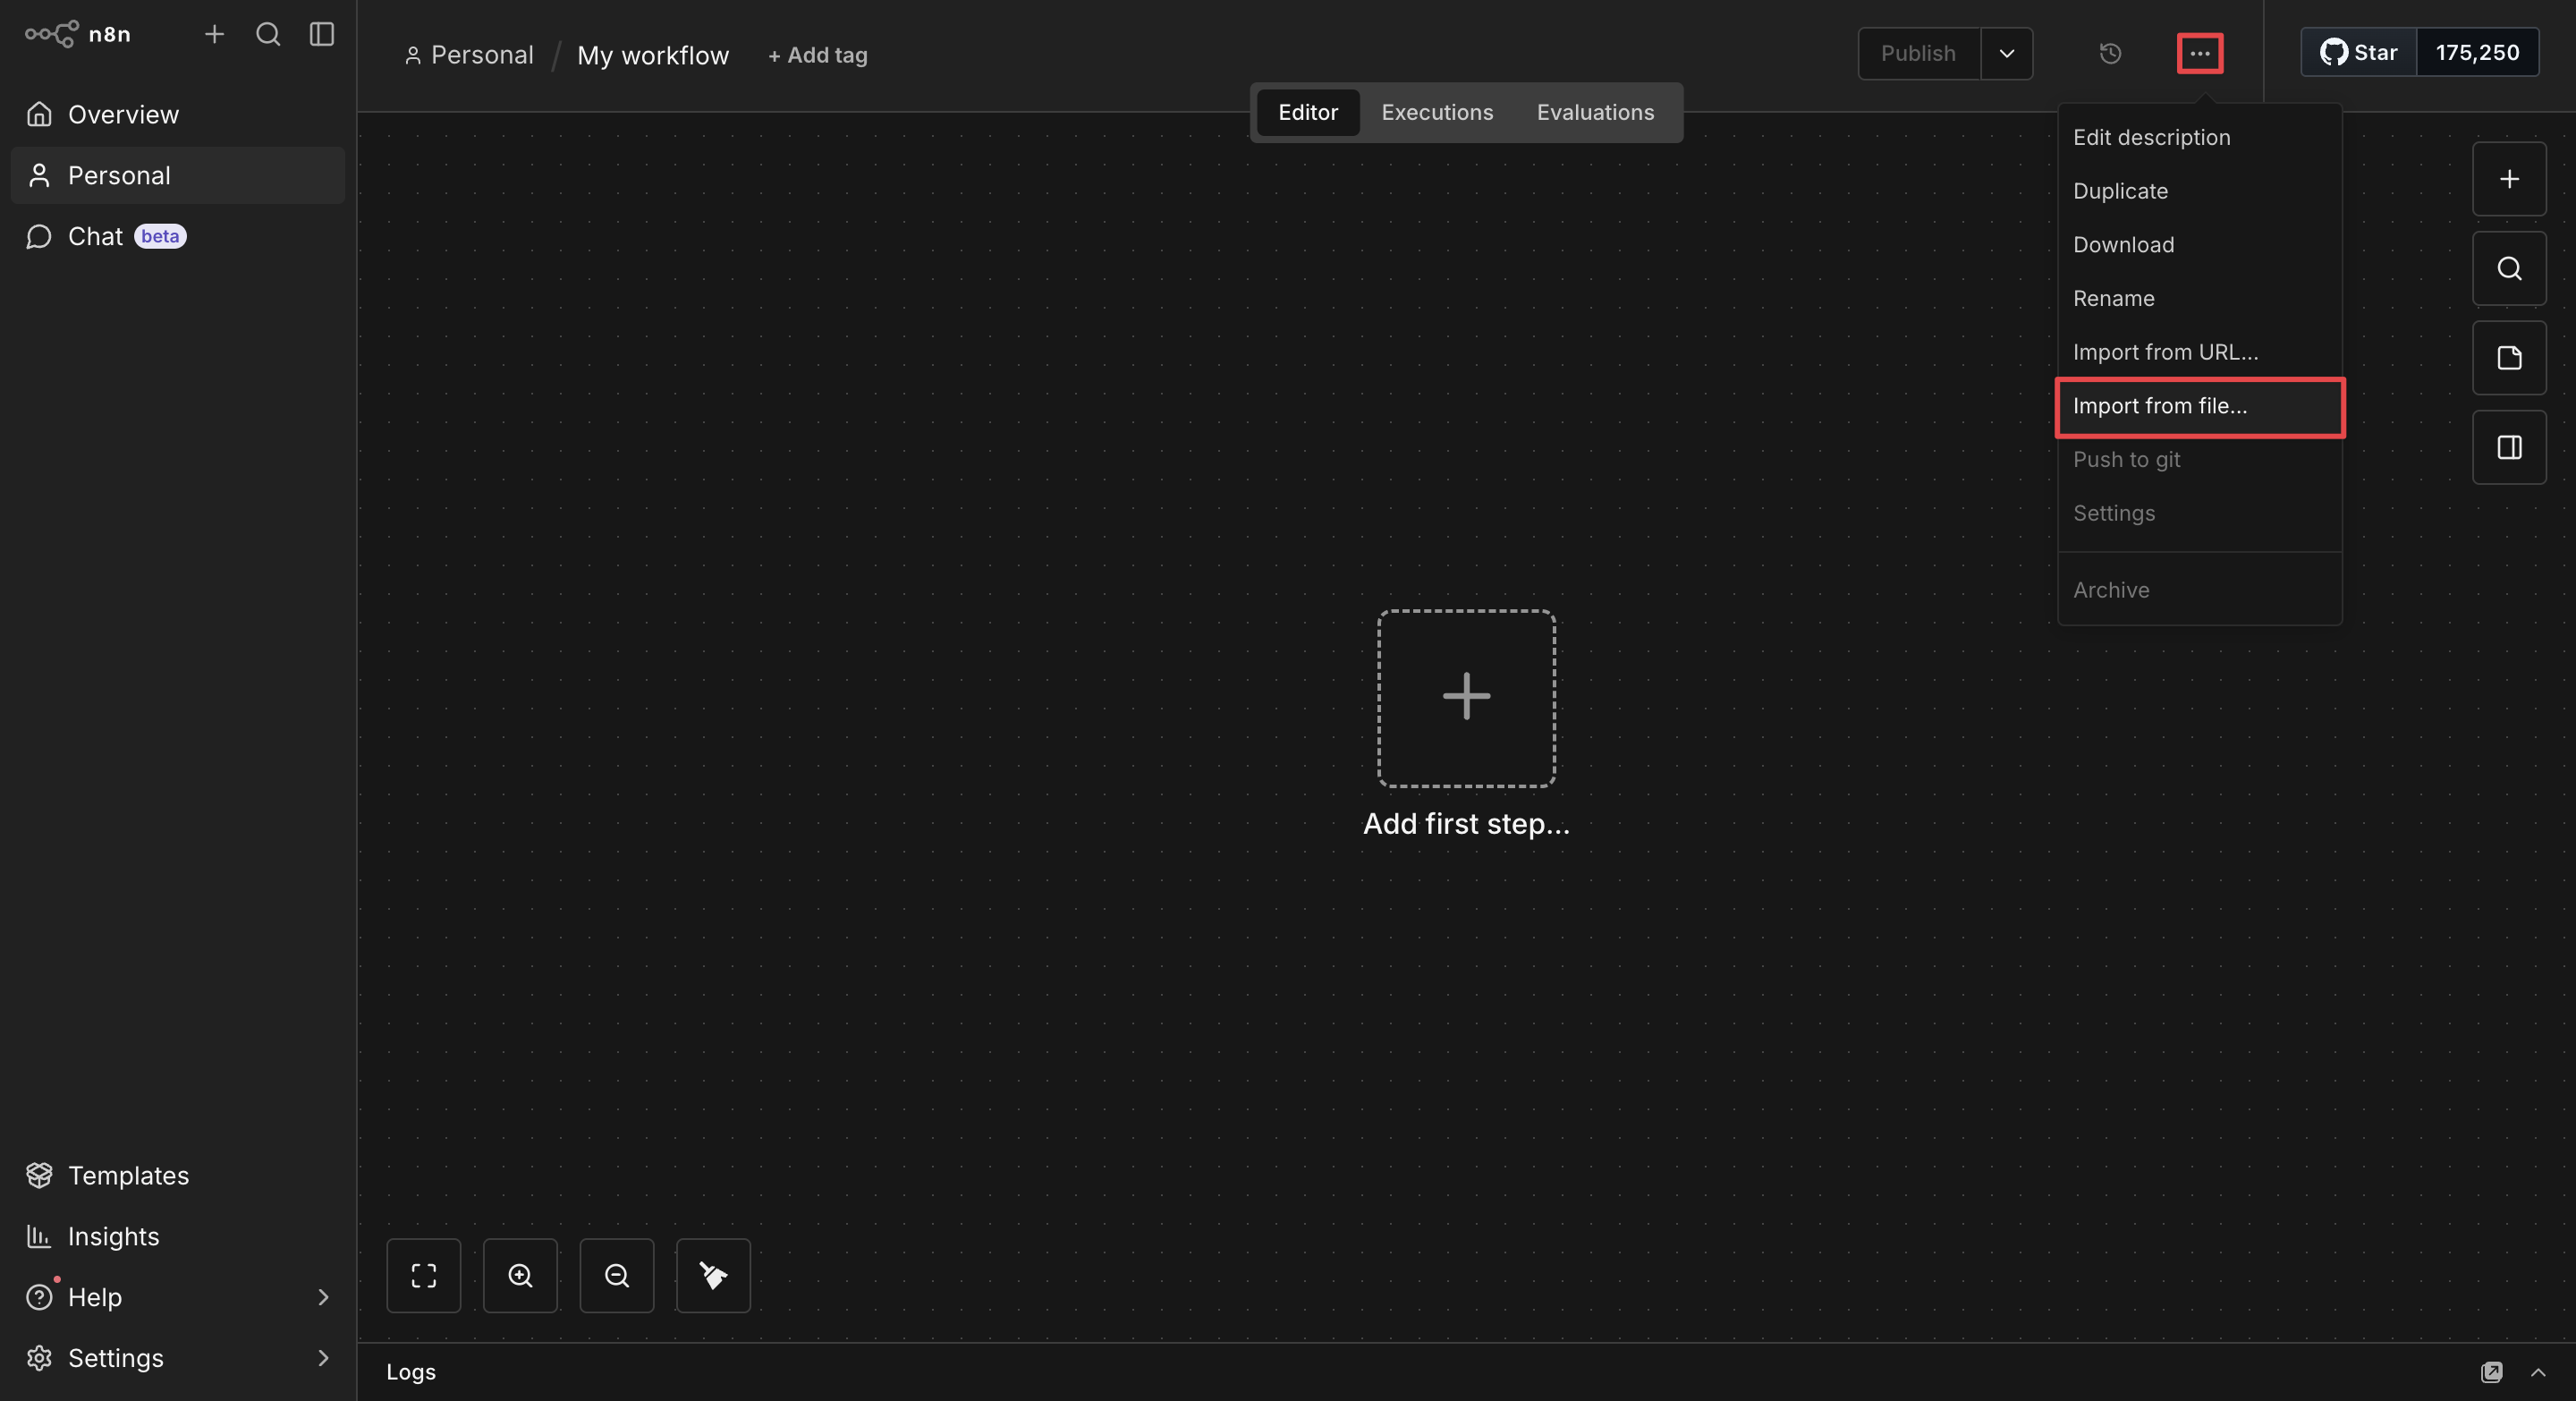
On a new workflow canvas in n8n, click the three-dot button in the top right corner, choose Import from File, and select the JSON file.
The eight nodes appear on the canvas, already connected.
Click on the nodes to open them, assign the credentials you created in Step 3, and update the following values:
- In the Resend Trigger node, use the Credential dropdown to select your Resend Webhook Signing Secret credential.
-
In both the Get email details node and the Send reply node, select your Resend API credential (they share the same credential).
-
In the Call Letta node, set Authentication to Header Auth, then in the Credential dropdown, select your Letta API credential.
-
In the Check Allow List node, replace
you@example.comwith your primary email address. -
In the HTTP Request node, update the URL to use your agent ID:
https://api.letta.com/v1/agents/YOUR_AGENT_ID_HERE/messages -
In the Send reply node, update From to your Jeeves address (for example,
jeeves@mail.yourdomain.com) and CC to your own email address.
Once you've set your credentials, skip to Step 5 to test the system.
Option B: Build it node by node
Each node passes its output to the next.
Node 1: Resend Trigger
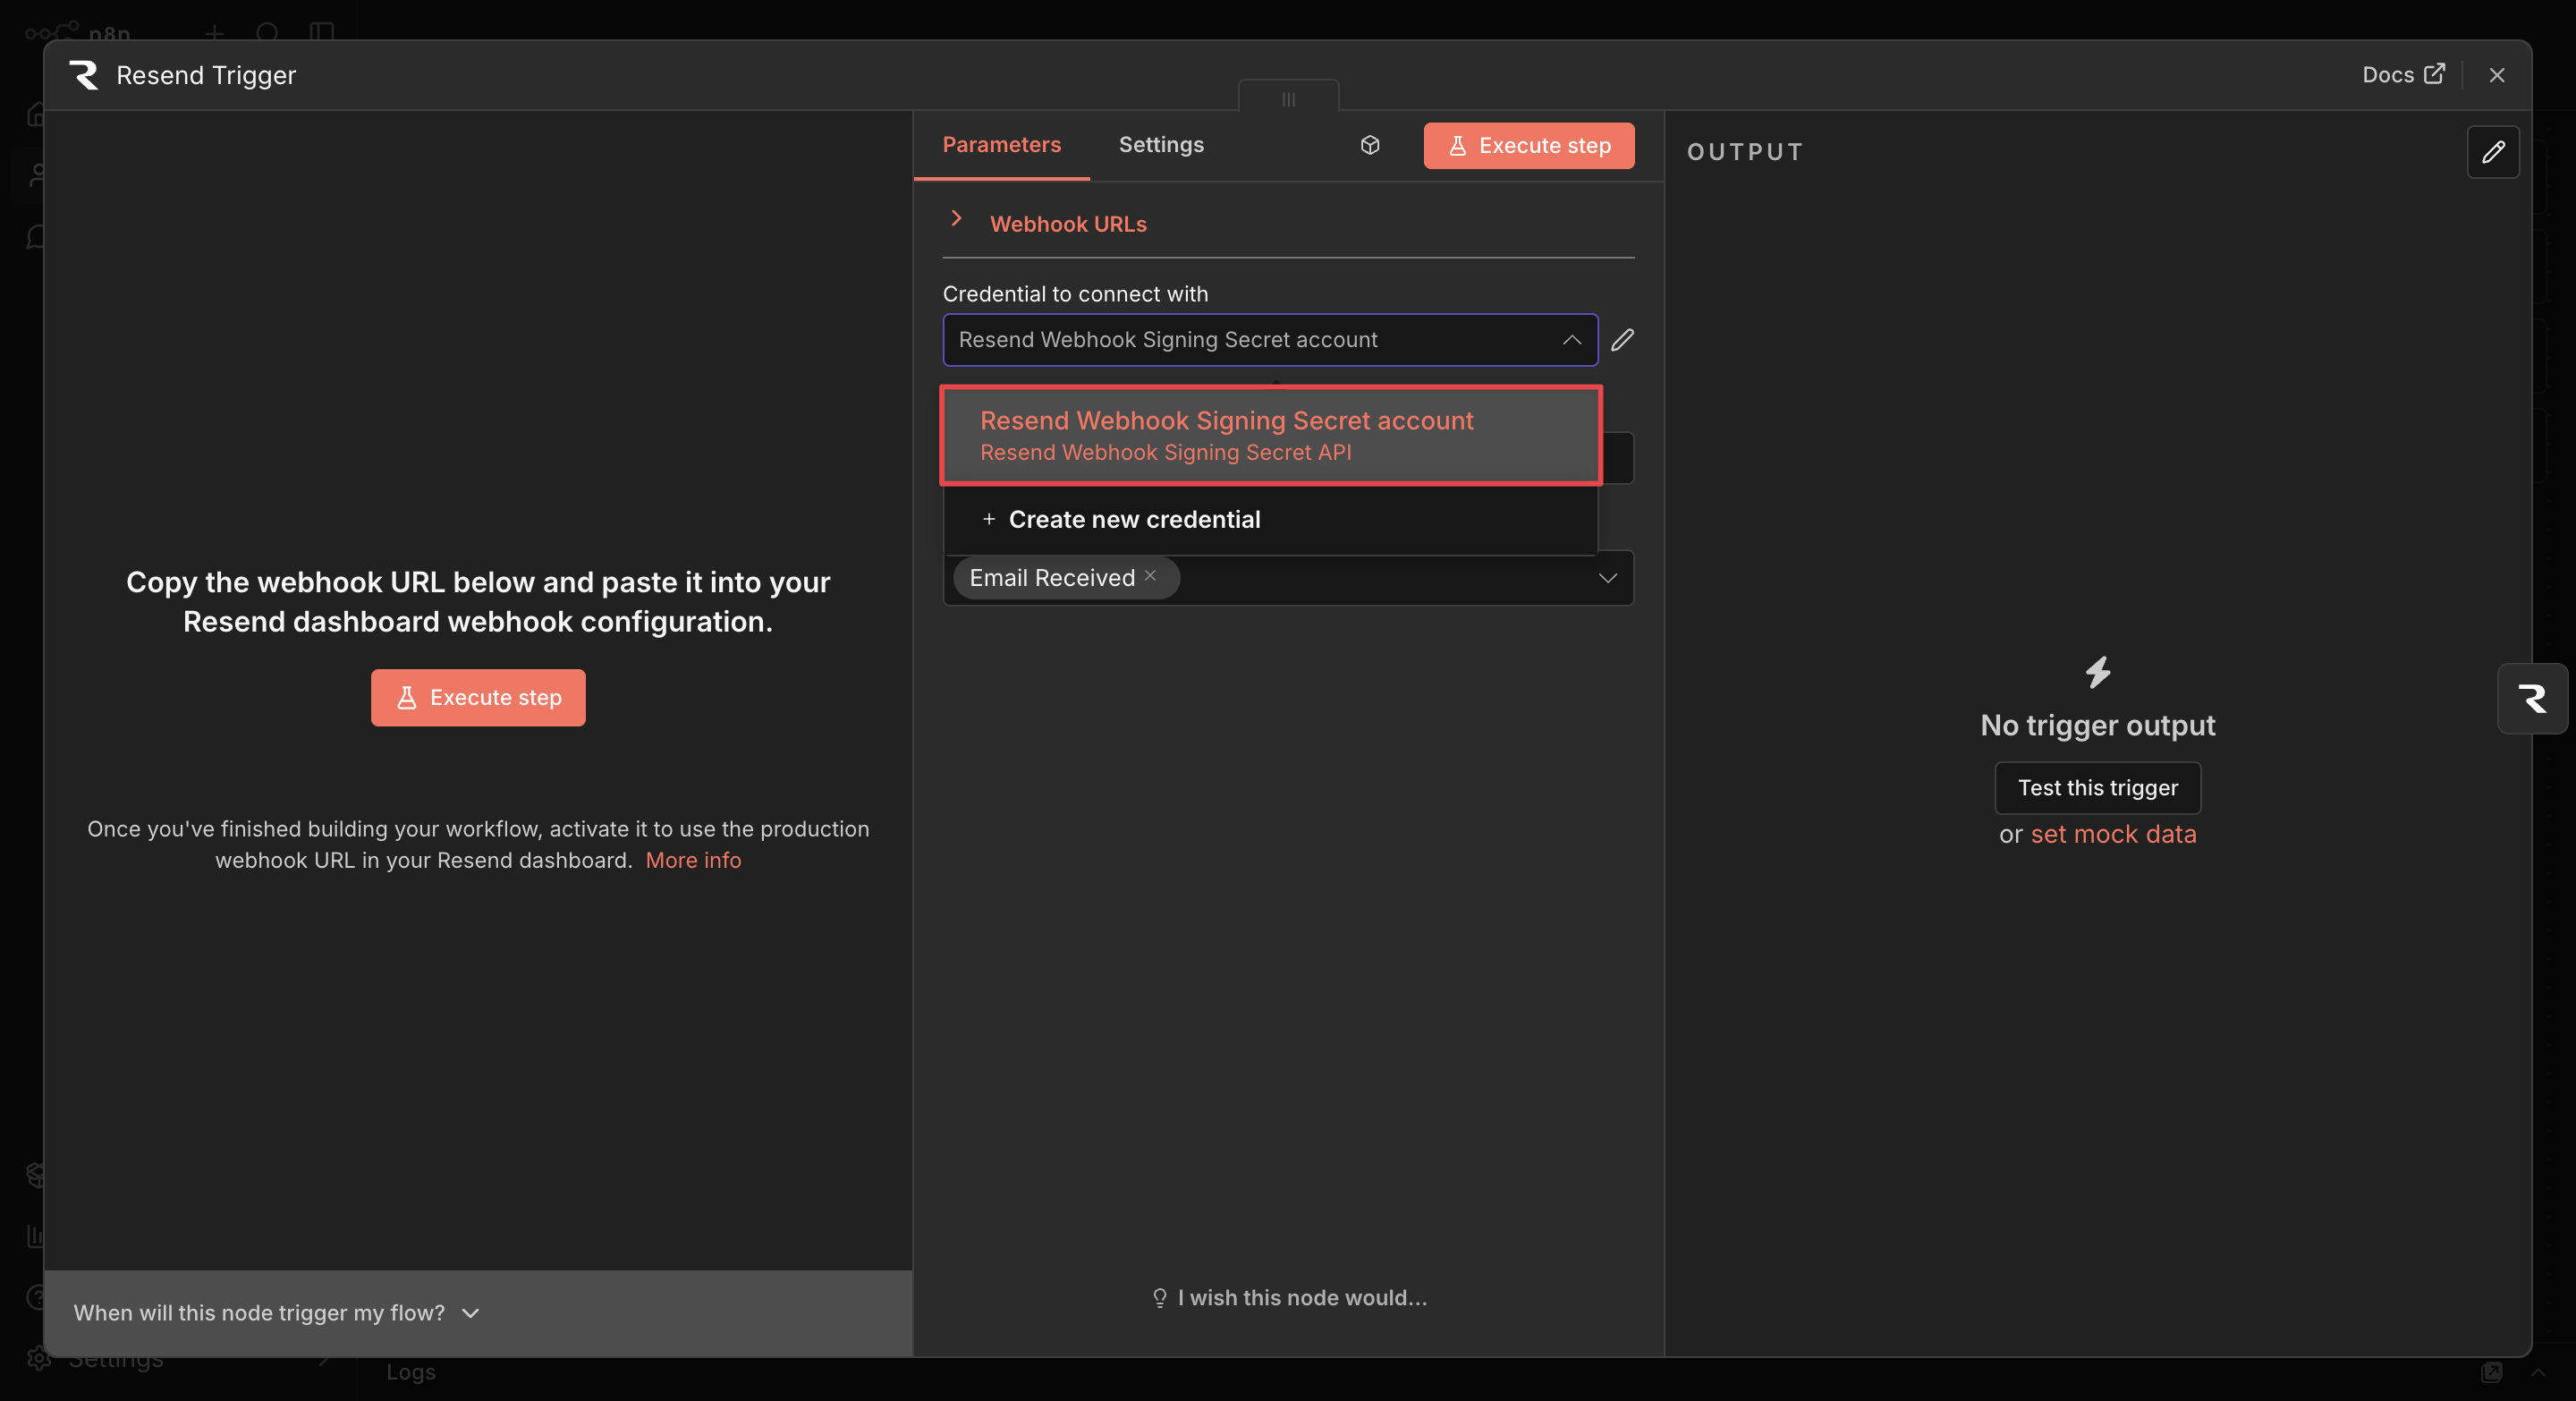
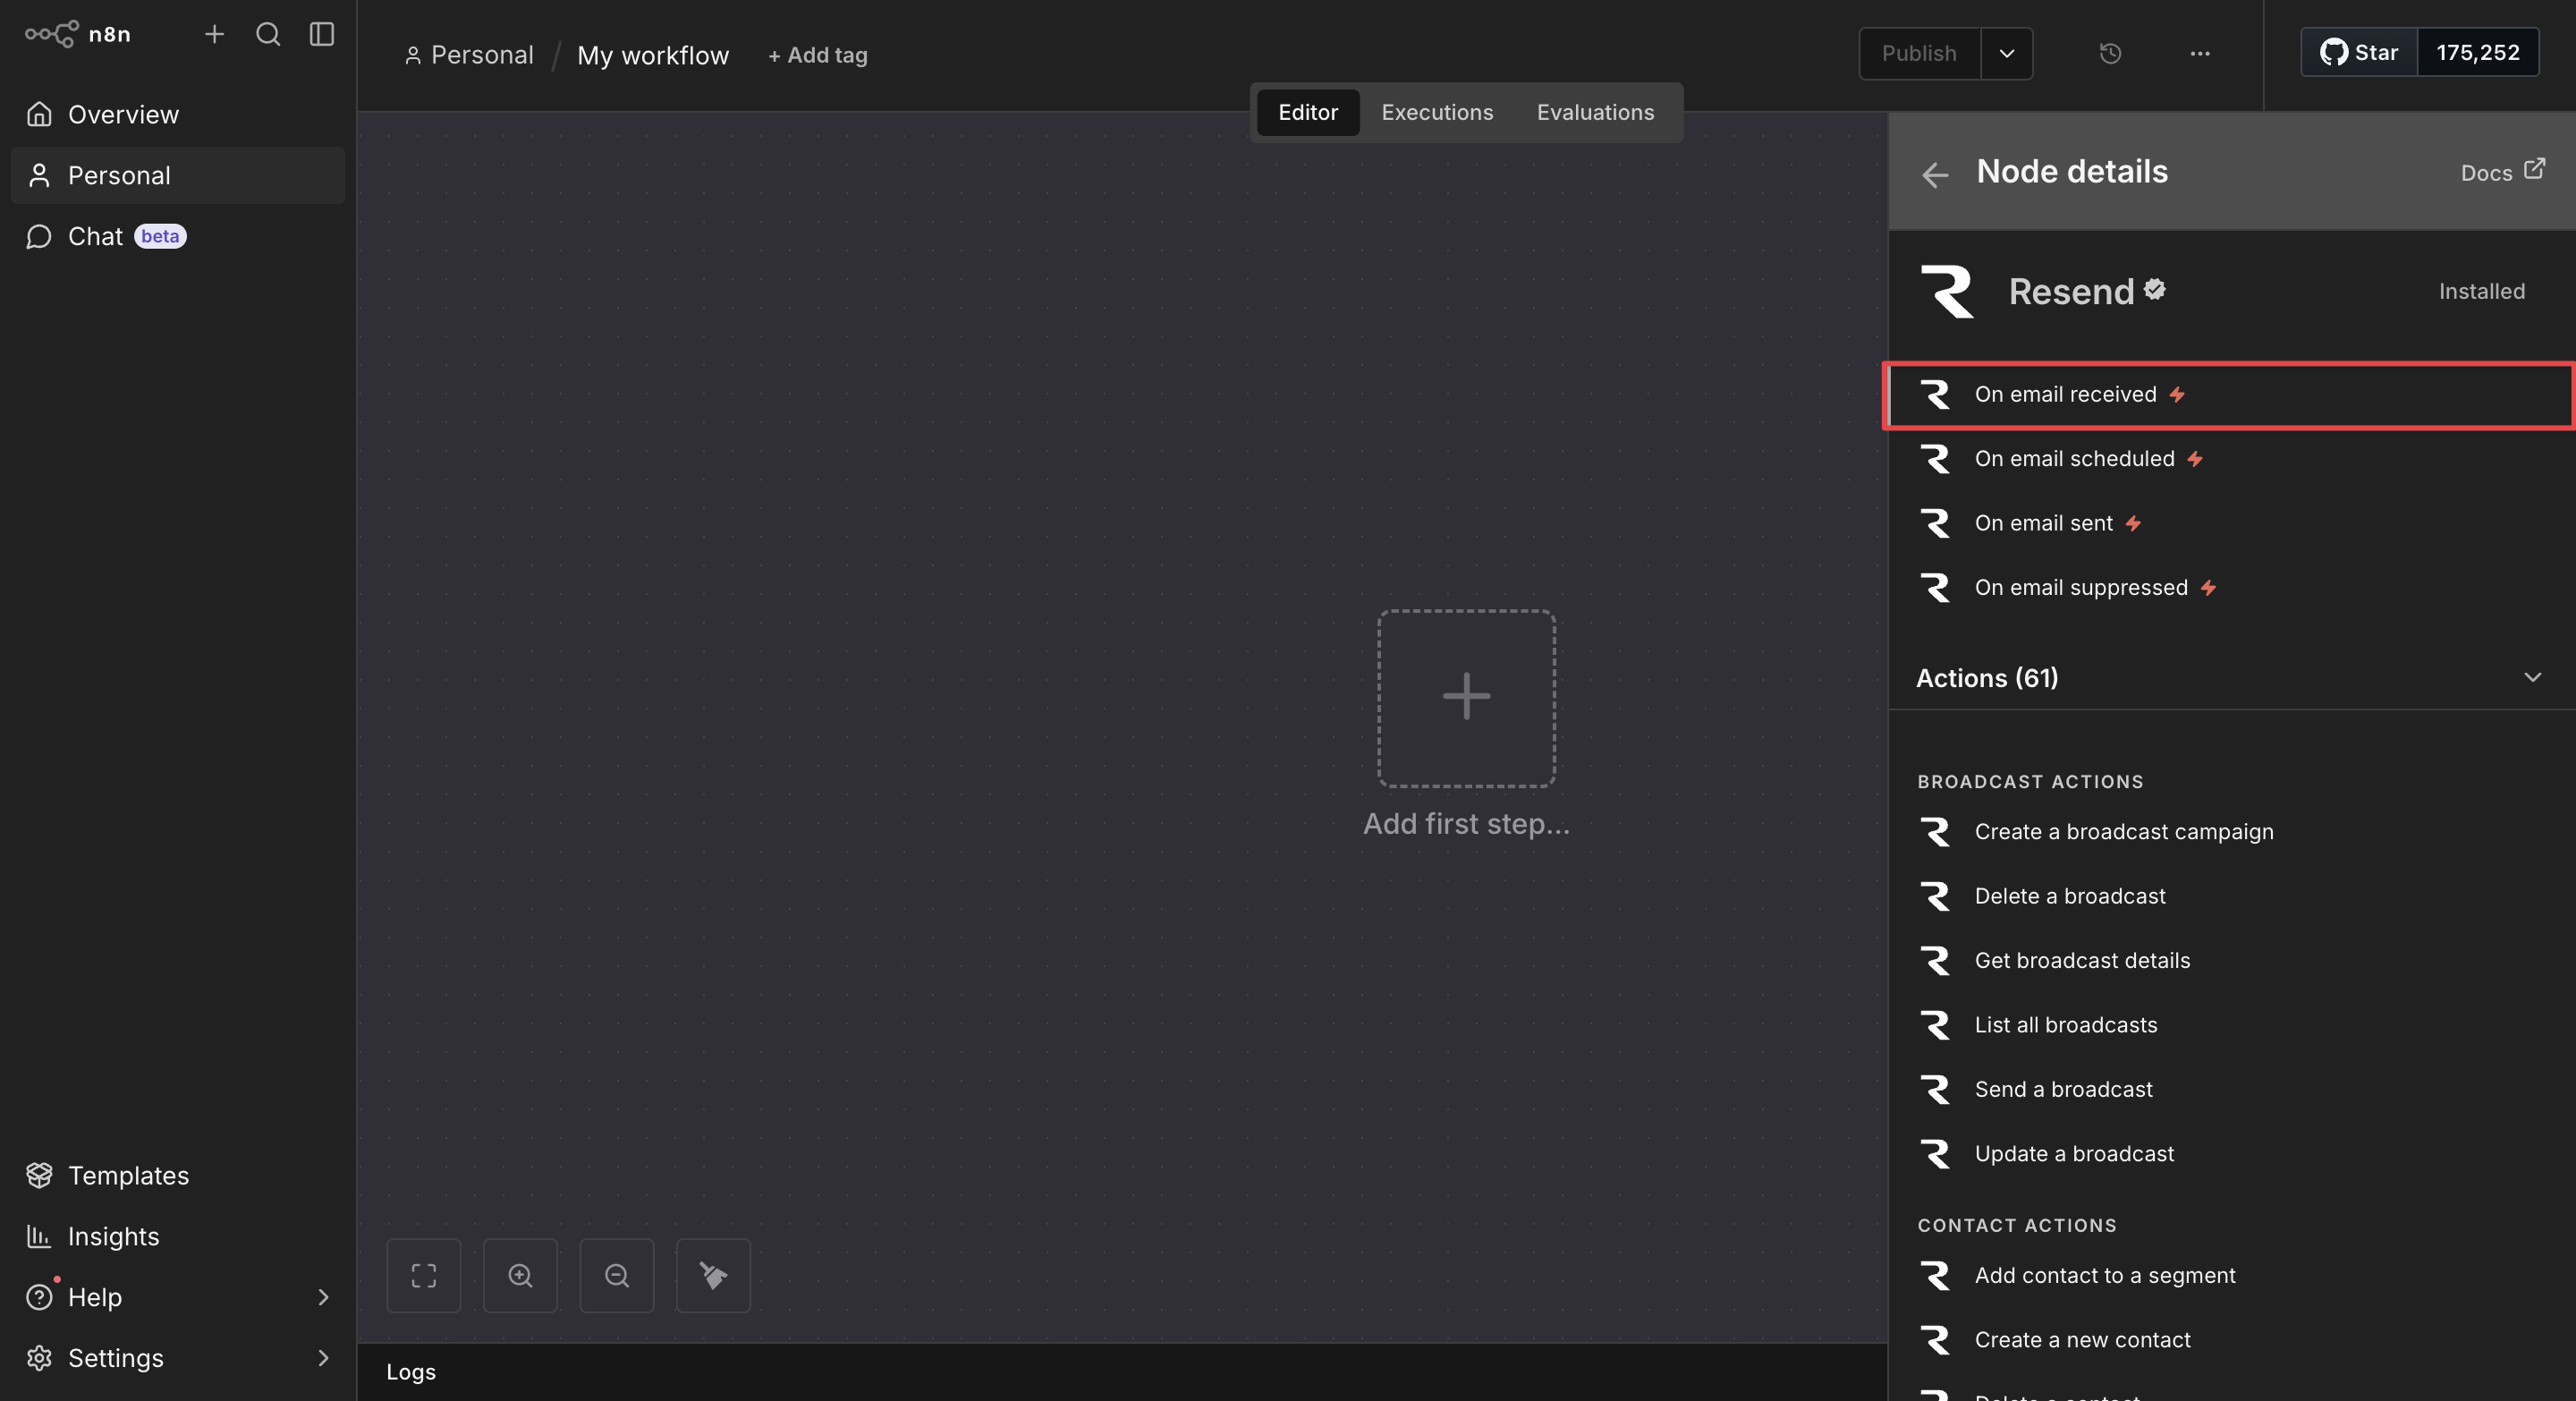
Click + on the canvas and search for Resend. Select the Resend Trigger (not the action node). Choose On email received as the event.
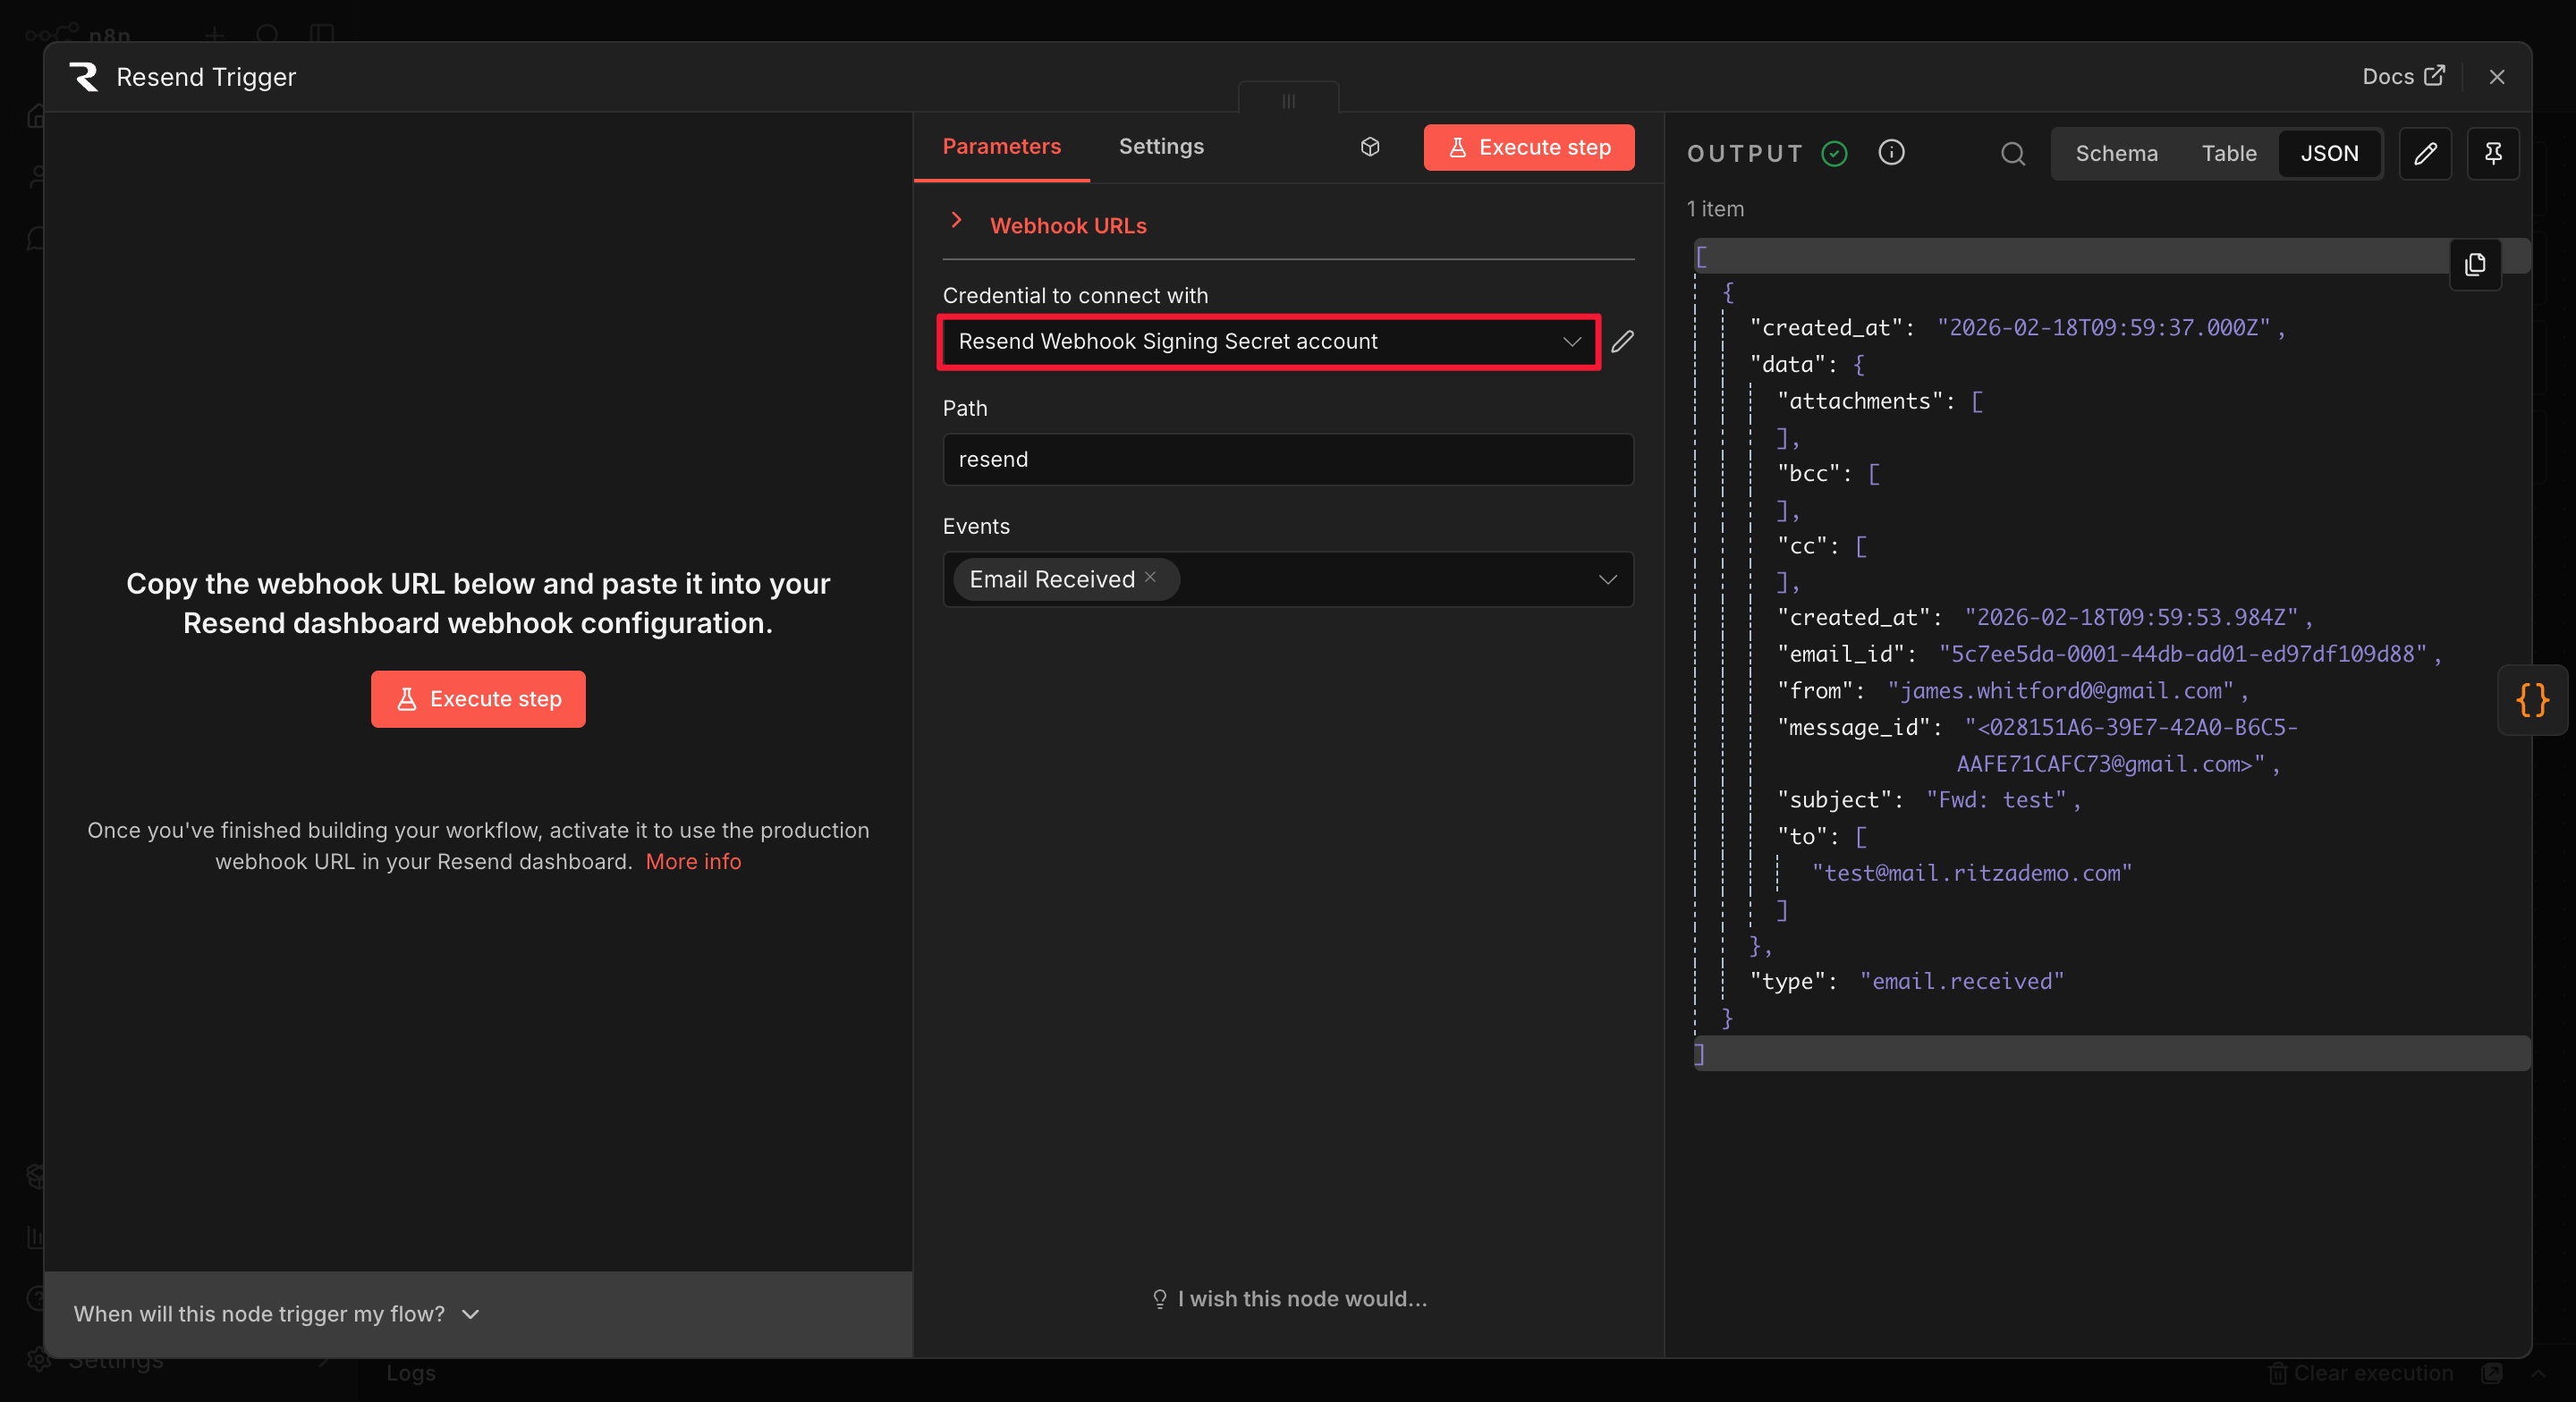
Attach your Resend Webhook Signing Secret credential. The node shows two webhook URLs: a test URL and a production URL. The production URL (/webhook/resend) is the URL you configured in the Resend dashboard in Step 3.
Node 2: Get received email details
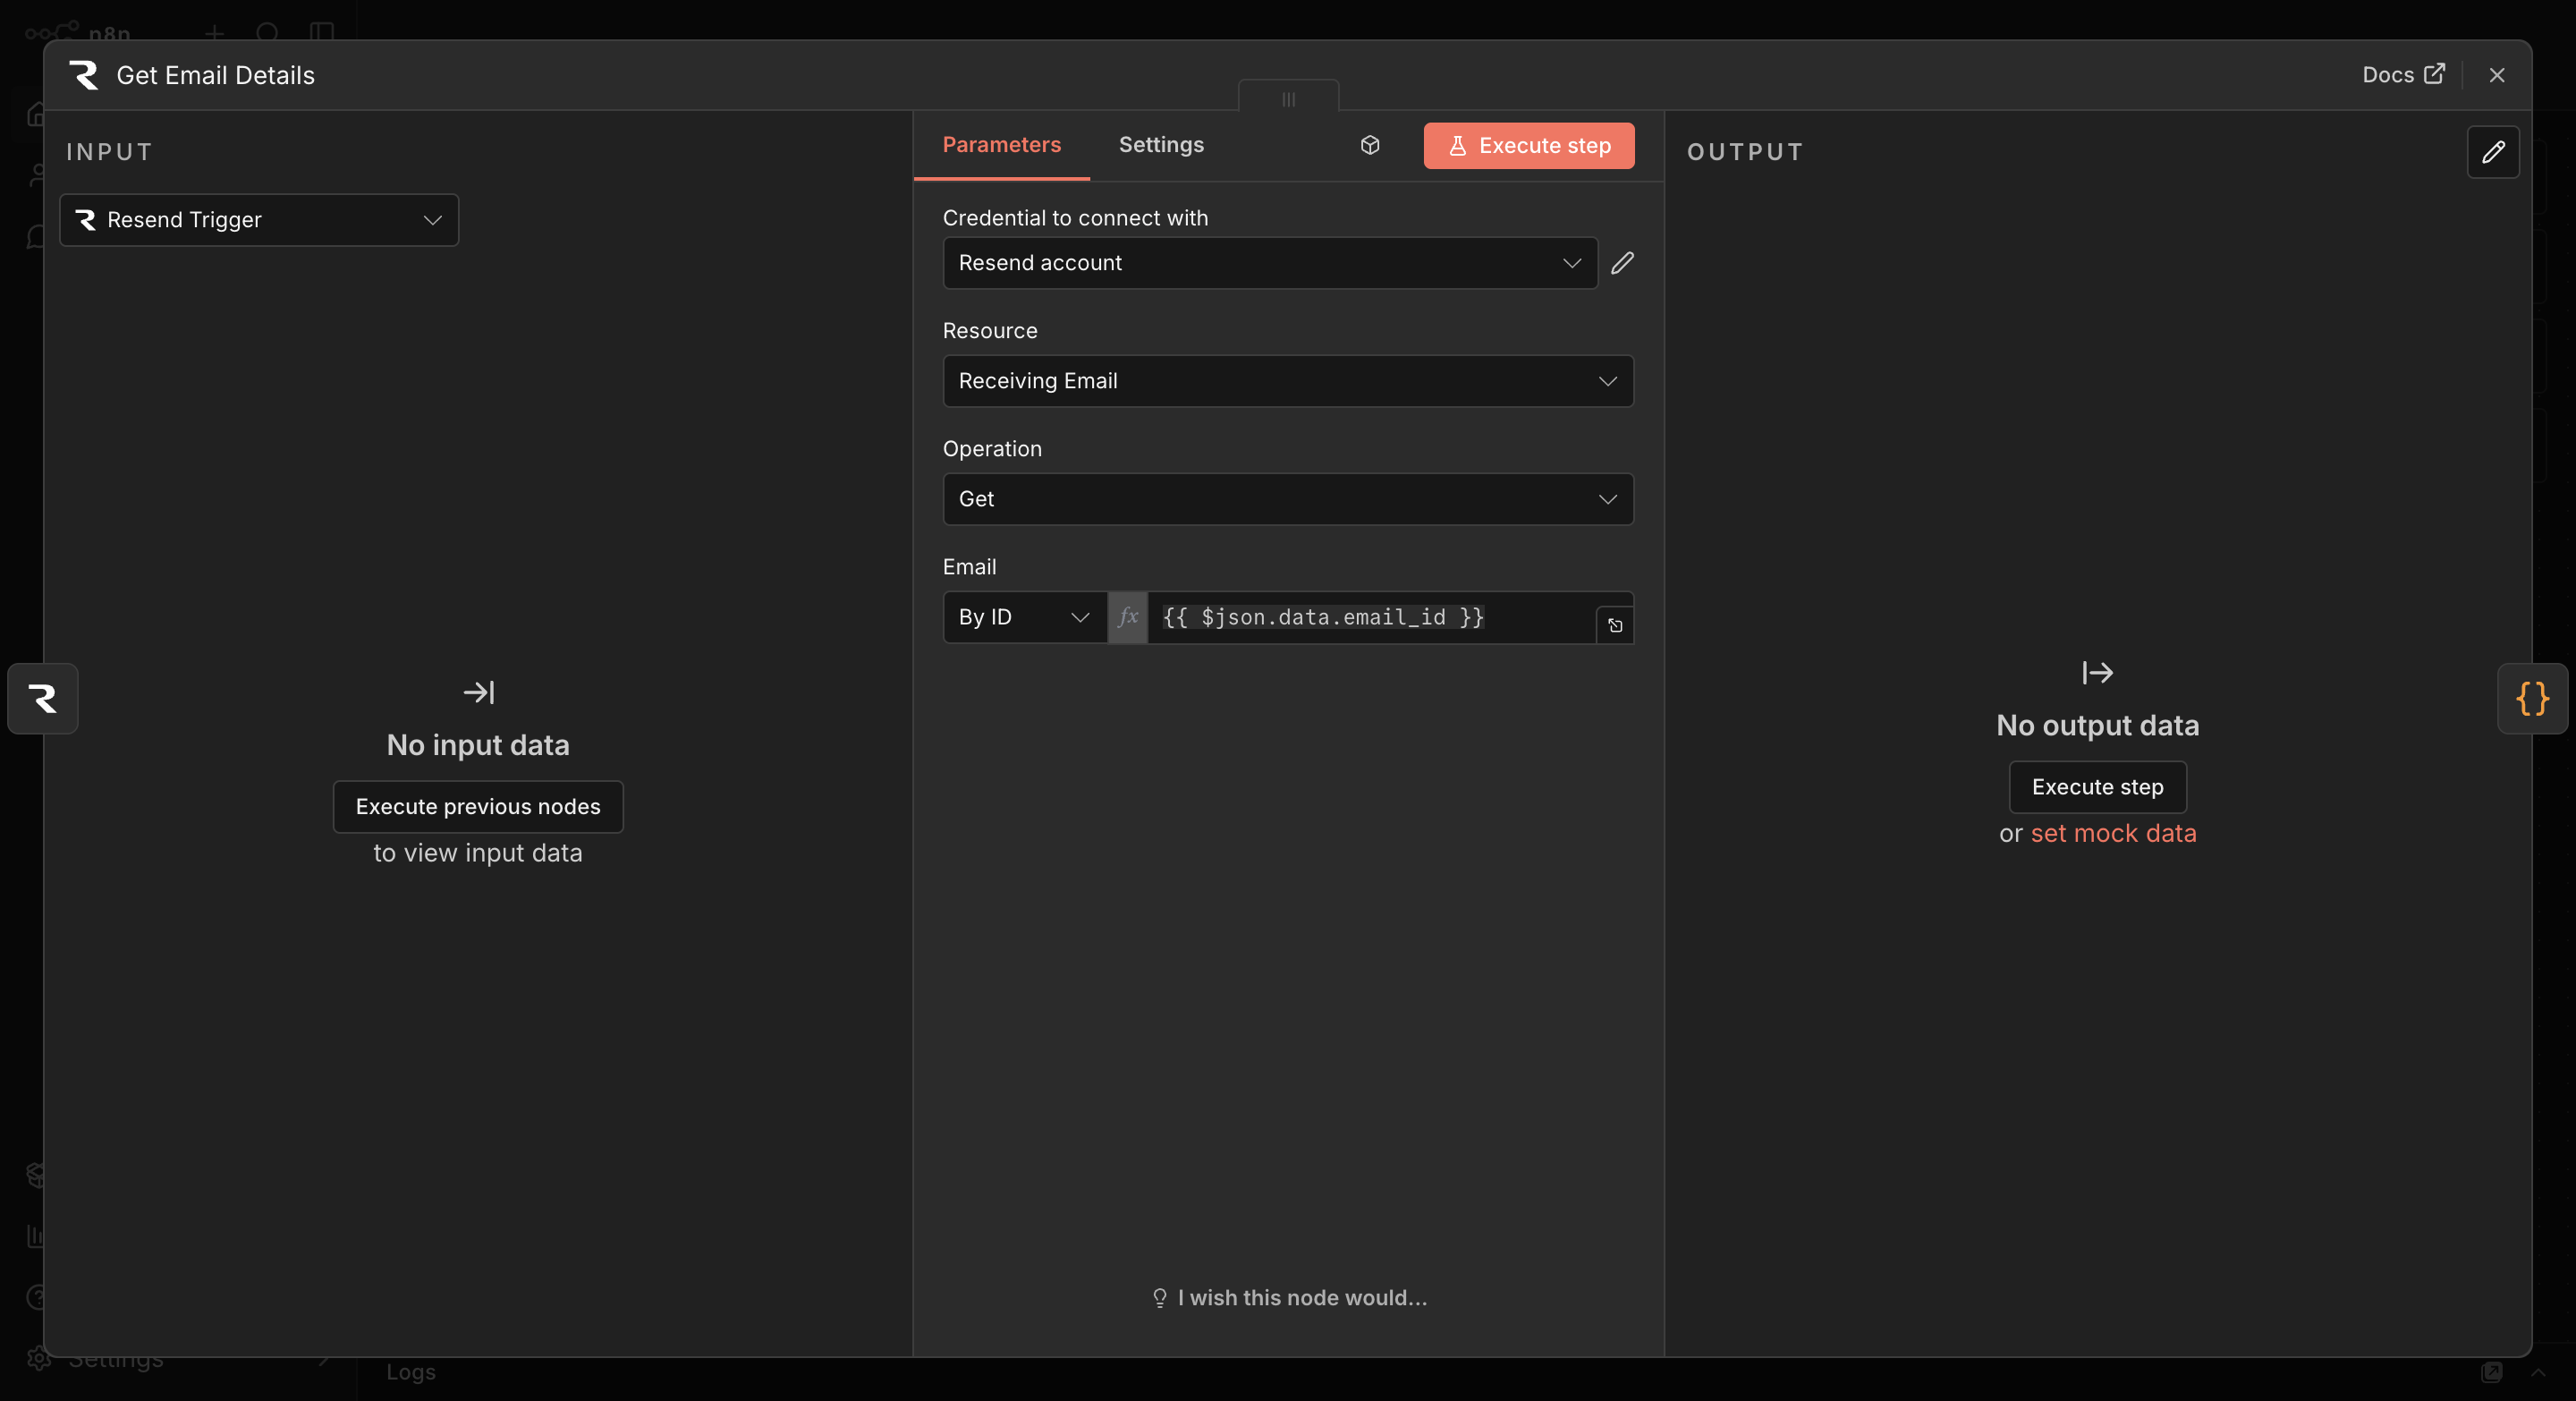
The Resend Trigger only delivers basic metadata about the incoming email, not the body. This node fetches the full email content using the email ID from the trigger.
Click + after the trigger, and search for Resend. This time, select the Resend action node called Get received email details.
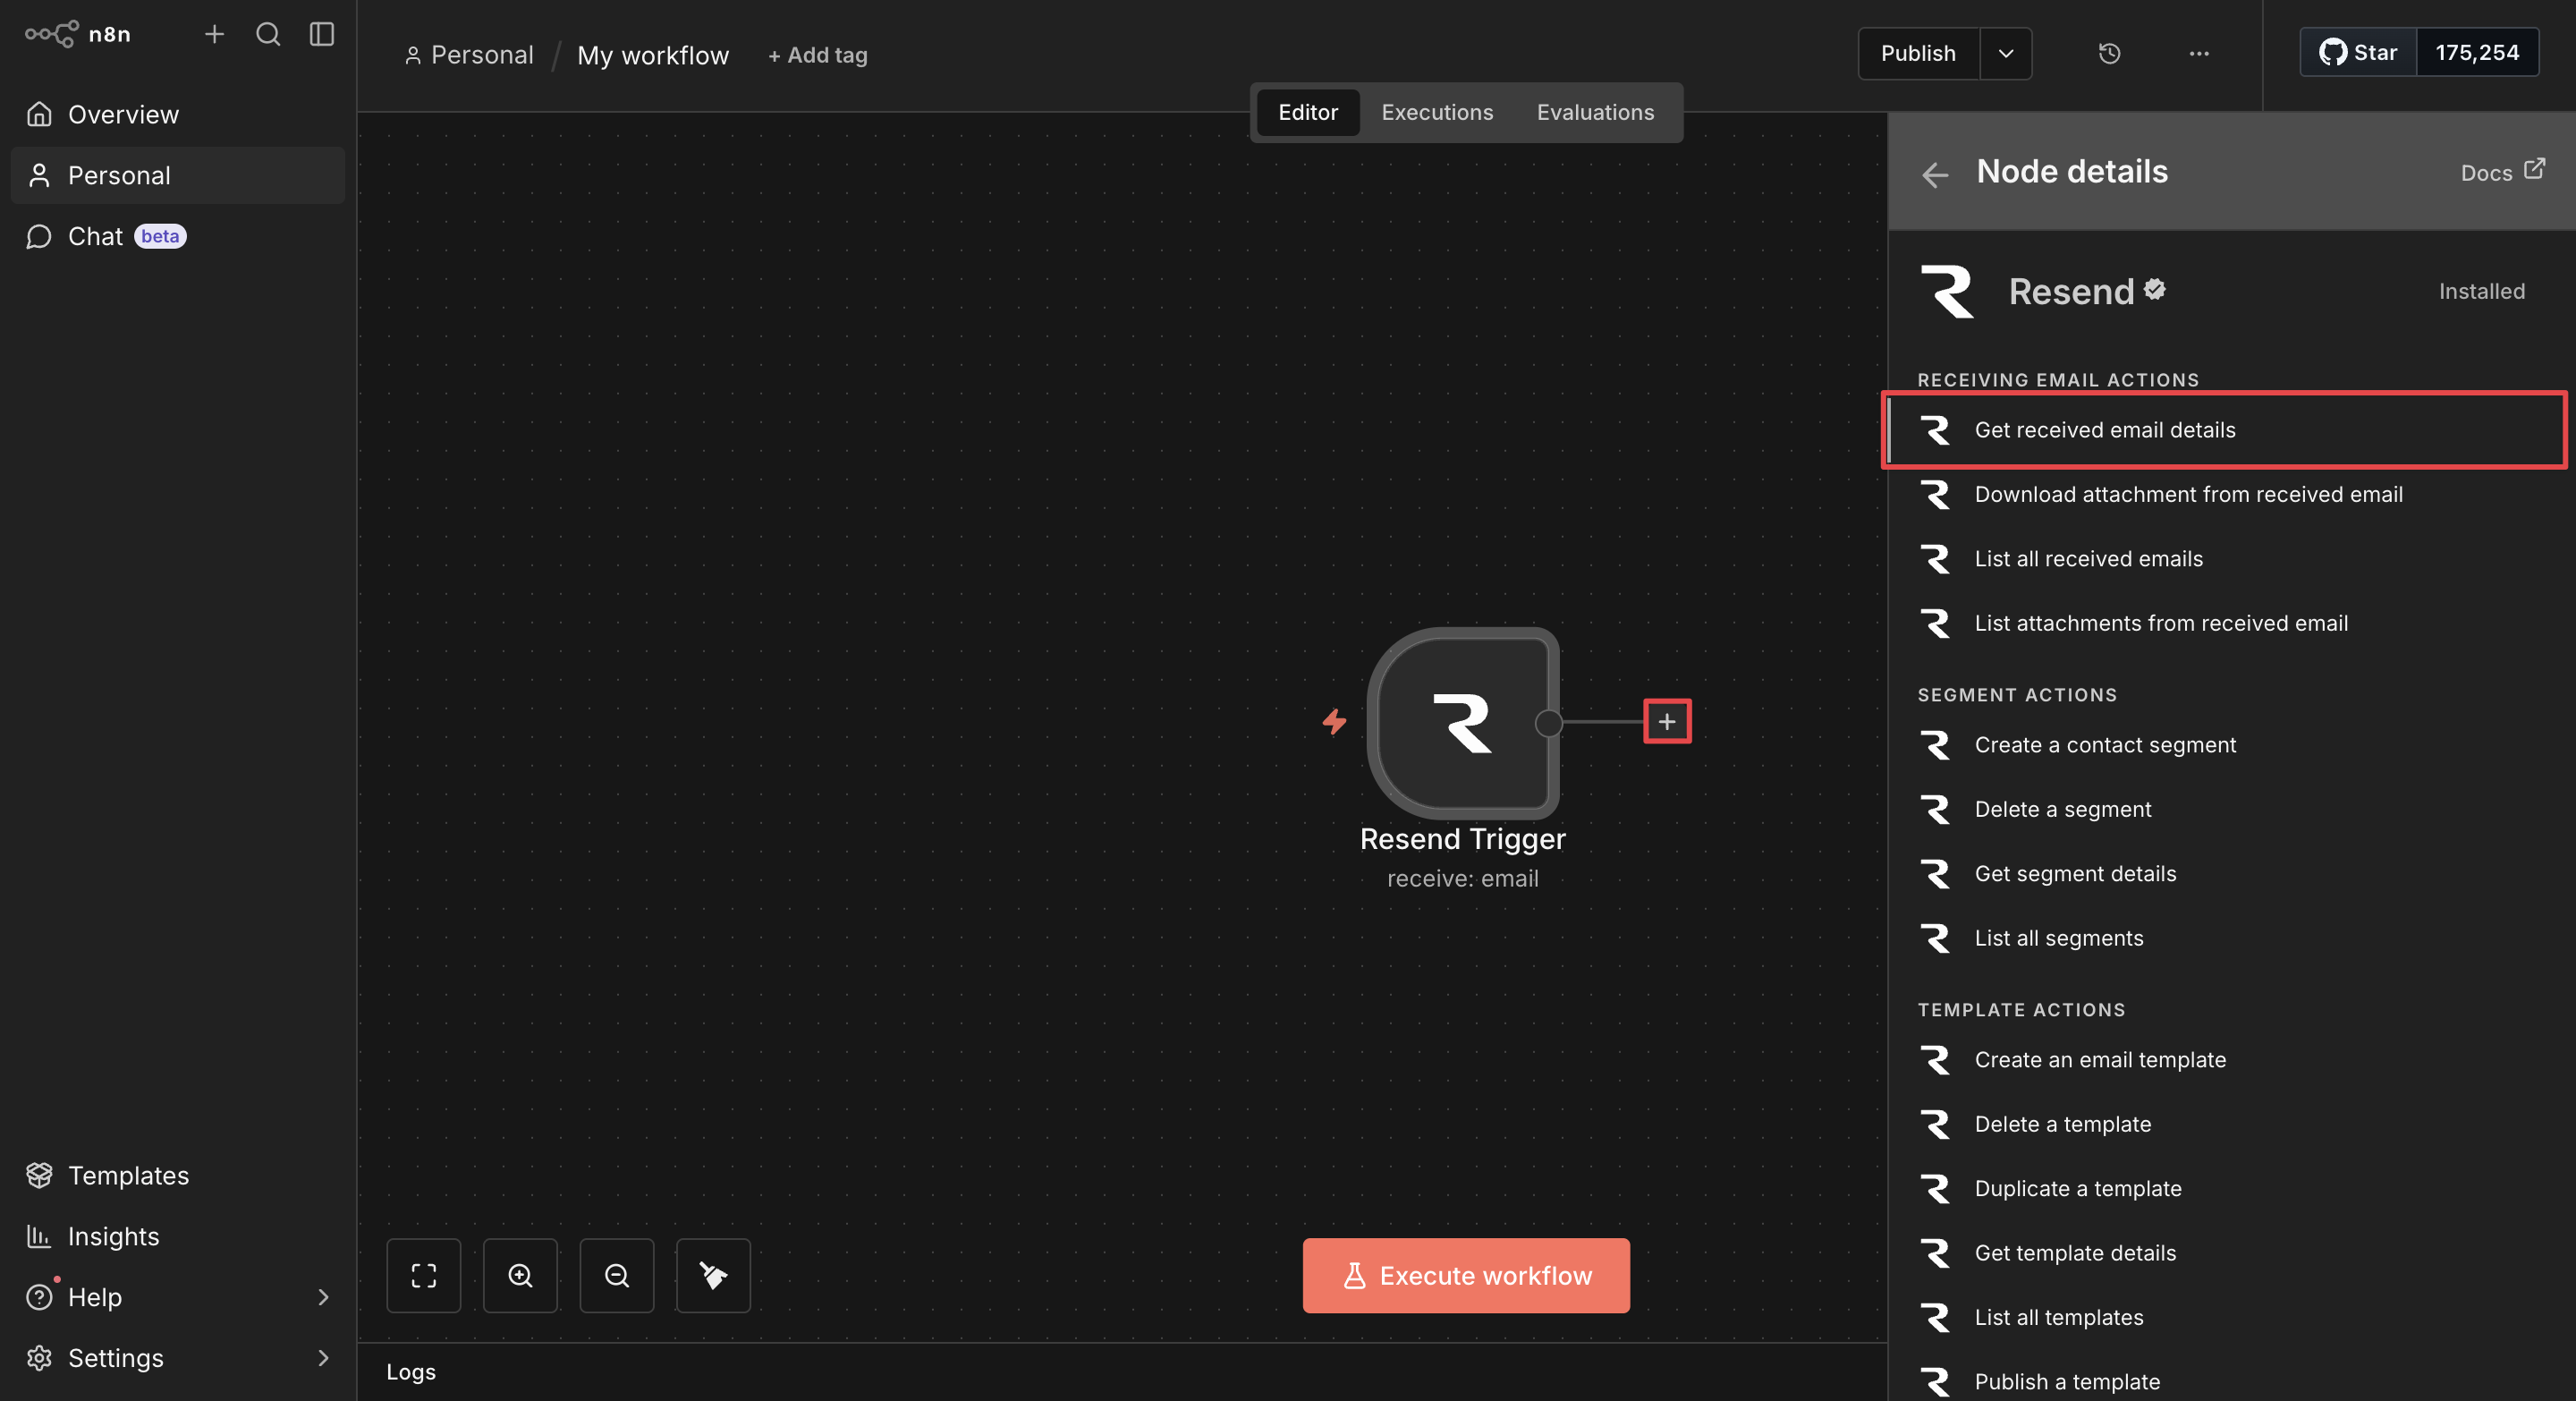
Set the parameters as follows:
- Credential: Select your Resend API credential.
- Resource: Select Receiving Email.
- Operation: Select Get.
- Email: Select By ID from the dropdown, and enter
{{ $json.data.email_id }}in the field.
Node 3: Check allow list
Without access control, anyone who discovers the Jeeves address can interact with it. This node restricts access to a single primary address and any contacts they introduce by forwarding emails.
When the primary address forwards something, the original sender is automatically added to the allow list. This node checks anyone else who emails Jeeves directly against that list, and if they're not on it, silently ends the workflow without Jeeves sending a reply.
The list is stored in n8n's built-in static data store, which persists across workflow runs with no external service required.
Click +, search for Code, and select Code in JavaScript.
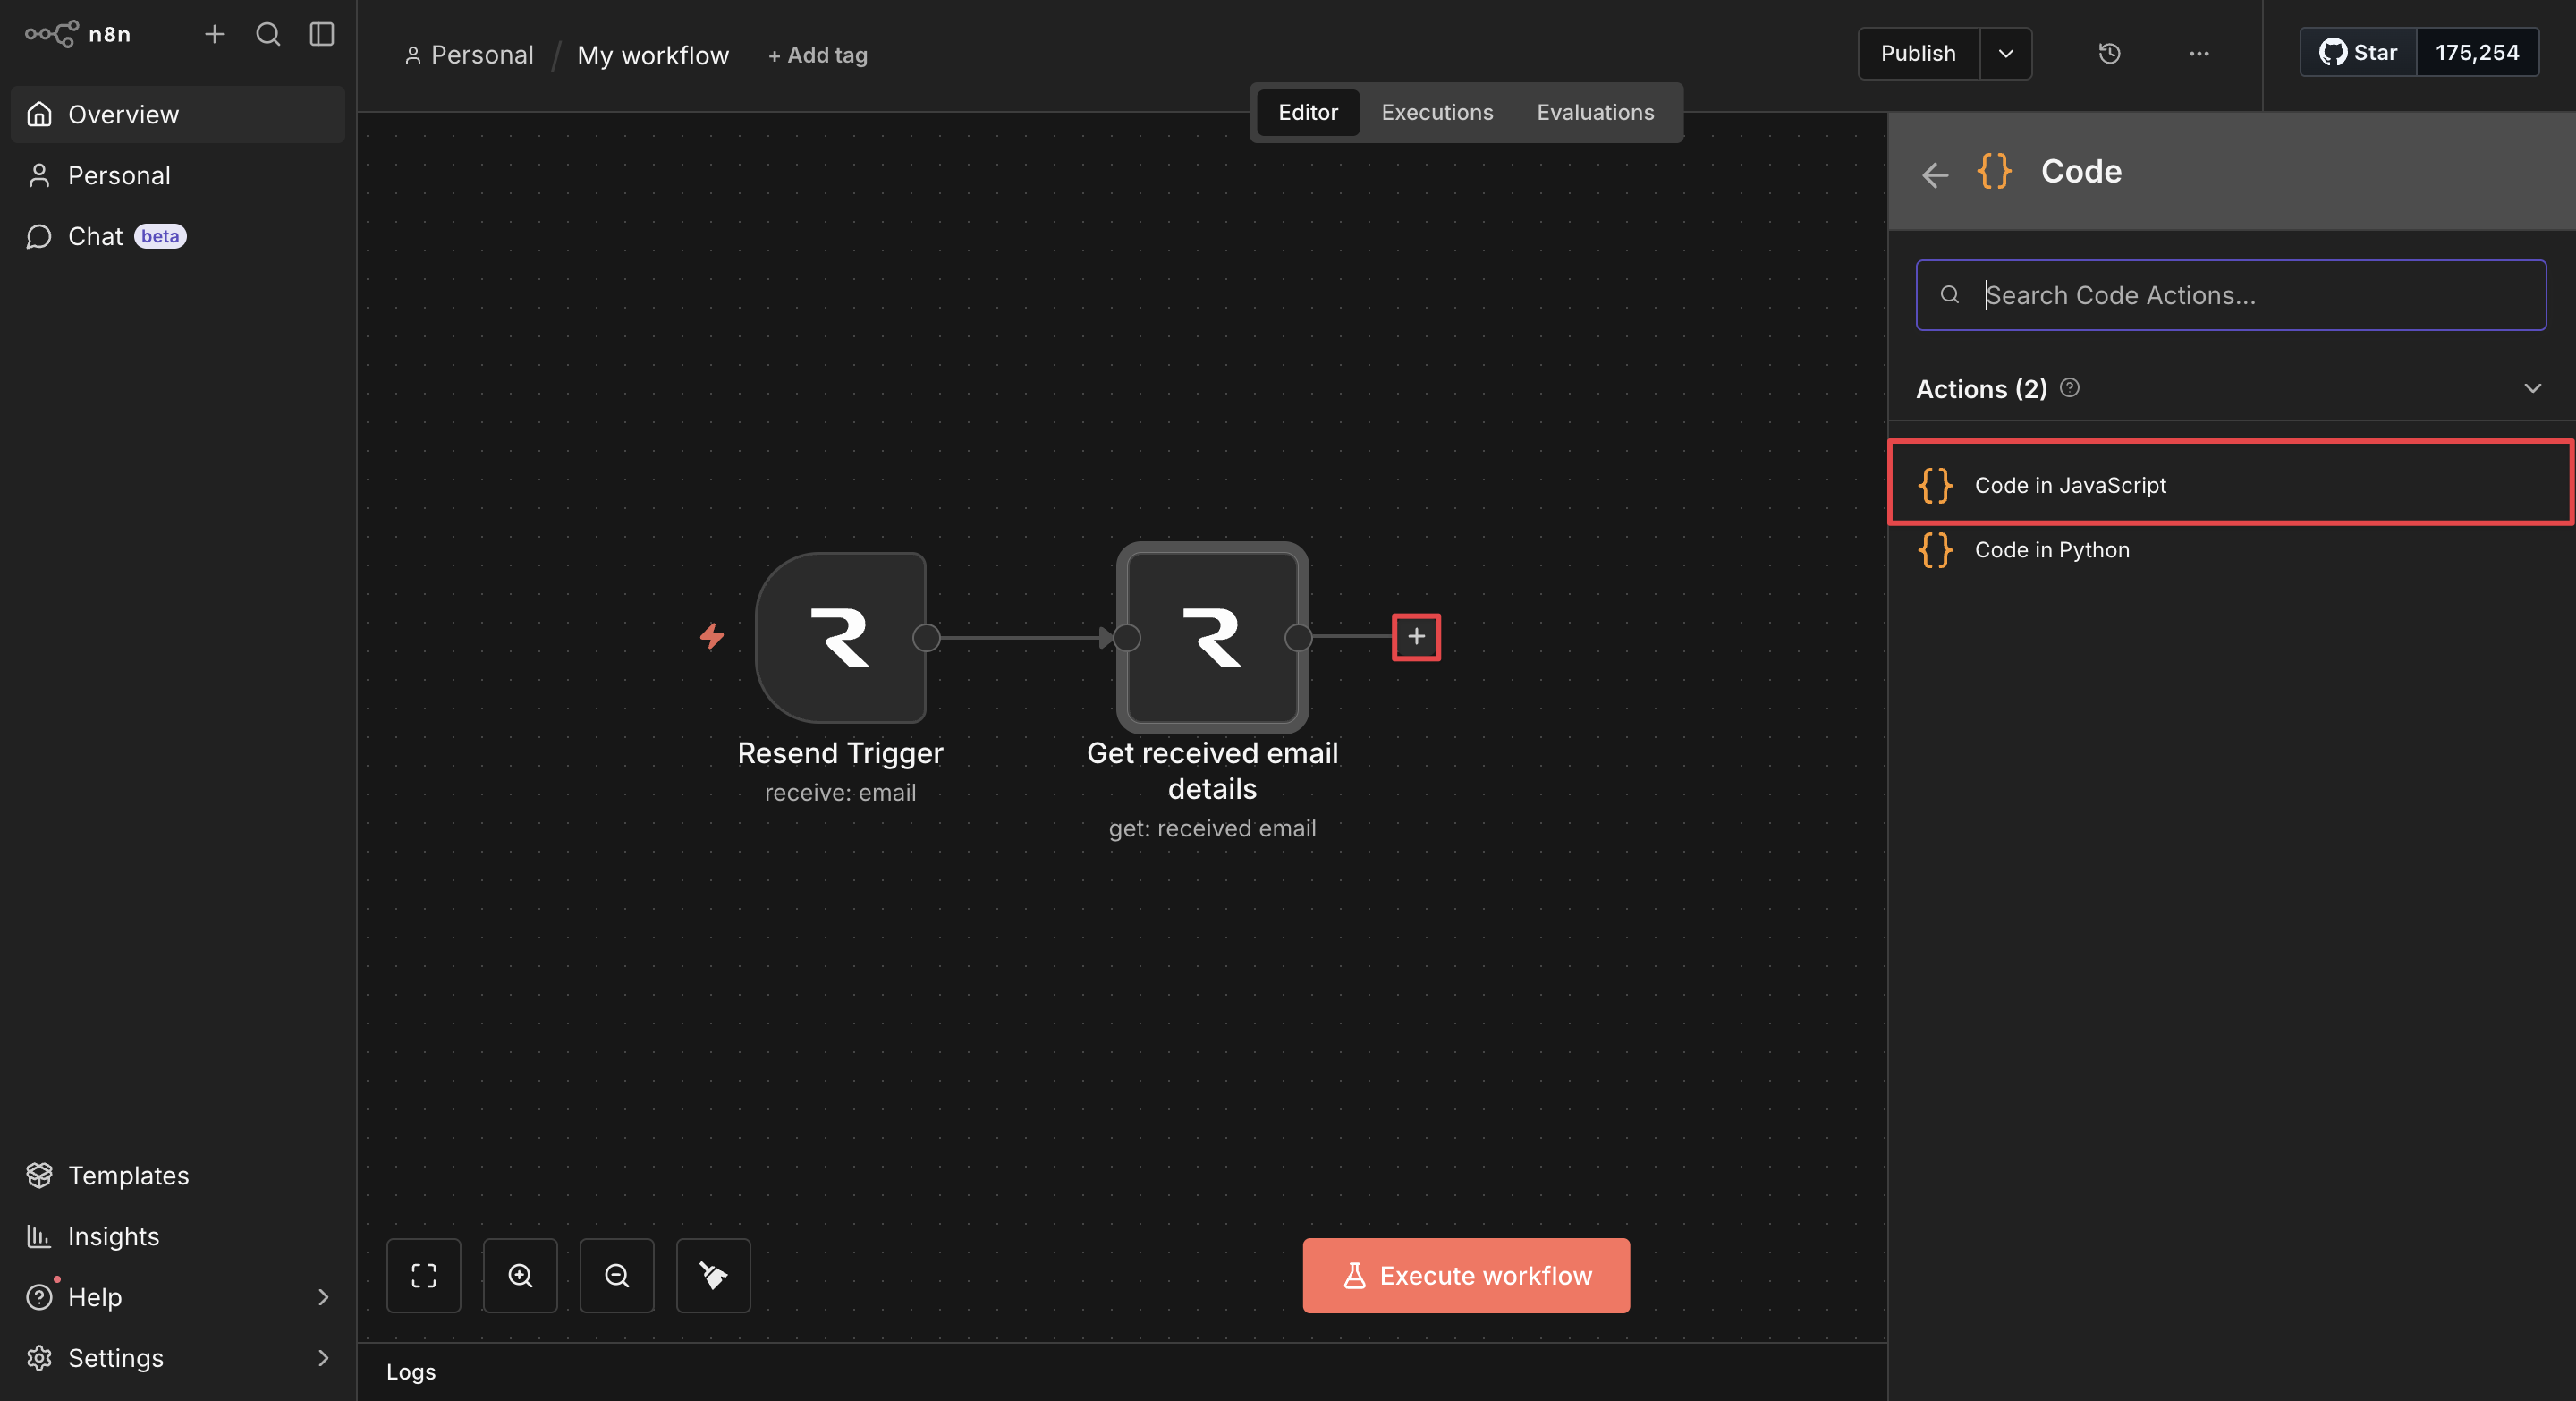
Paste the following code in the JavaScript field, replacing you@example.com with your primary email address:
const emailData = $input.all()[0].json;

const PRIMARY_EMAIL = "you@example.com"; // ← replace with your address

const staticData = $getWorkflowStaticData('global');
if (!staticData.allowList) {
  staticData.allowList = [PRIMARY_EMAIL.toLowerCase()];
}
const allowList = staticData.allowList;

const senderEmail = emailData.from.toLowerCase().trim();
const isFromPrimary = senderEmail === PRIMARY_EMAIL.toLowerCase();

const emailText = emailData.text || "";
const fromMatch = emailText.match(/From:\s*(.+?)\s*<(.+?)>/i);
const originalSenderEmail = fromMatch ? fromMatch[2].trim().toLowerCase() : null;

// If the primary address is forwarding, add the original sender to the list
if (isFromPrimary && originalSenderEmail && !allowList.includes(originalSenderEmail)) {
  allowList.push(originalSenderEmail);
  staticData.allowList = allowList;
}

const isAuthorised = isFromPrimary || allowList.includes(senderEmail);

return {
  json: {
    ...emailData,
    senderEmail,
    isFromPrimary,
    originalSenderEmail,
    isAuthorised
  }
};
Node 4: Is authorized?
Click + and search for If. Select the If node and name it Is authorized?.
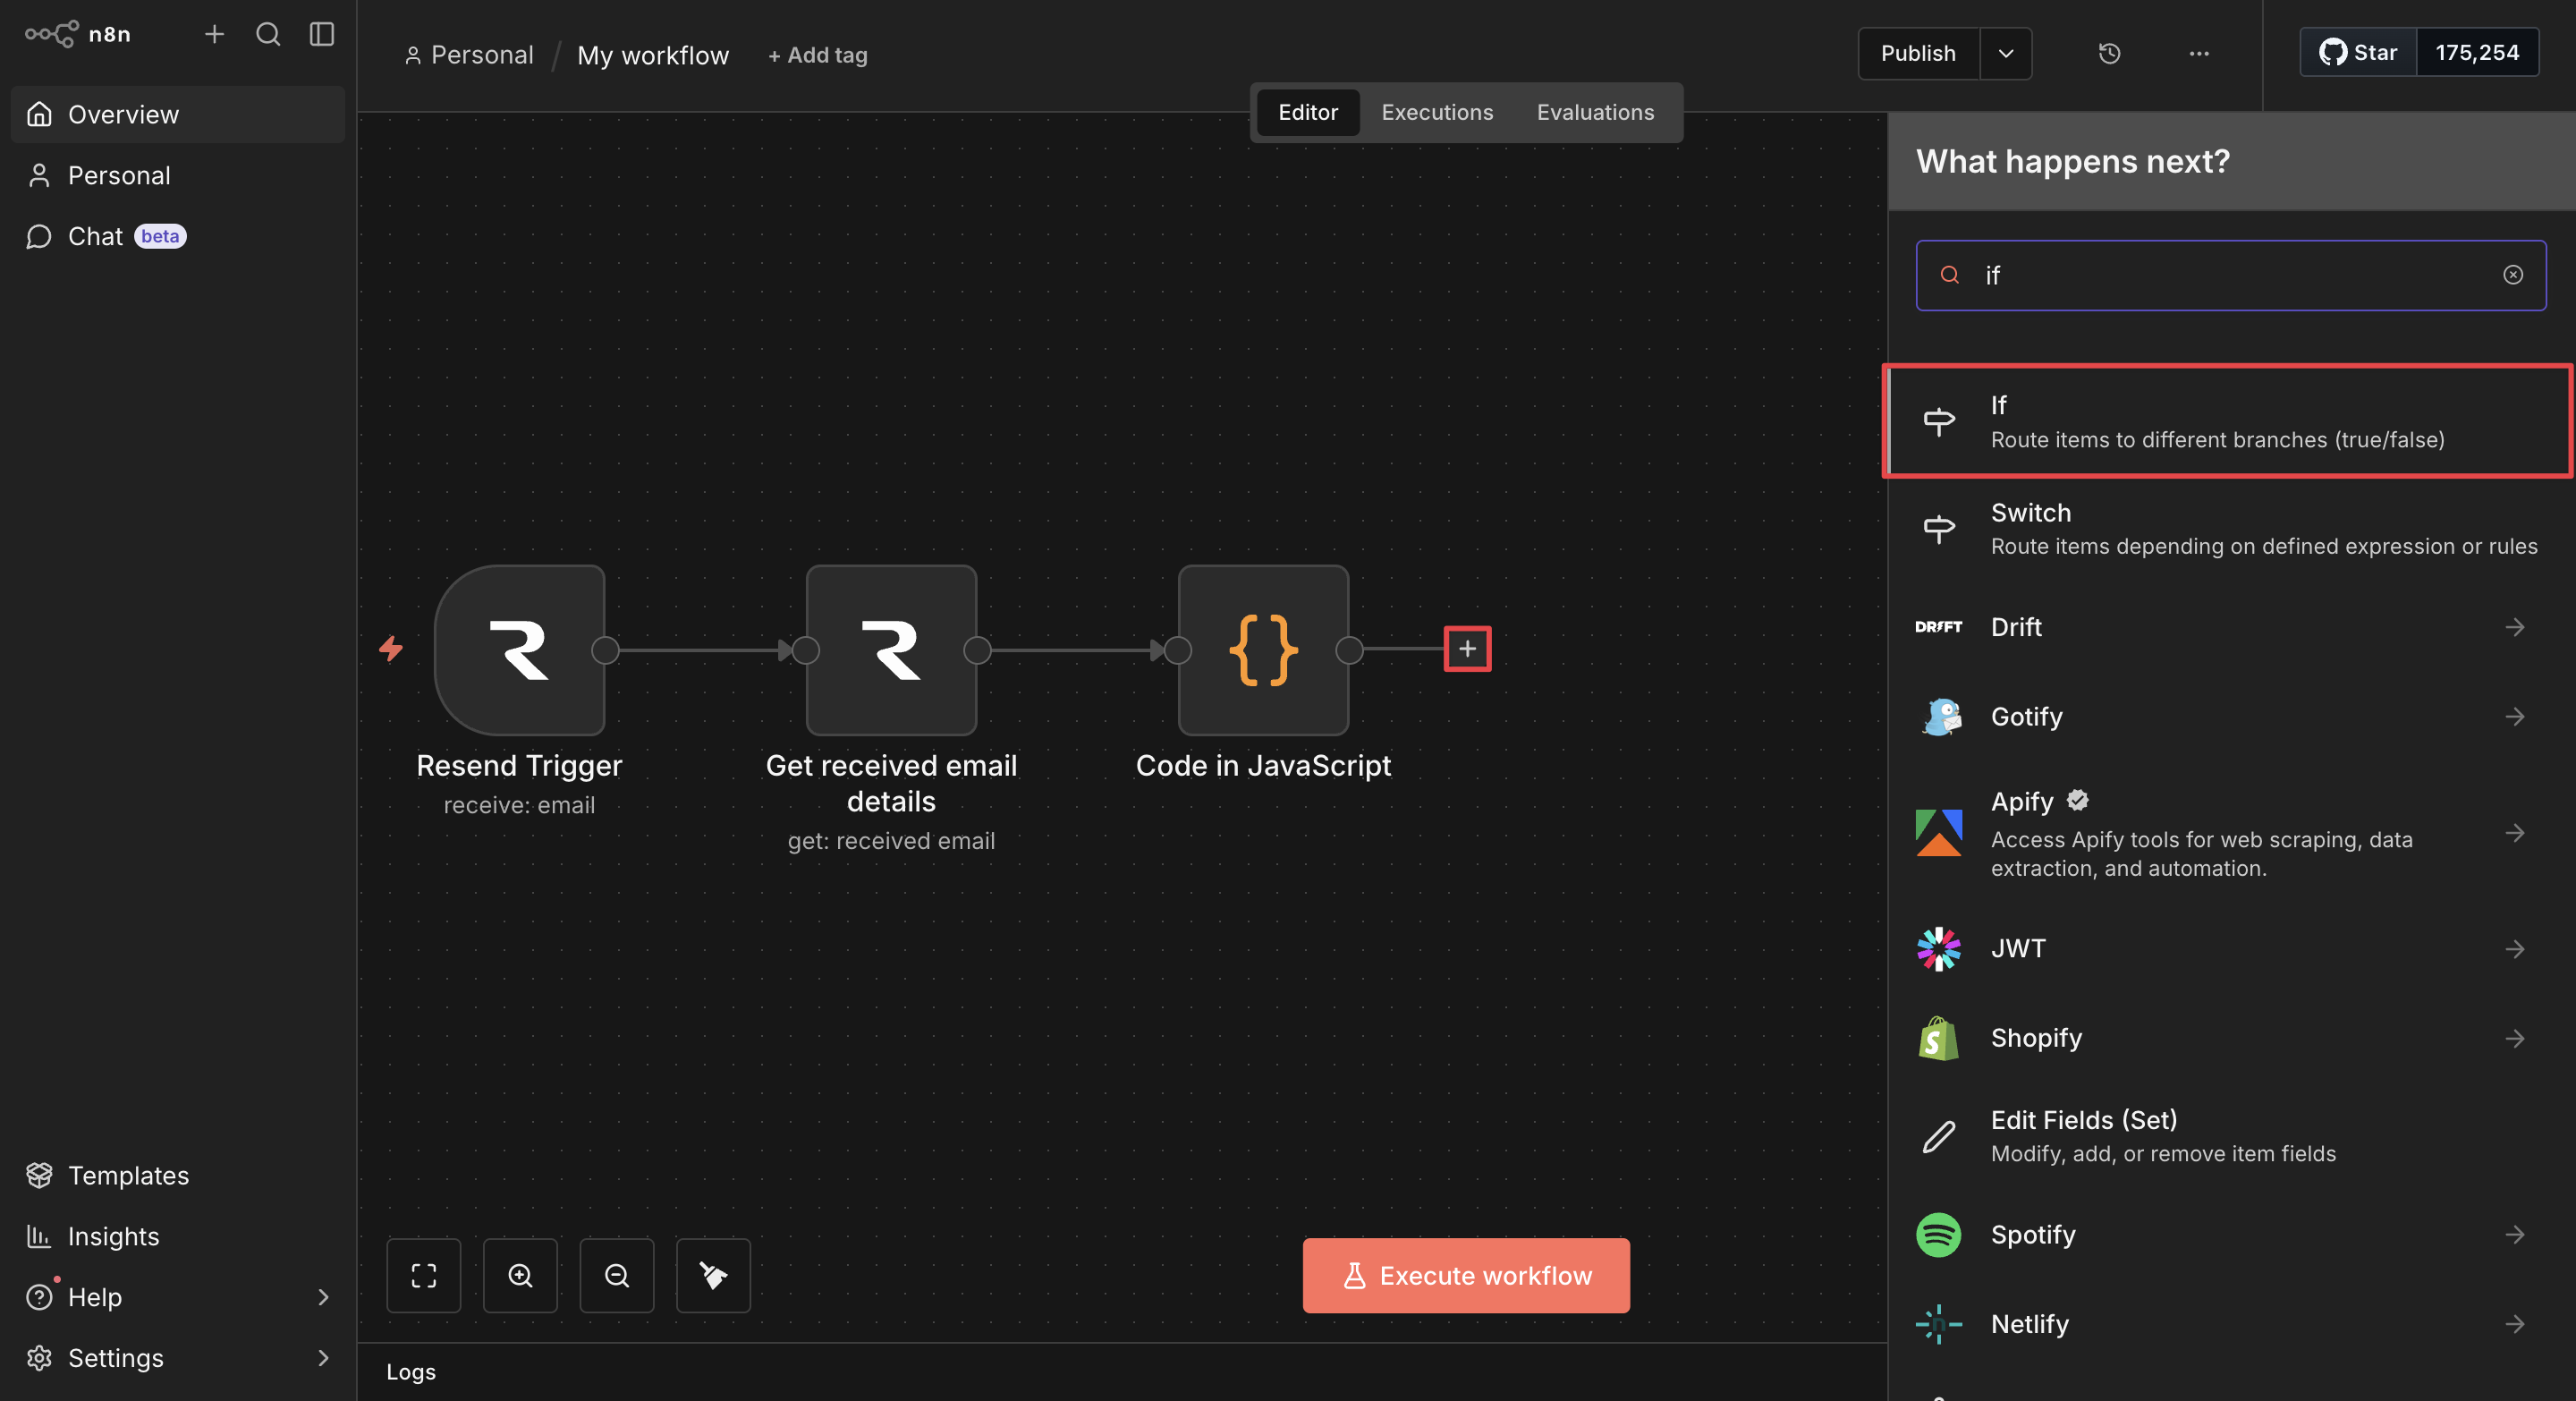
Add a condition with the following configuration:
- Value1: Enter
{{ $json.isAuthorised.toString() }}. - Operator: Select is equal to.
- Value2: Enter
true.
Click the toggle switch to activate Convert types where required.
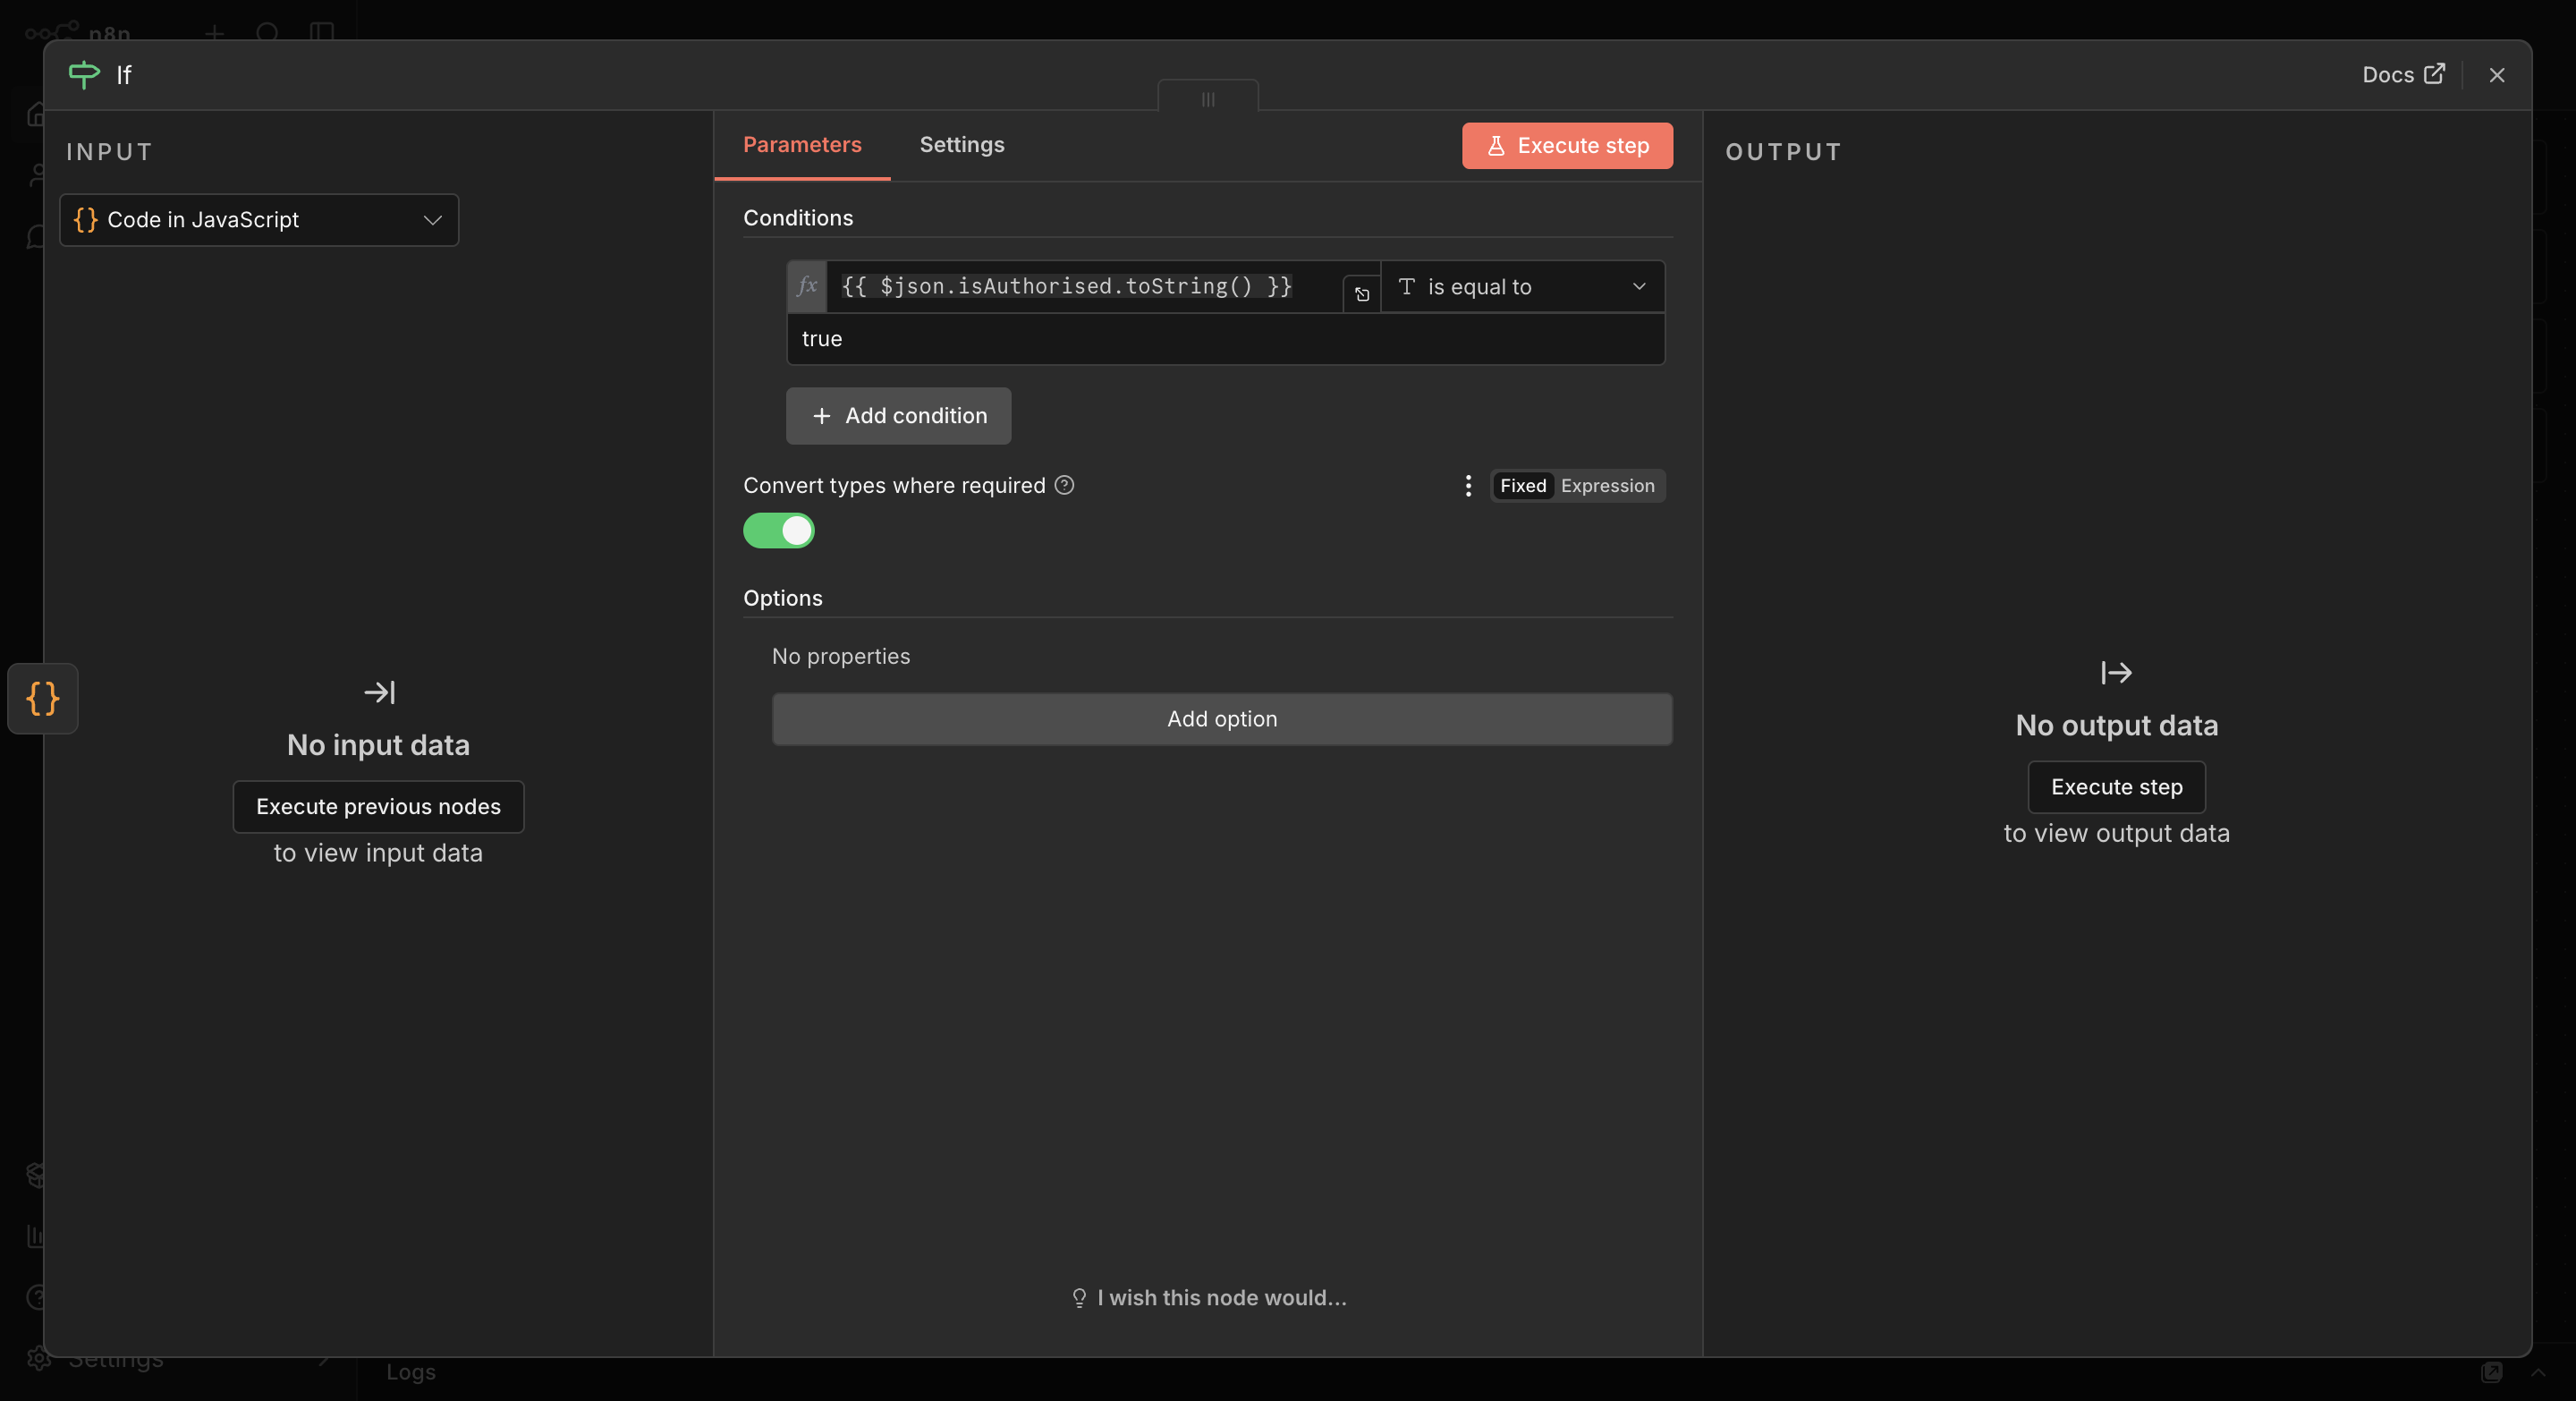
Connect the true output to Node 5 (Parse forwarded email). Leave the false output unconnected, so that the workflow ends silently for anyone not on the allow list.
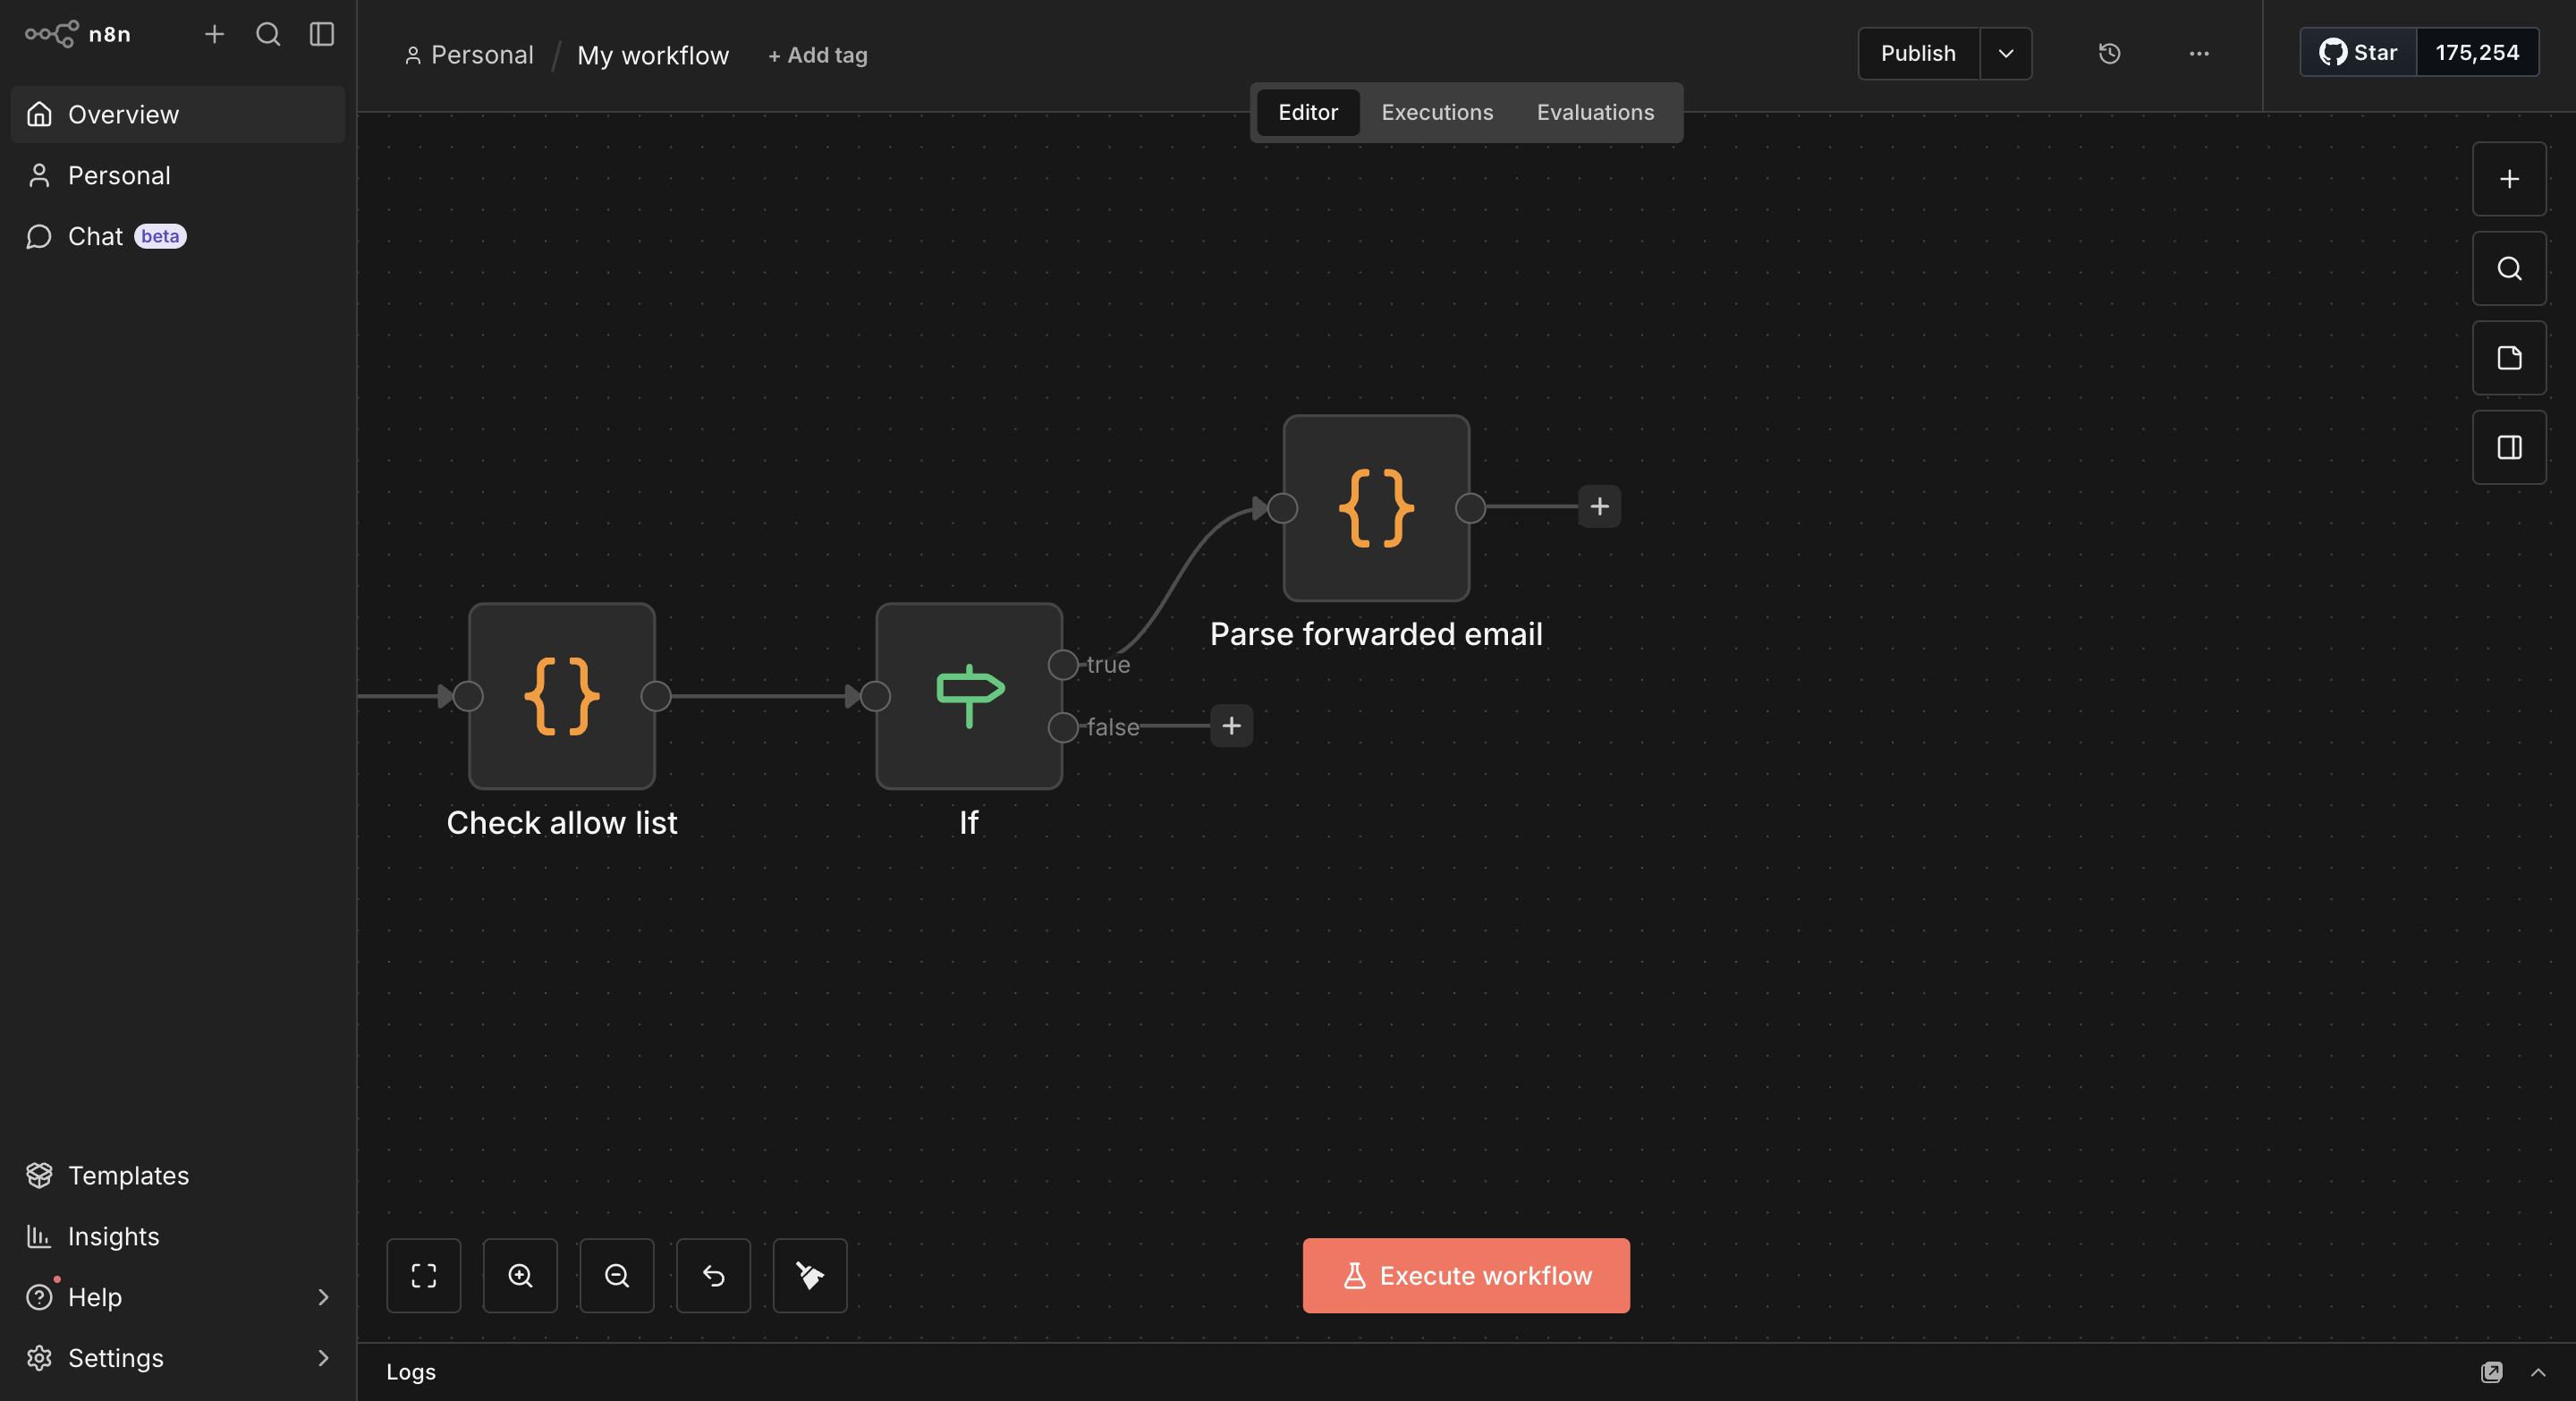
Node 5: Parse forwarded email
This Code node extracts the original sender and message from the forwarded email body, then formats the data as a Letta API request.
Click + and search for Code. Select Code, then Code in JavaScript, and paste the following code in the JavaScript field:
const emailData = $input.all()[0].json;

const forwarderEmail = emailData.from;
const forwarderName = emailData.from.match(/"([^"]+)"/)?.[1] || forwarderEmail;
const rawSubject = emailData.subject;
const emailText = emailData.text;

// Strip "Fwd:" or "FW:" prefix from subject
const originalSubject = rawSubject.replace(/^(Fwd:|FW:)\s*/i, '').trim();

// Extract original sender from forwarded message body
const fromMatch = emailText.match(/From:\s*(.+?)\s*<(.+?)>/i);
const originalSenderName = fromMatch ? fromMatch[1].trim() : null;
const originalSenderEmail = fromMatch ? fromMatch[2].trim() : null;

// Extract the original message content
const contentMatch = emailText.match(/Date:.*?\n\n([\s\S]+)/i);
const originalMessage = contentMatch ? contentMatch[1].trim() : emailText;

const messageText = `I received a forwarded email from ${forwarderName} (${forwarderEmail}). The original email was from ${originalSenderName} <${originalSenderEmail}> with subject '${originalSubject}'. Original message: ${originalMessage}. Please draft a professional reply to ${originalSenderEmail}.`;

return {
  json: {
    messages: [{ role: "user", content: messageText }],
    forwarderEmail,
    originalSenderEmail,
    originalSubject
  }
};
The code passes forwarderEmail and originalSenderEmail through the output. Although Letta doesn't need these values, the Send Reply node at the end does, and data from intermediate nodes isn't available that far down the chain.
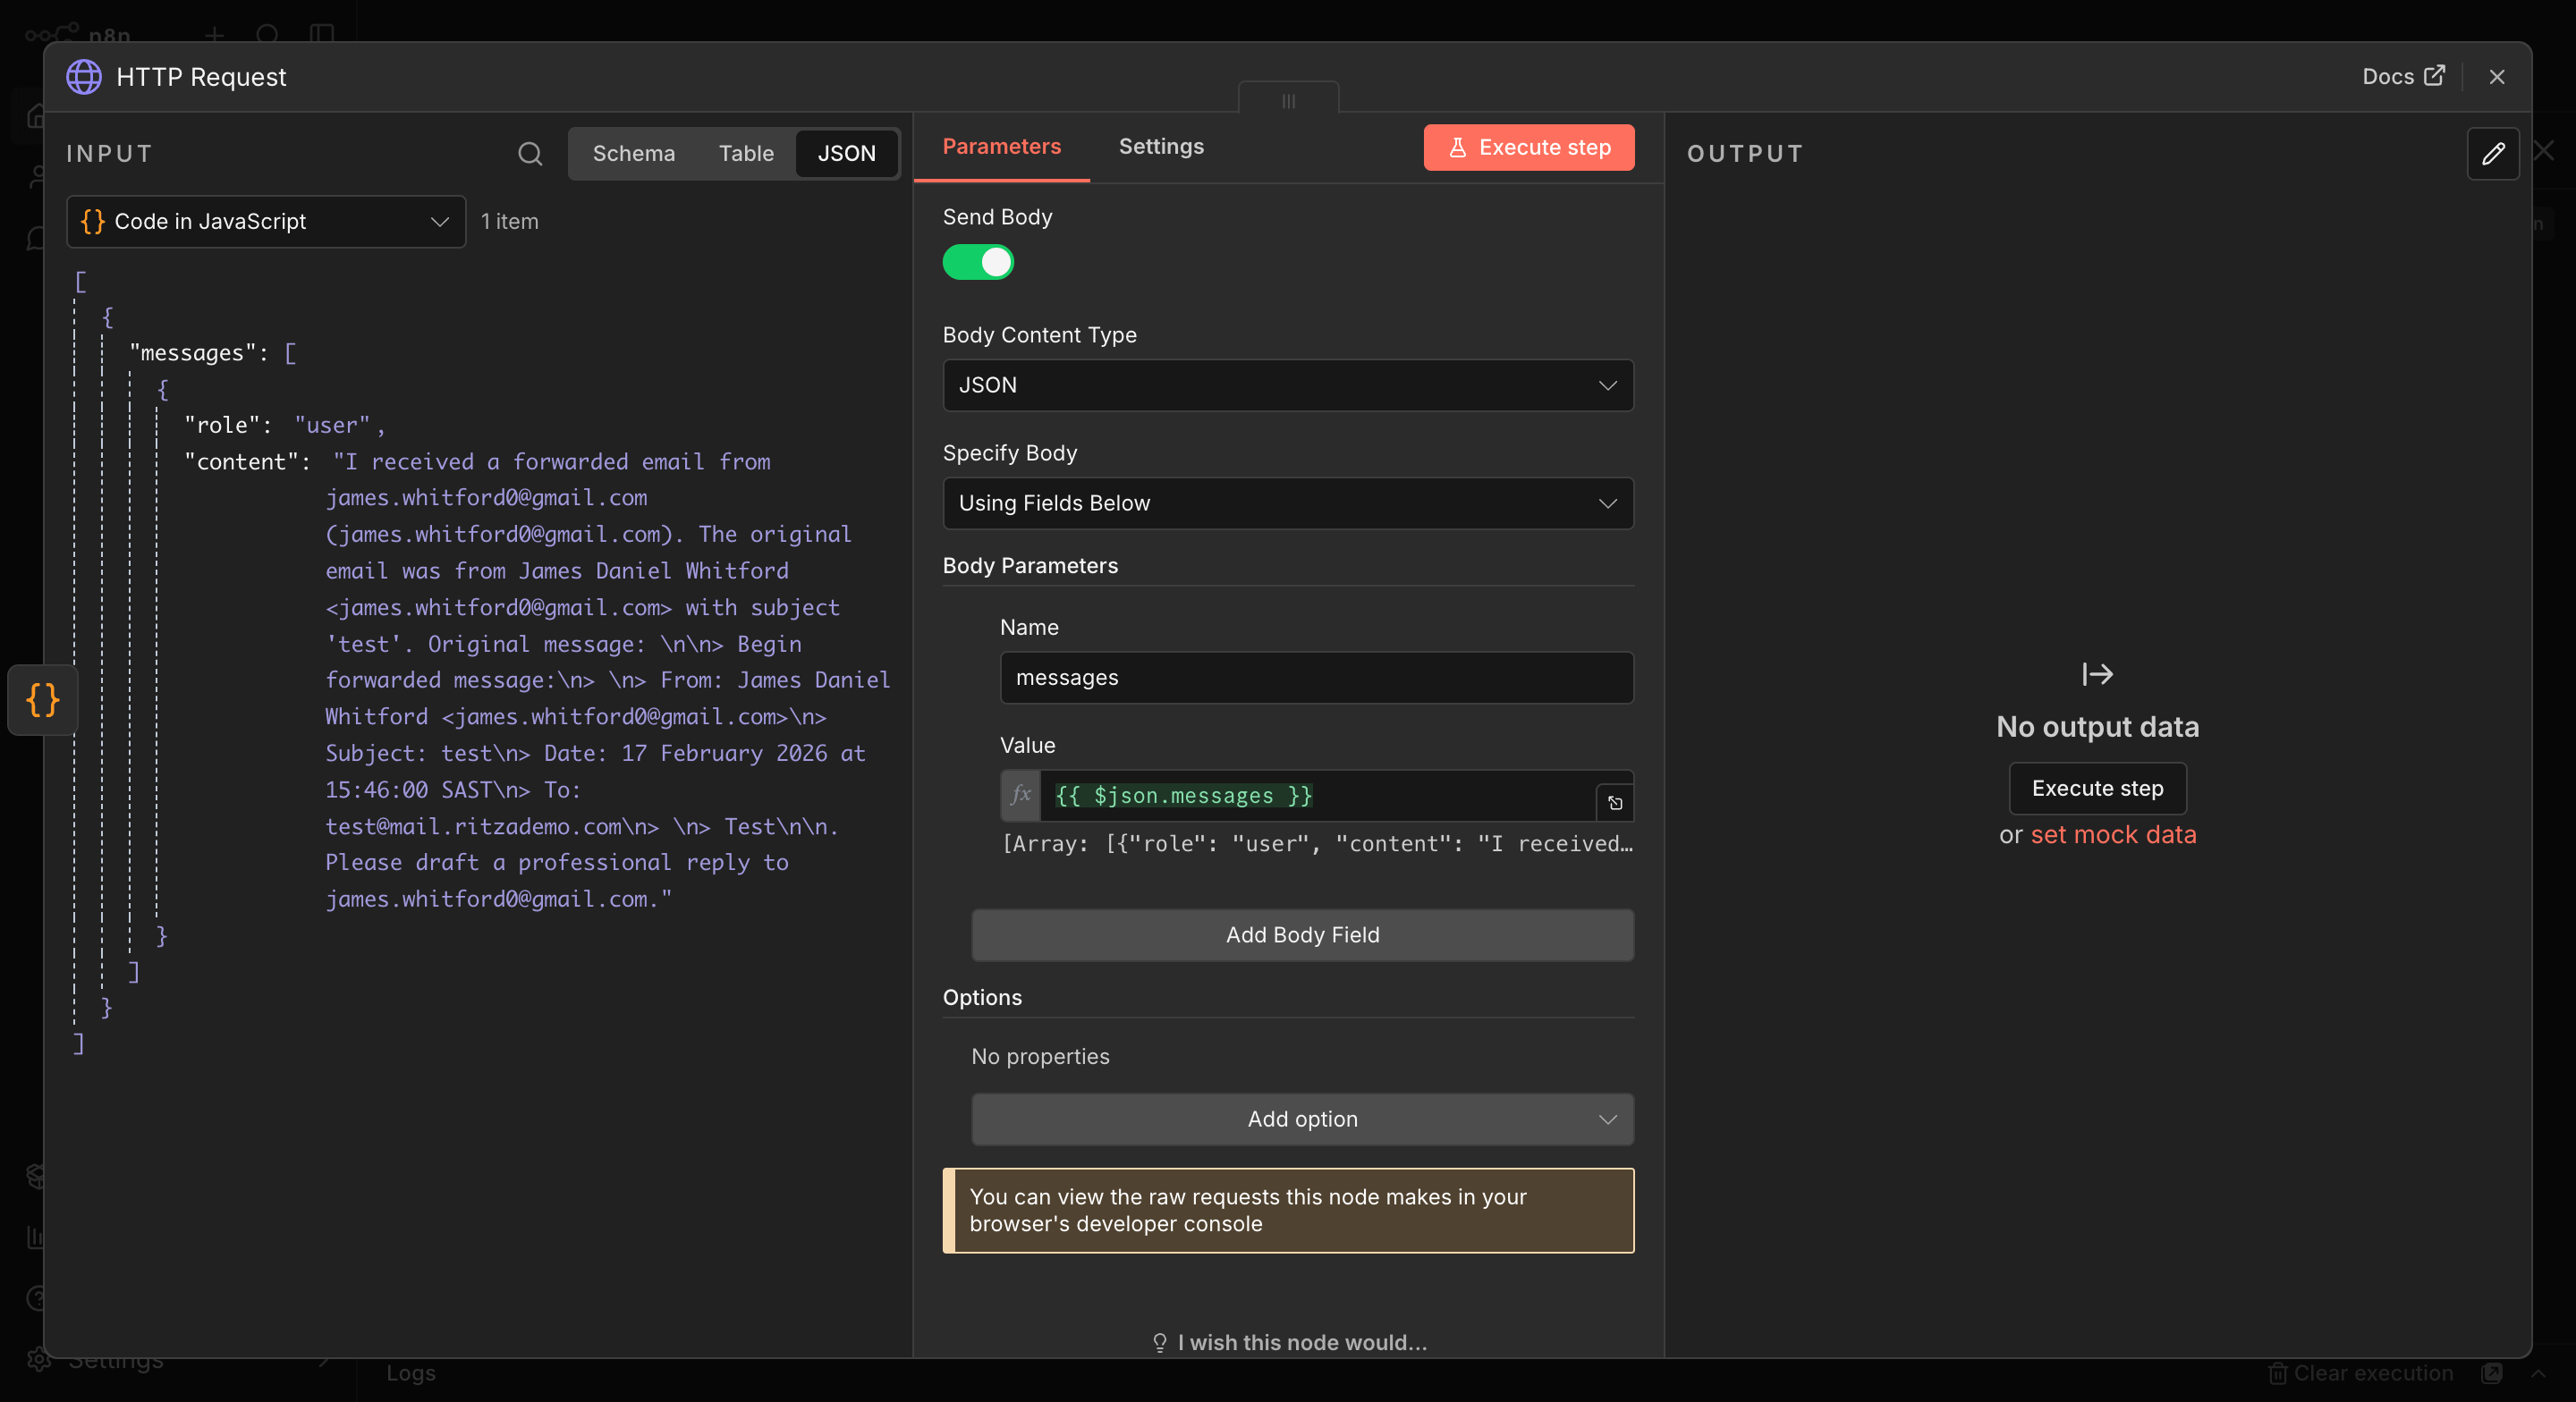
Node 6: Call Letta agent
Click + to add a new node, and search for HTTP Request.
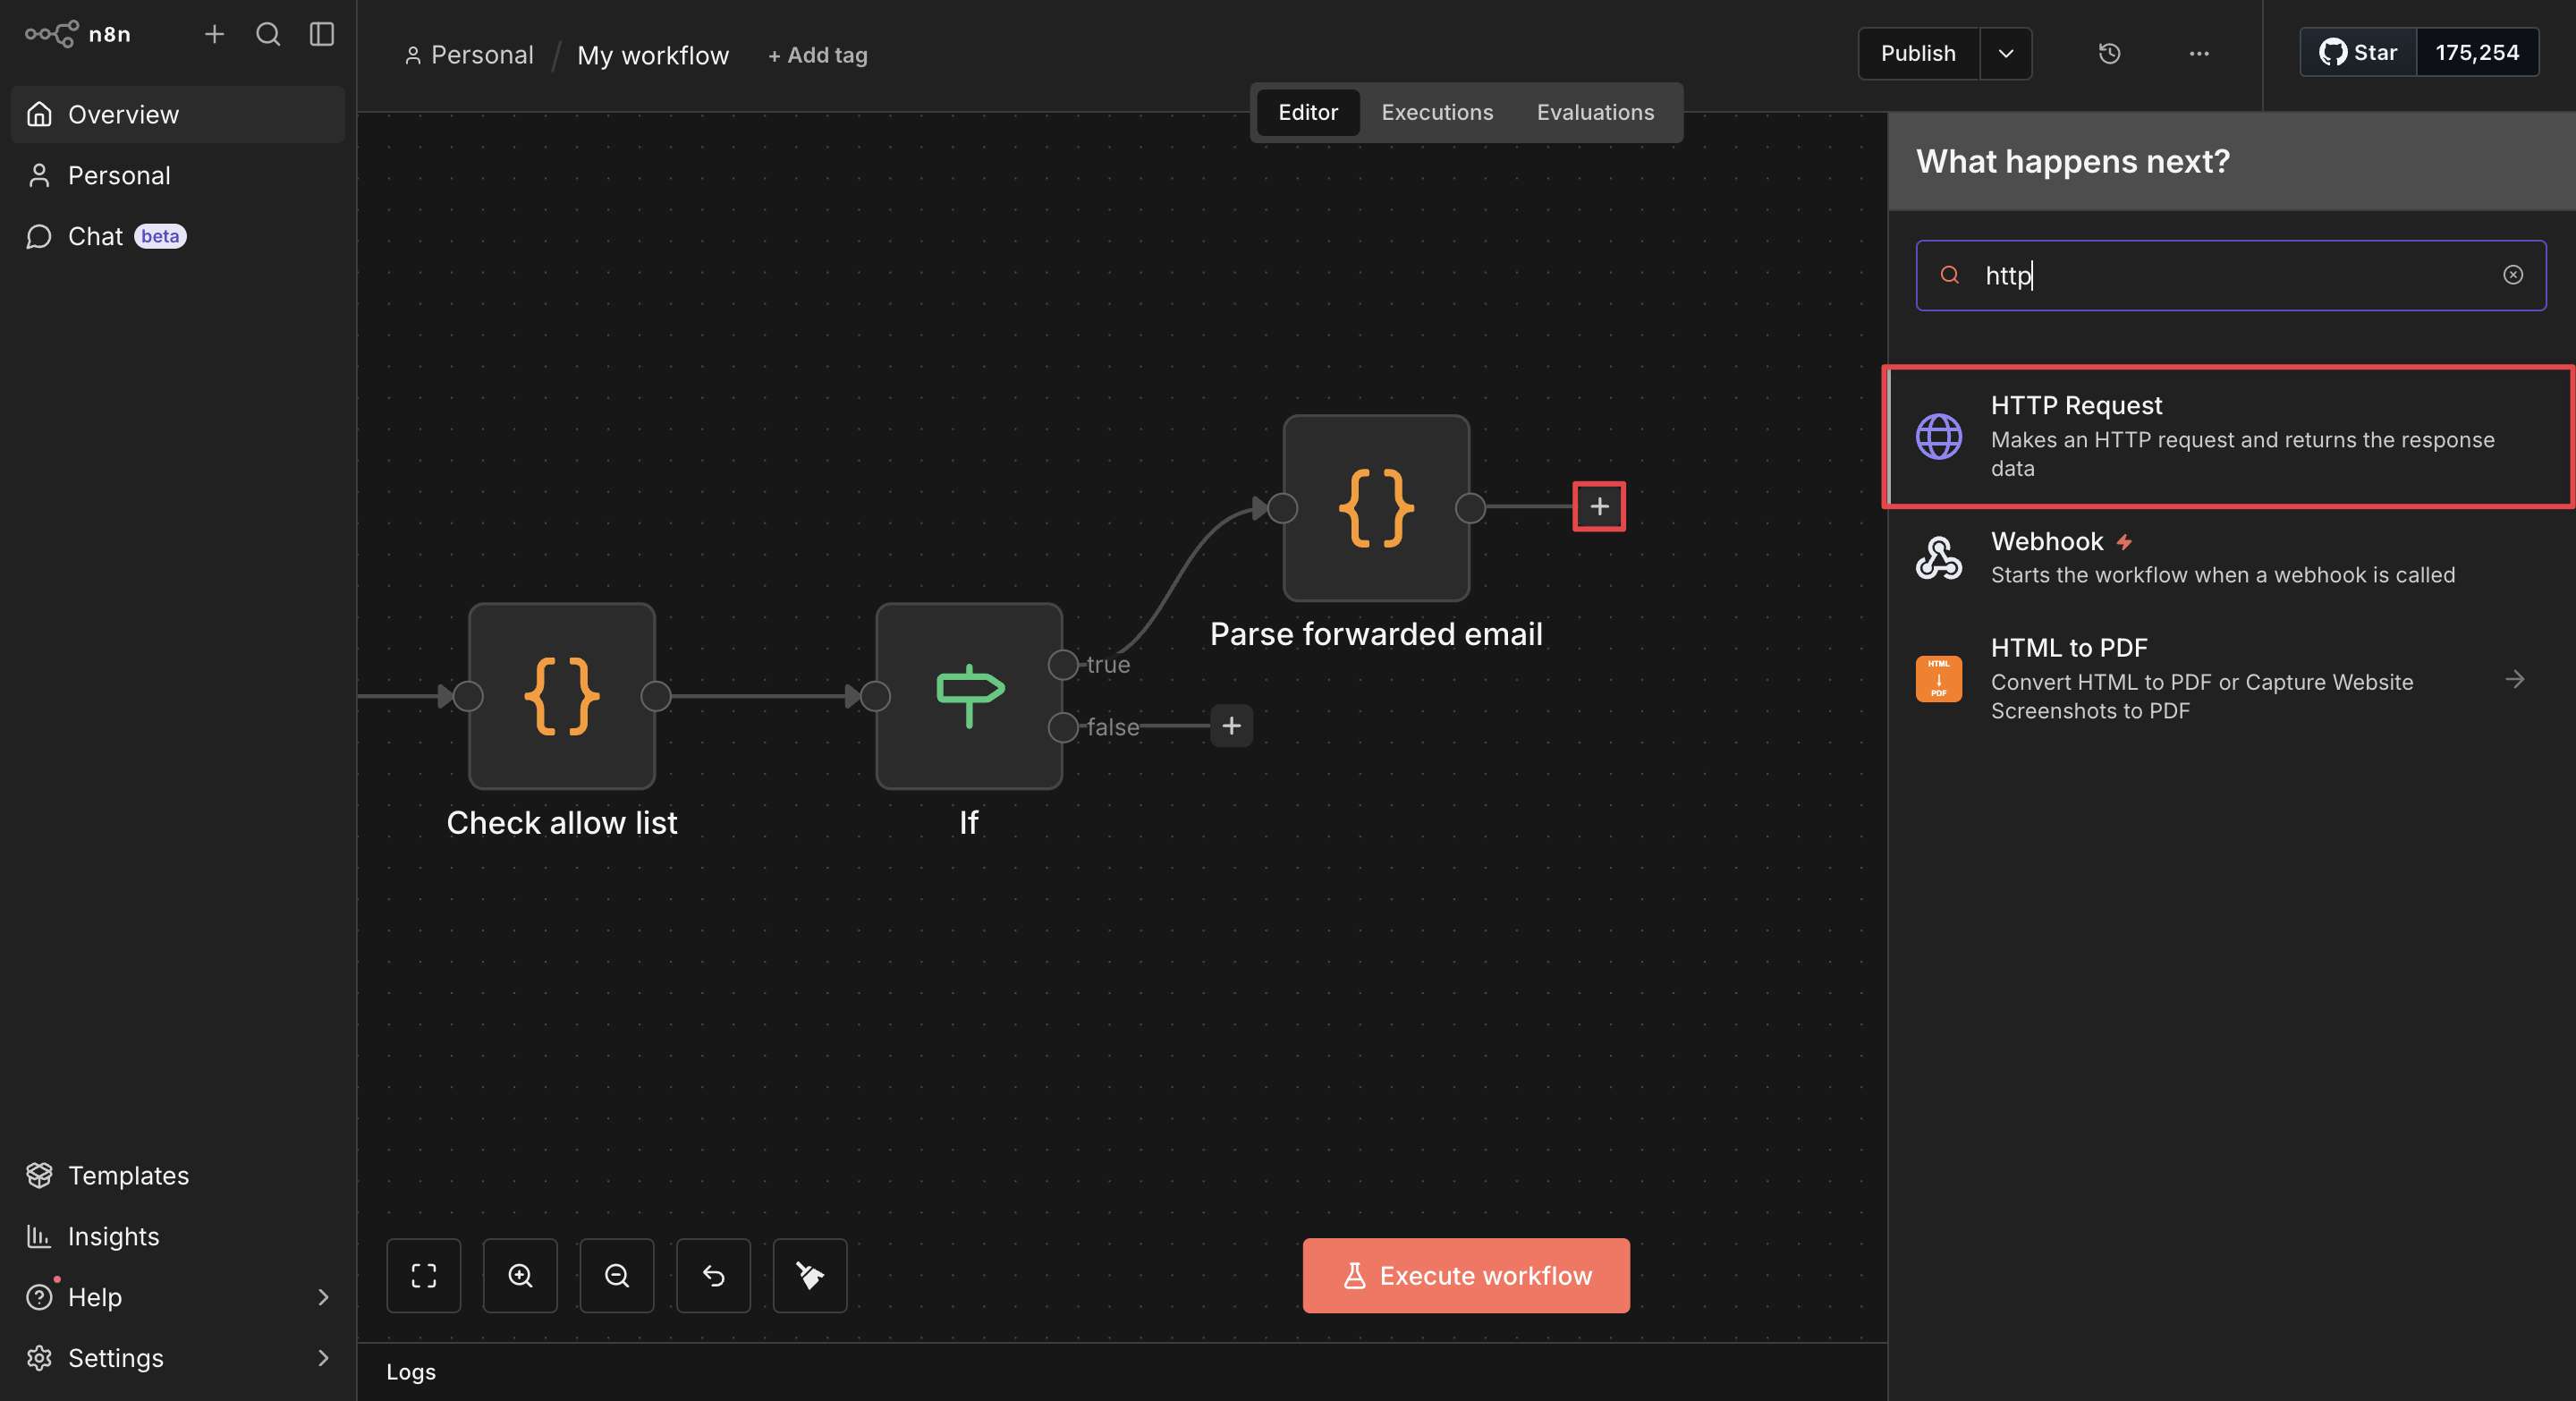
Set the parameters as follows:
- Method: Select POST.
- URL: Enter
https://api.letta.com/v1/agents/YOUR_AGENT_ID/messages. - Authentication: Select Header Auth and select your Letta API credential.
- Send Body: Toggle on.
- Body Content Type: Select JSON.
- Specify Body: Select Using Fields Below.
- Add a field with the Name
messagesand a Value of{{ $json.messages }}.
Select Using Fields Below rather than Using JSON for the body. Pasting a JSON string with n8n expressions inside it causes a validation error; mapping individual fields avoids this.
Node 7: Extract Letta response
Letta returns an array of messages, including internal reasoning steps. This node finds the actual drafted email among them and pulls out the to, subject, and emailBody.
Click +, search for Code, and select Code in JavaScript.
Paste the following in the JavaScript field:
const lettaResponse = $input.all()[0].json;

let emailContent = '';

for (const message of lettaResponse.messages) {
  if (message.message_type === 'assistant_message' && message.content) {
    if (message.content.includes('**To:**') || message.content.includes('**Subject:**')) {
      emailContent = message.content;
    }
  }
}

// Fall back to last assistant message if no formatted draft found
if (!emailContent) {
  const assistantMessages = lettaResponse.messages.filter(
    m => m.message_type === 'assistant_message' && m.content
  );
  if (assistantMessages.length > 0) {
    emailContent = assistantMessages[assistantMessages.length - 1].content;
  }
}

const emailMatch = emailContent.match(/---\s*([\s\S]*?)\s*---/);
const emailBody = emailMatch ? emailMatch[1].trim() : emailContent;

const toMatch = emailBody.match(/\*\*To:\*\*\s*(.+?)(?:\n|$)/);
const subjectMatch = emailBody.match(/\*\*Subject:\*\*\s*(.+?)(?:\n|$)/);
const bodyMatch = emailBody.match(/\*\*Subject:\*\*.*?\n\n([\s\S]+)/);
const messageBody = bodyMatch ? bodyMatch[1].trim() : emailBody;

return {
  json: {
    emailBody: messageBody,
    to: toMatch ? toMatch[1].trim() : null,
    subject: subjectMatch ? subjectMatch[1].trim() : null
  }
};
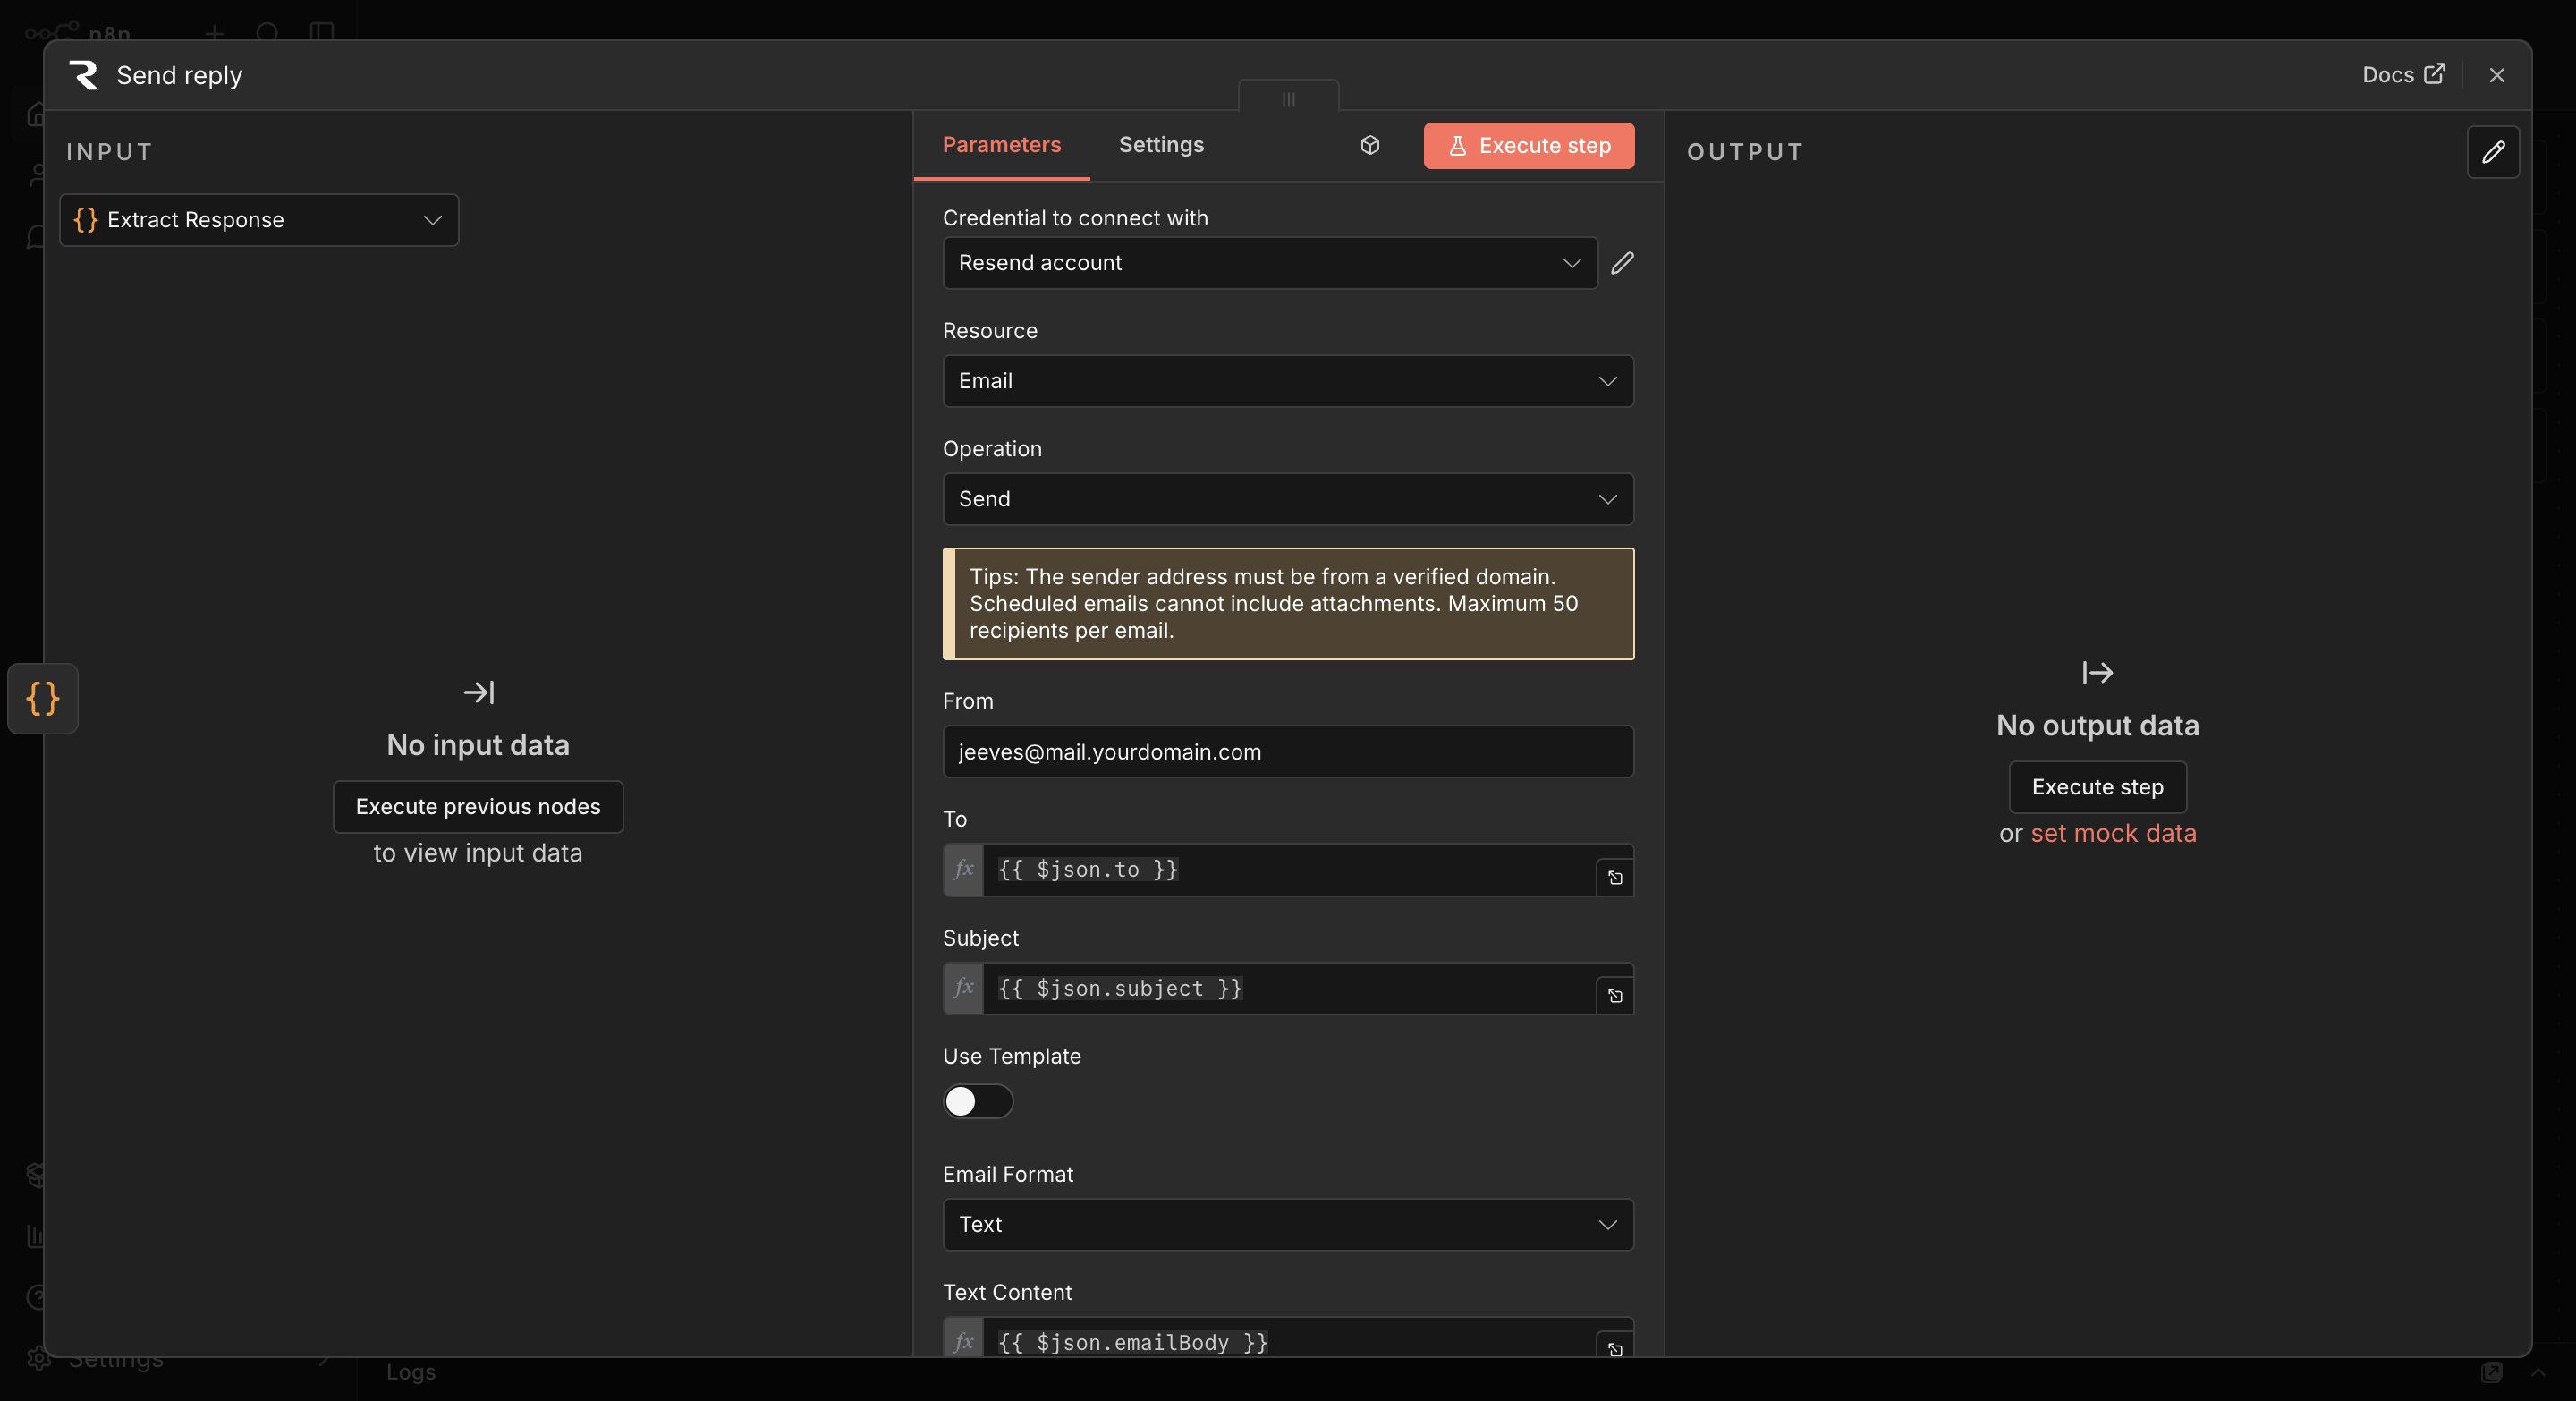
Node 8: Send reply
Click + and search for Resend. Select the Resend Send a new email action node.
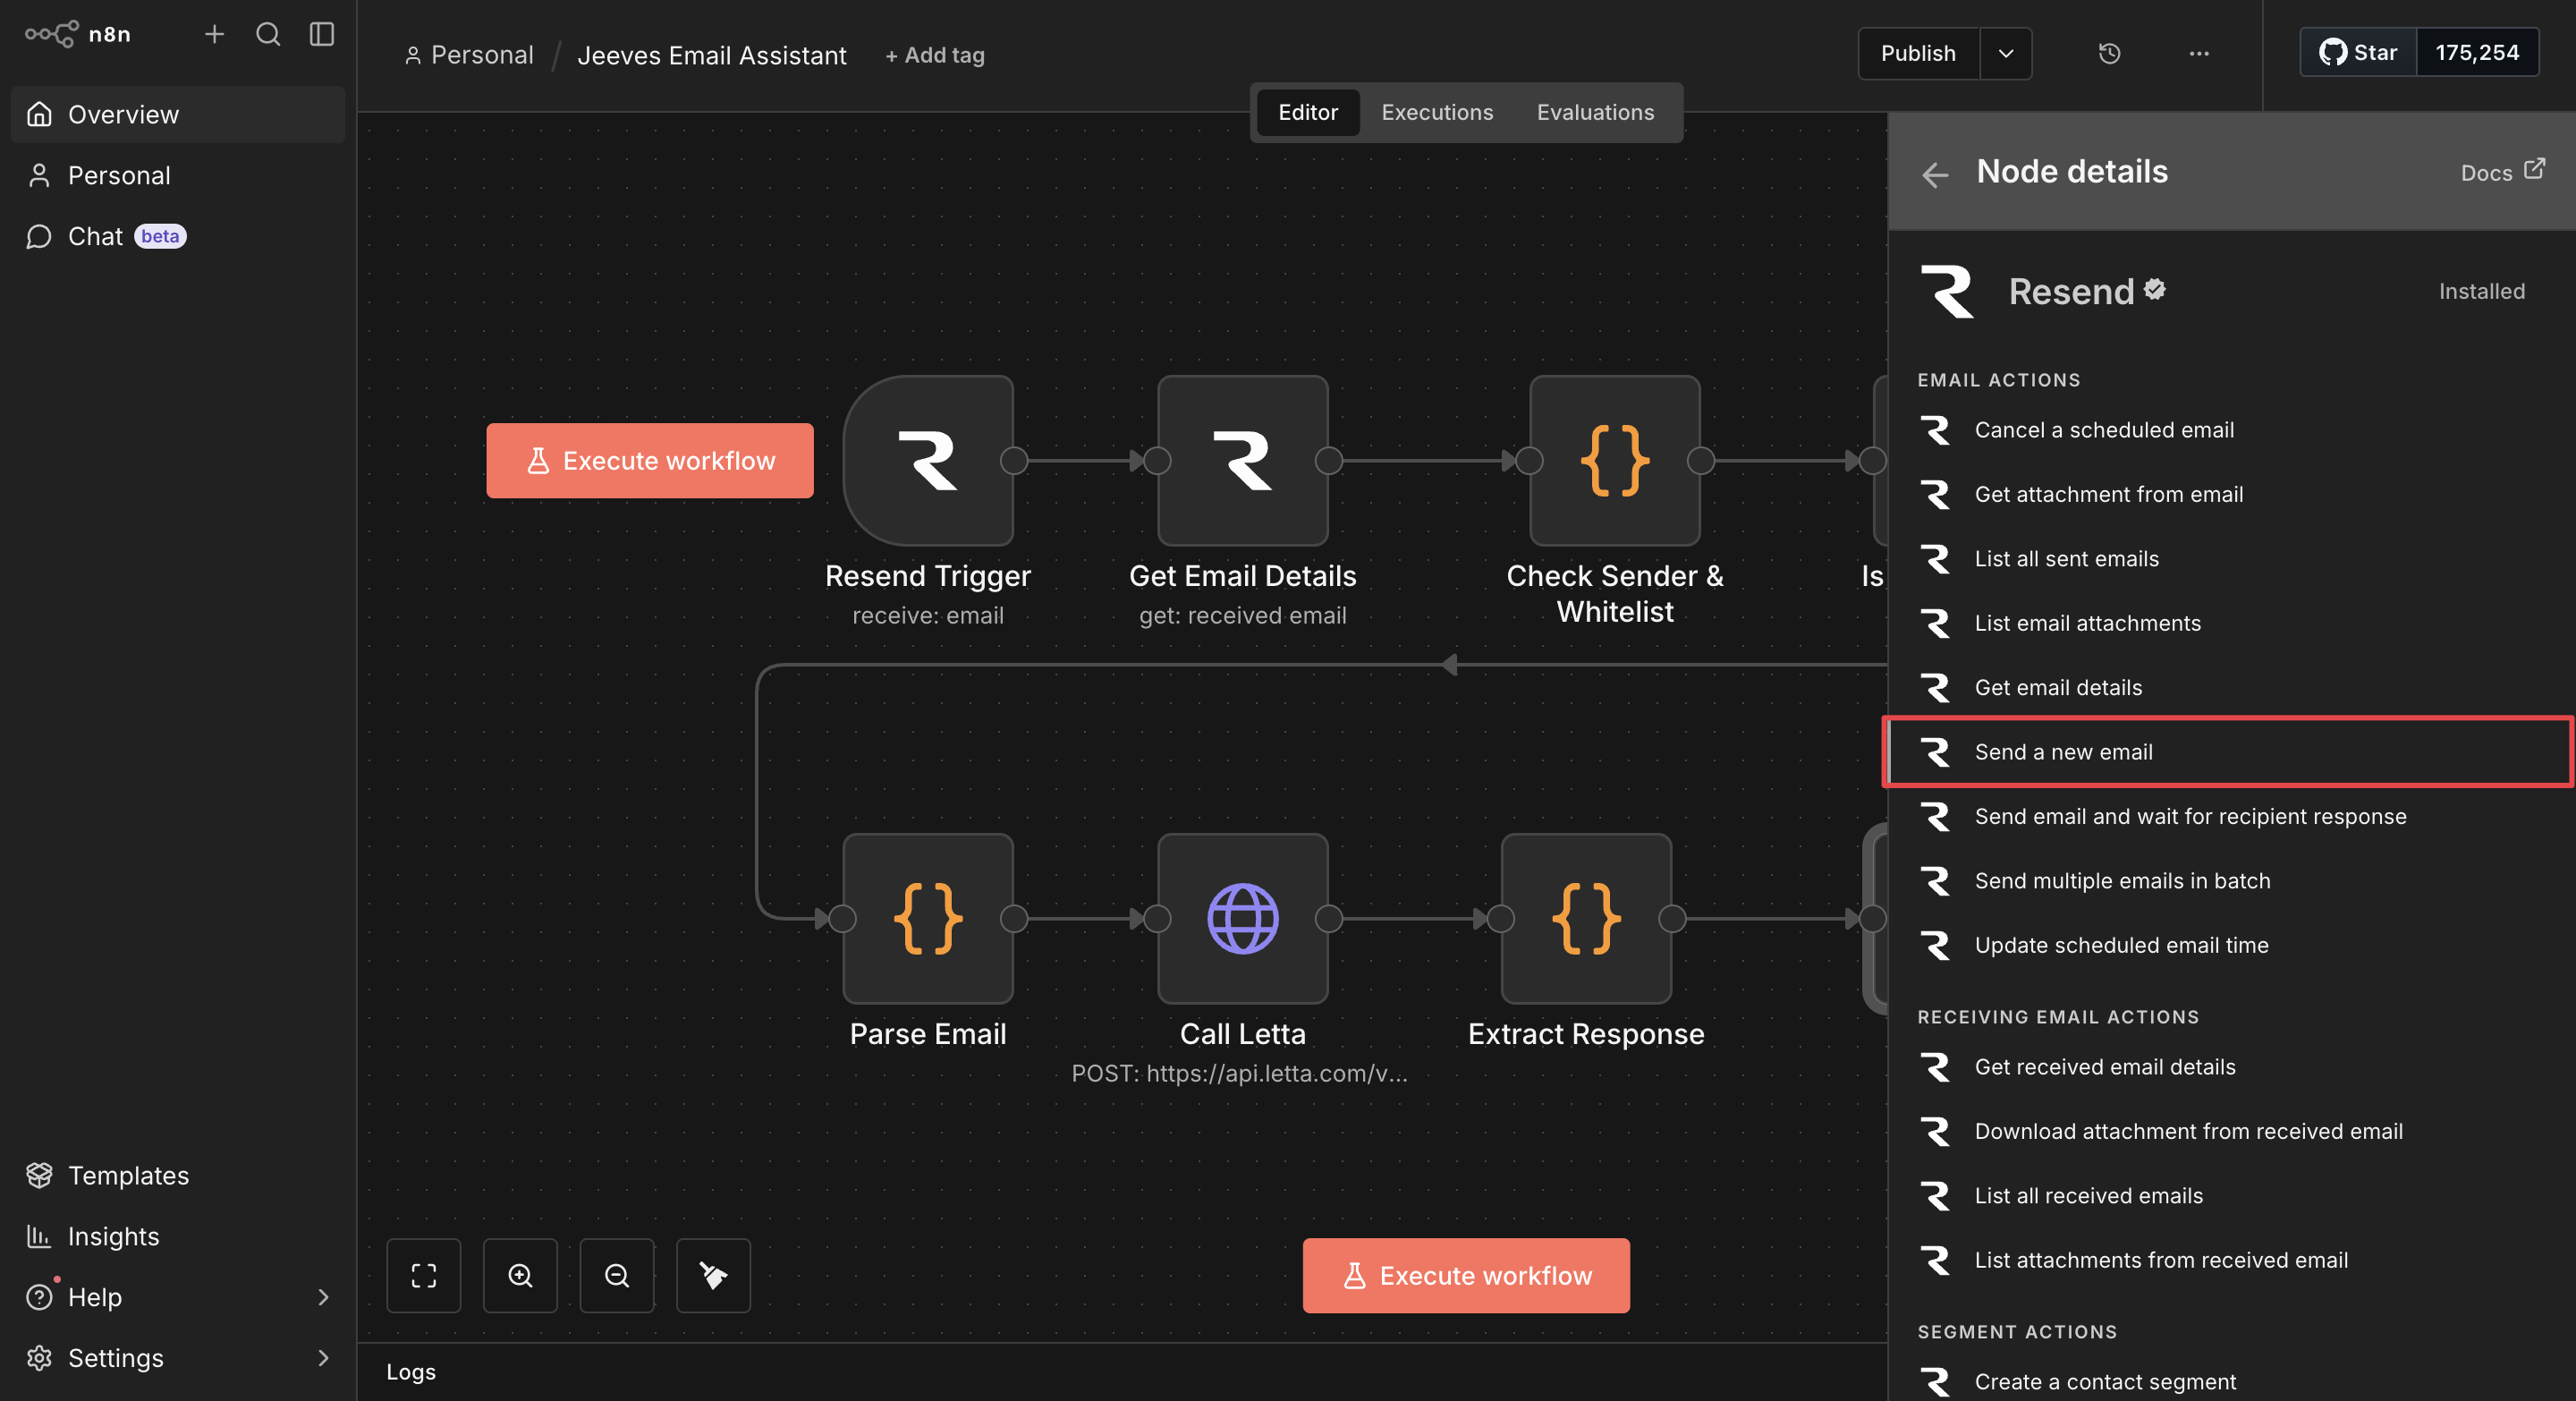
Set the parameters as follows:
- Credential: Select your Resend API credential.
- Resource: Select Email.
- Operation: Select Send to send a new email.
- From: Enter
jeeves@mail.yourdomain.com. - To: Enter
{{ $json.to }}. - CC: Enter your email address (we hardcoded this as the forwarder's address for this demo).
- Subject: Enter
{{ $json.subject }}. - Text: Enter
{{ $json.emailBody }}.
Save the workflow.
Step 5: Test the complete system
Publish the workflow by clicking Publish in the top-right corner.
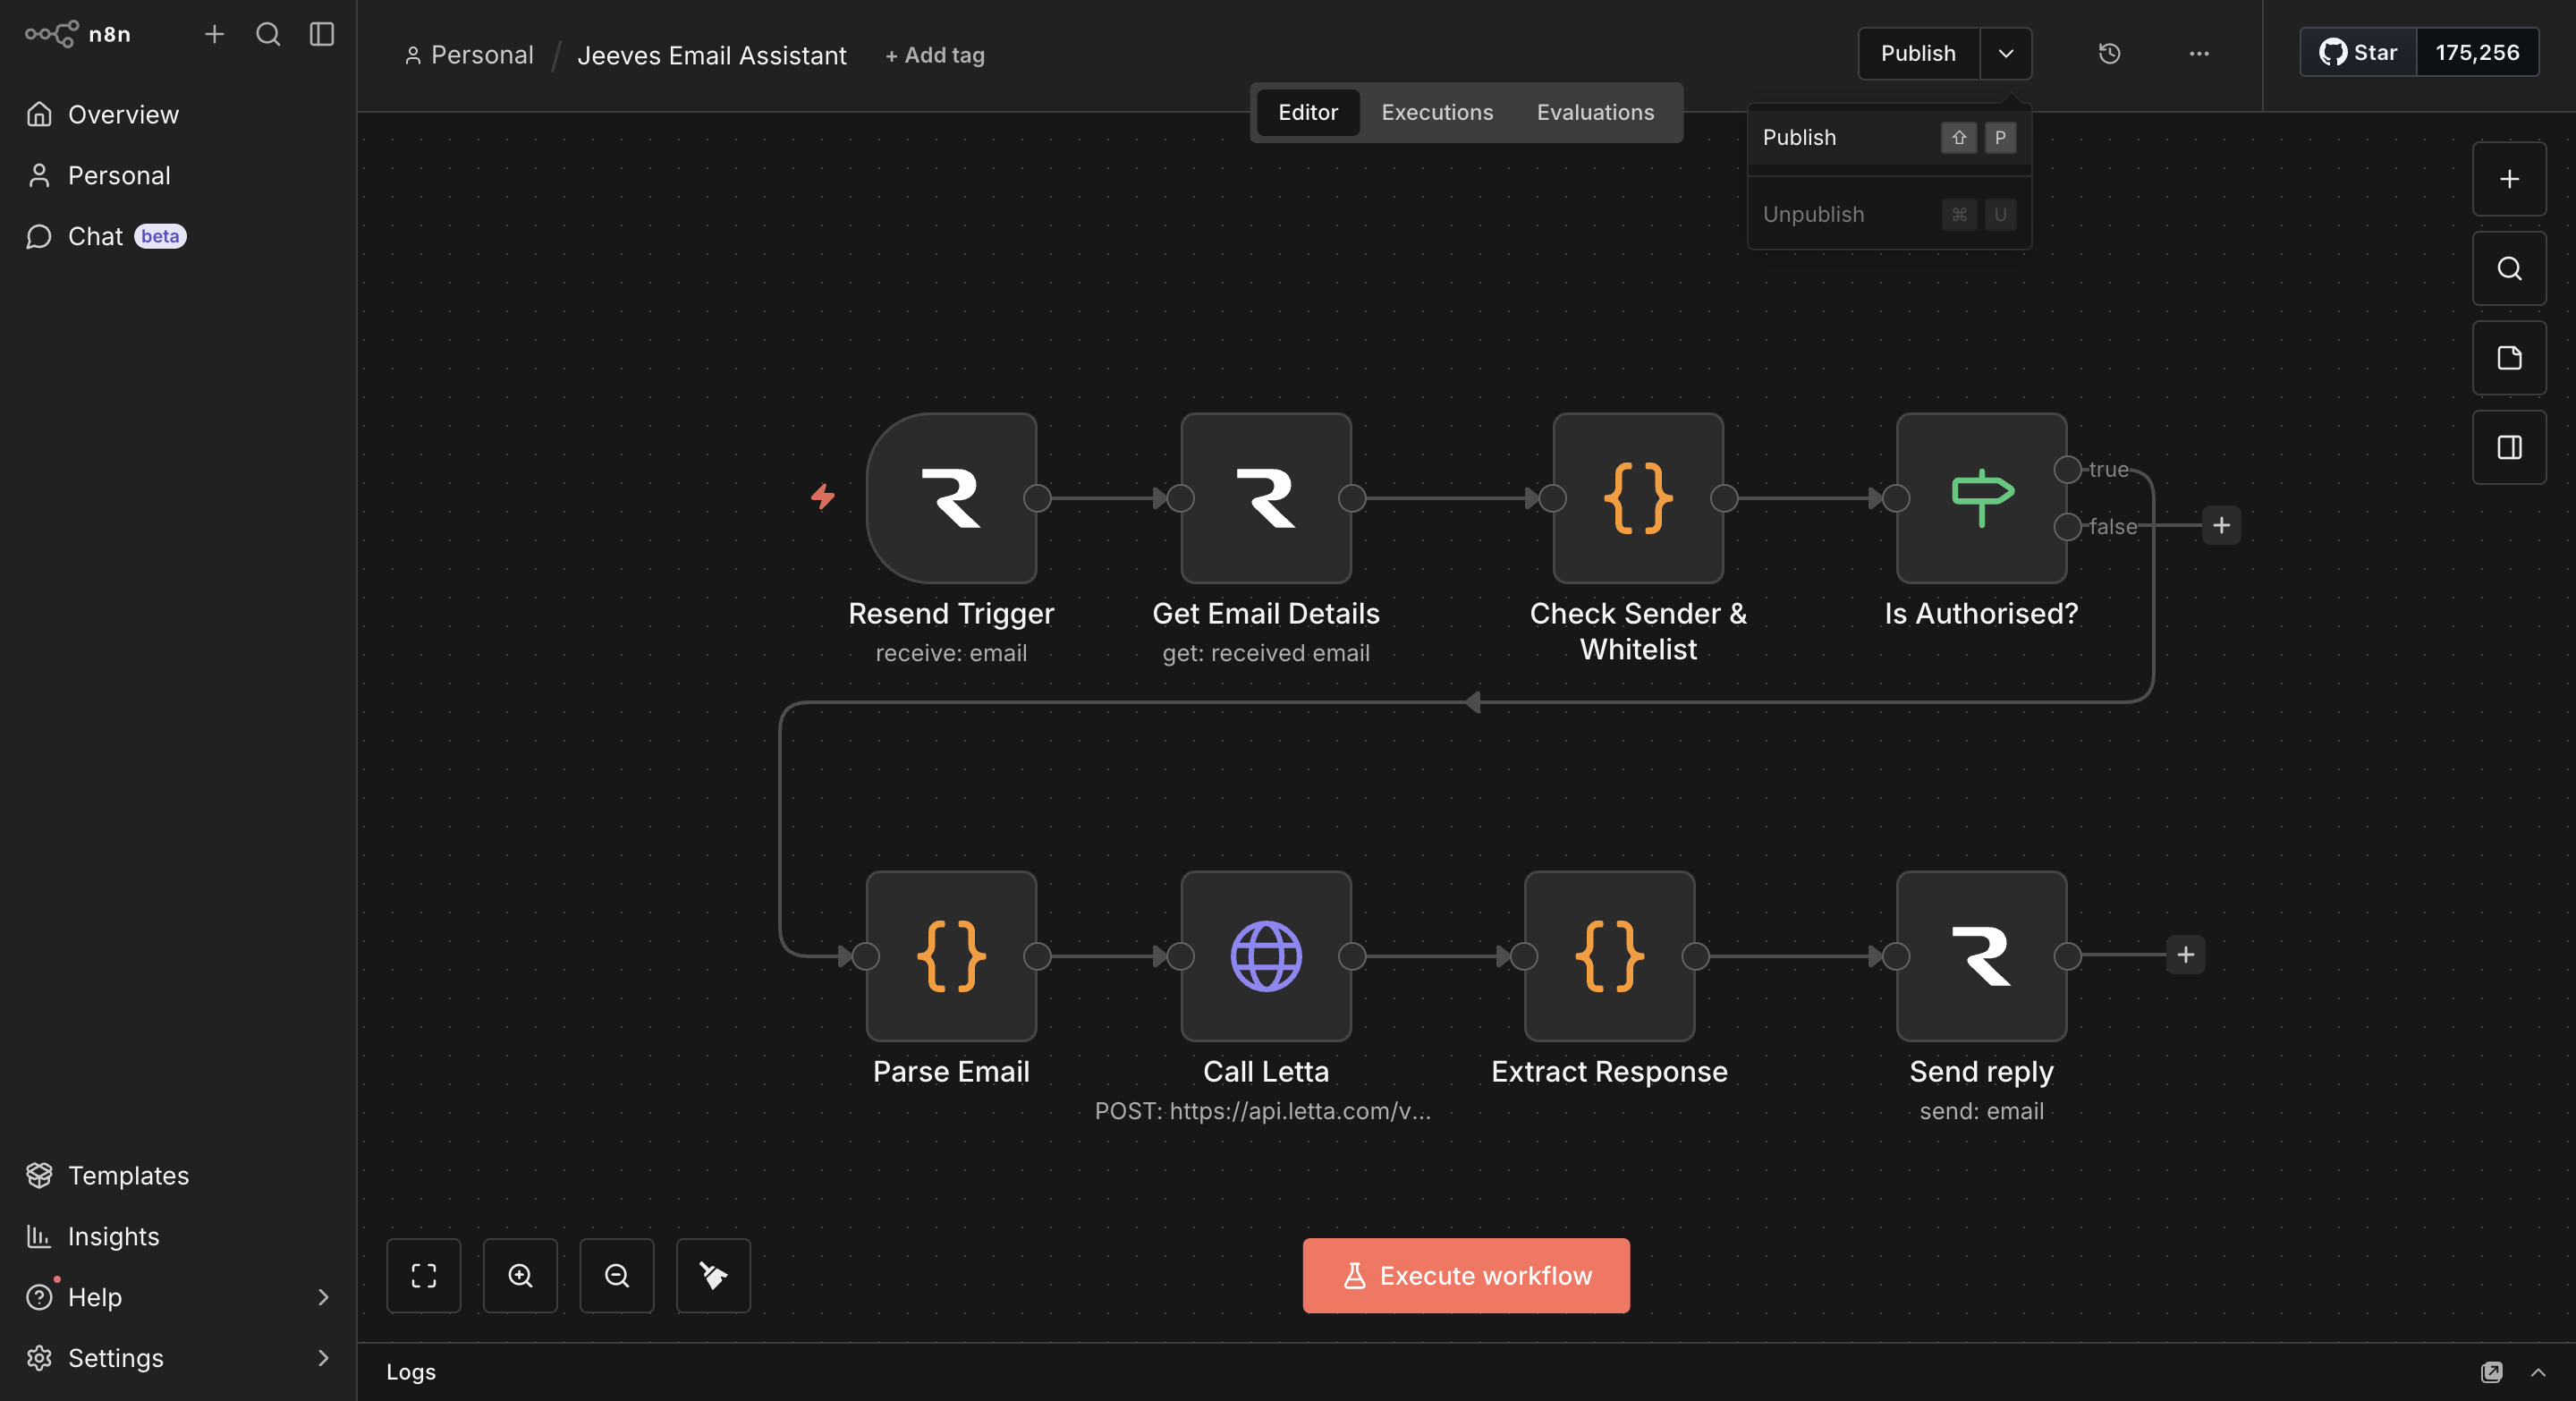
This switches the workflow to active and starts listening on the production webhook URL.
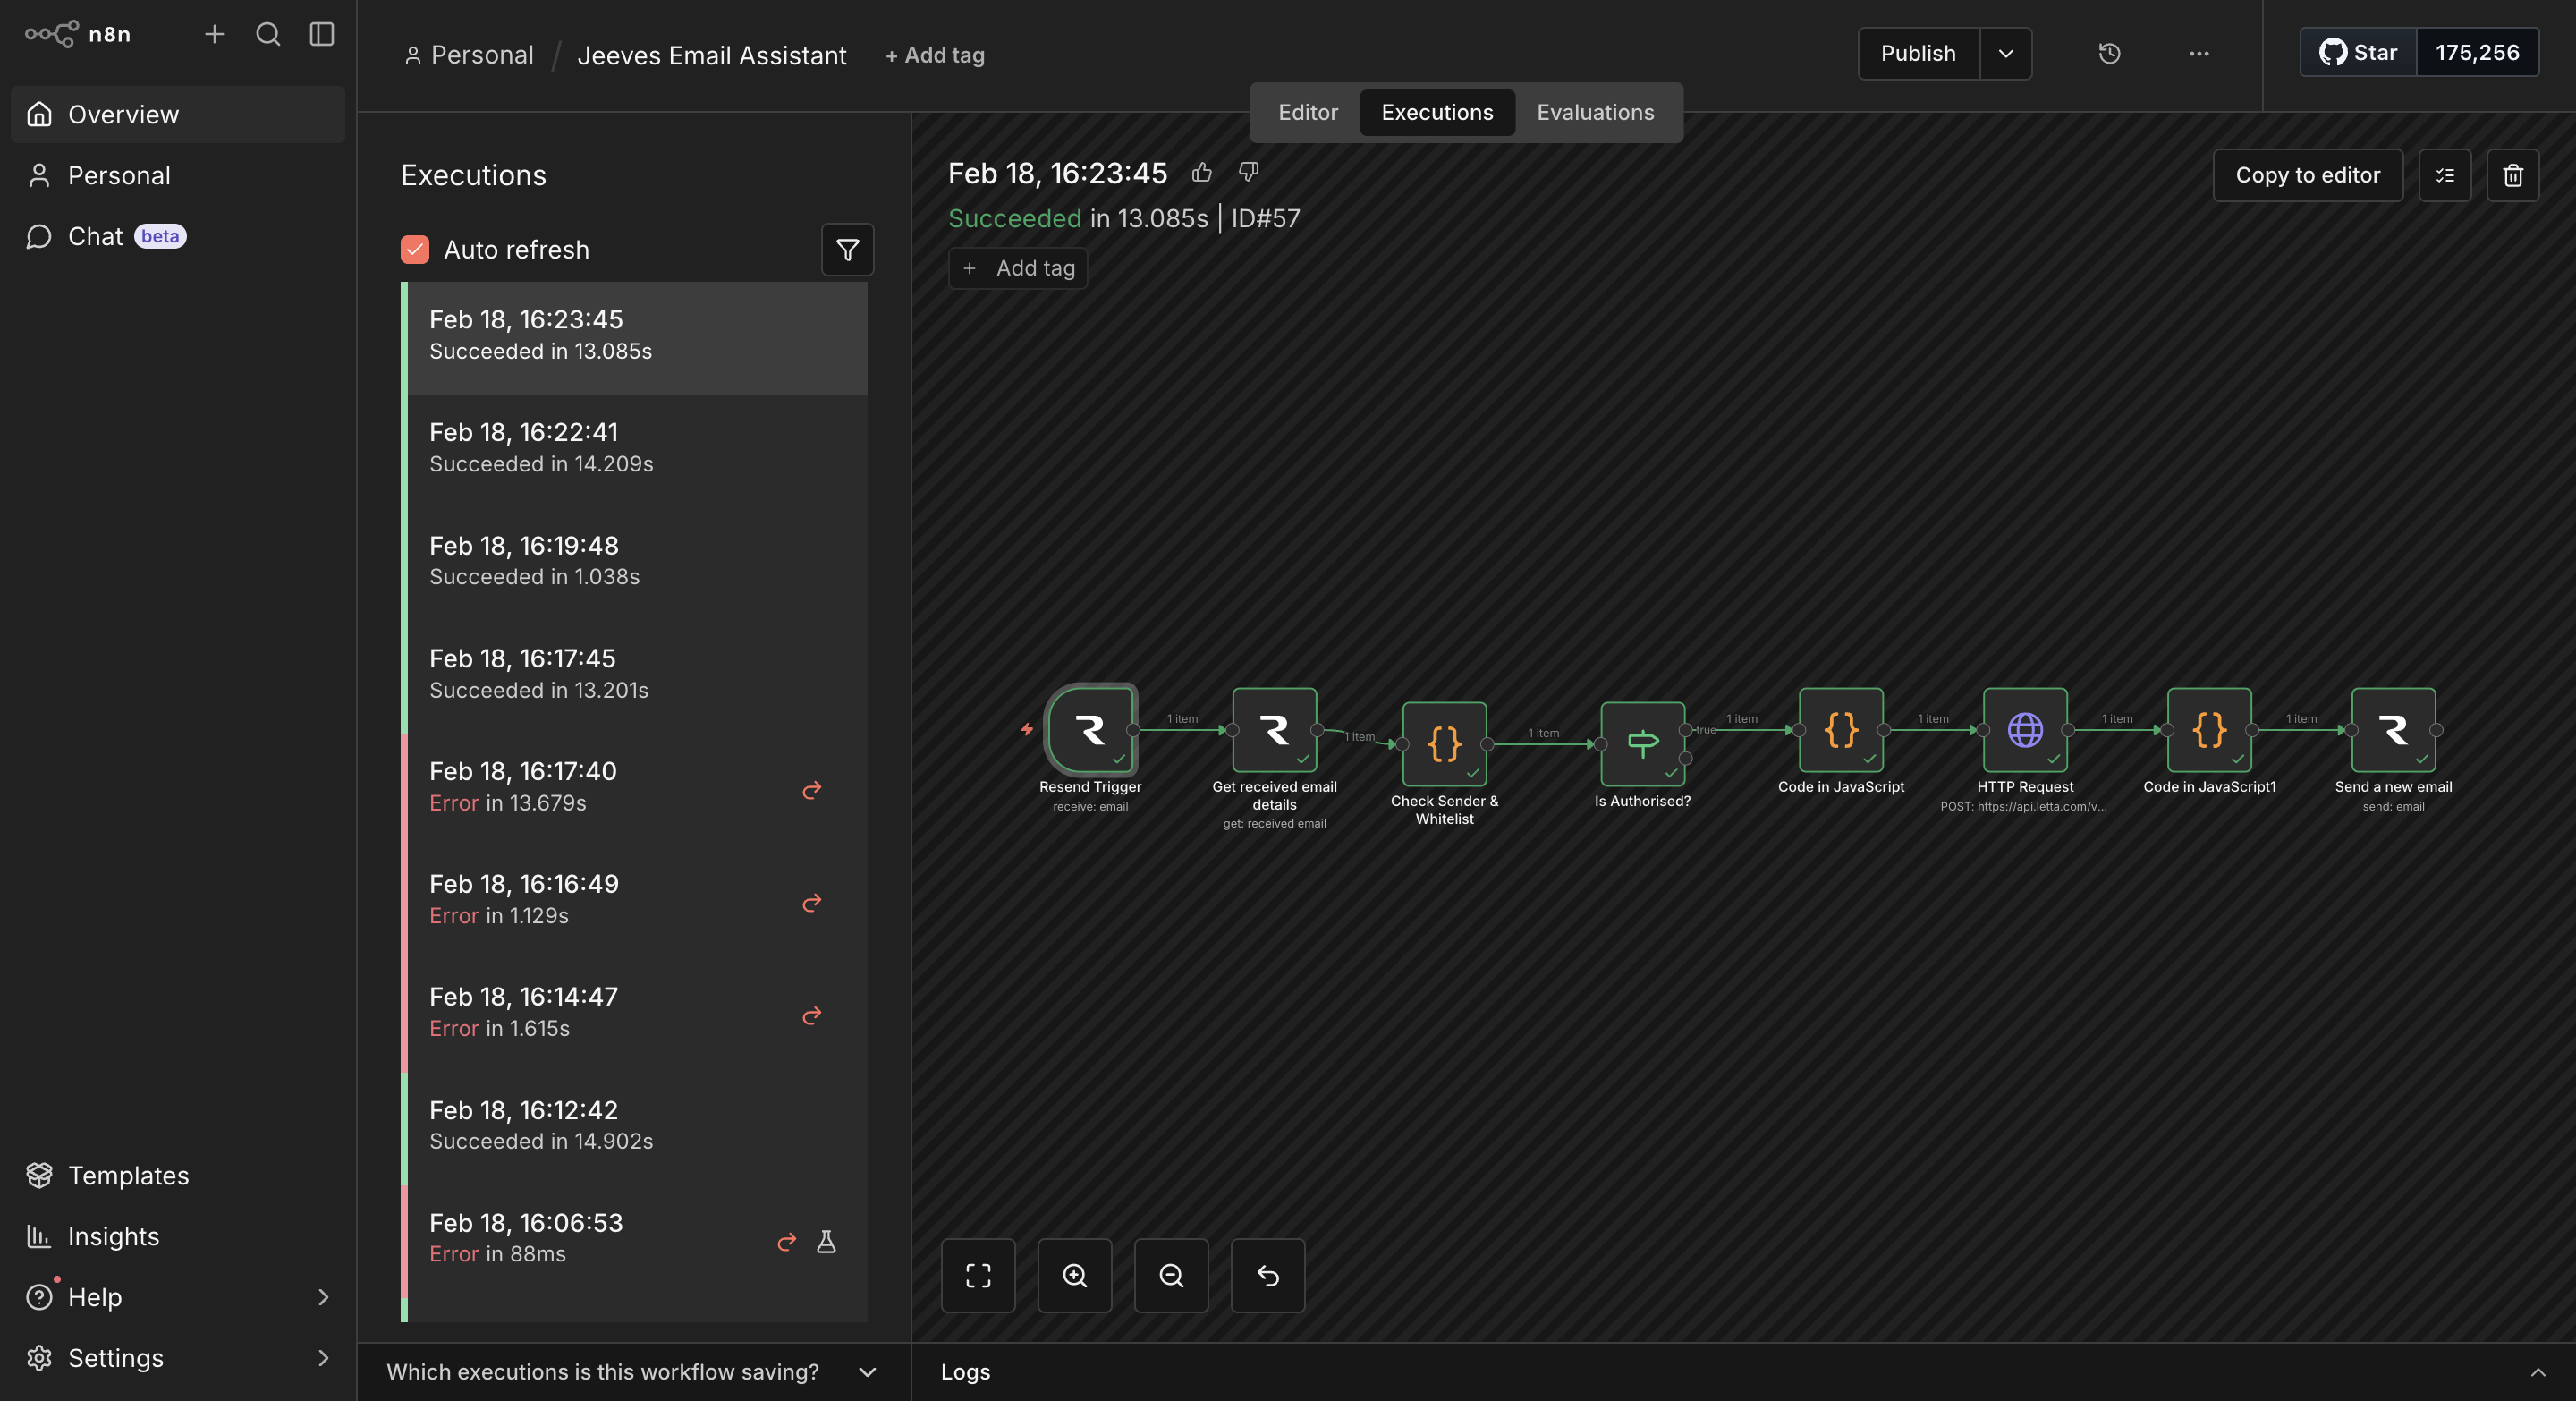
Forward an email to your Jeeves address. Within a few seconds, we should see:
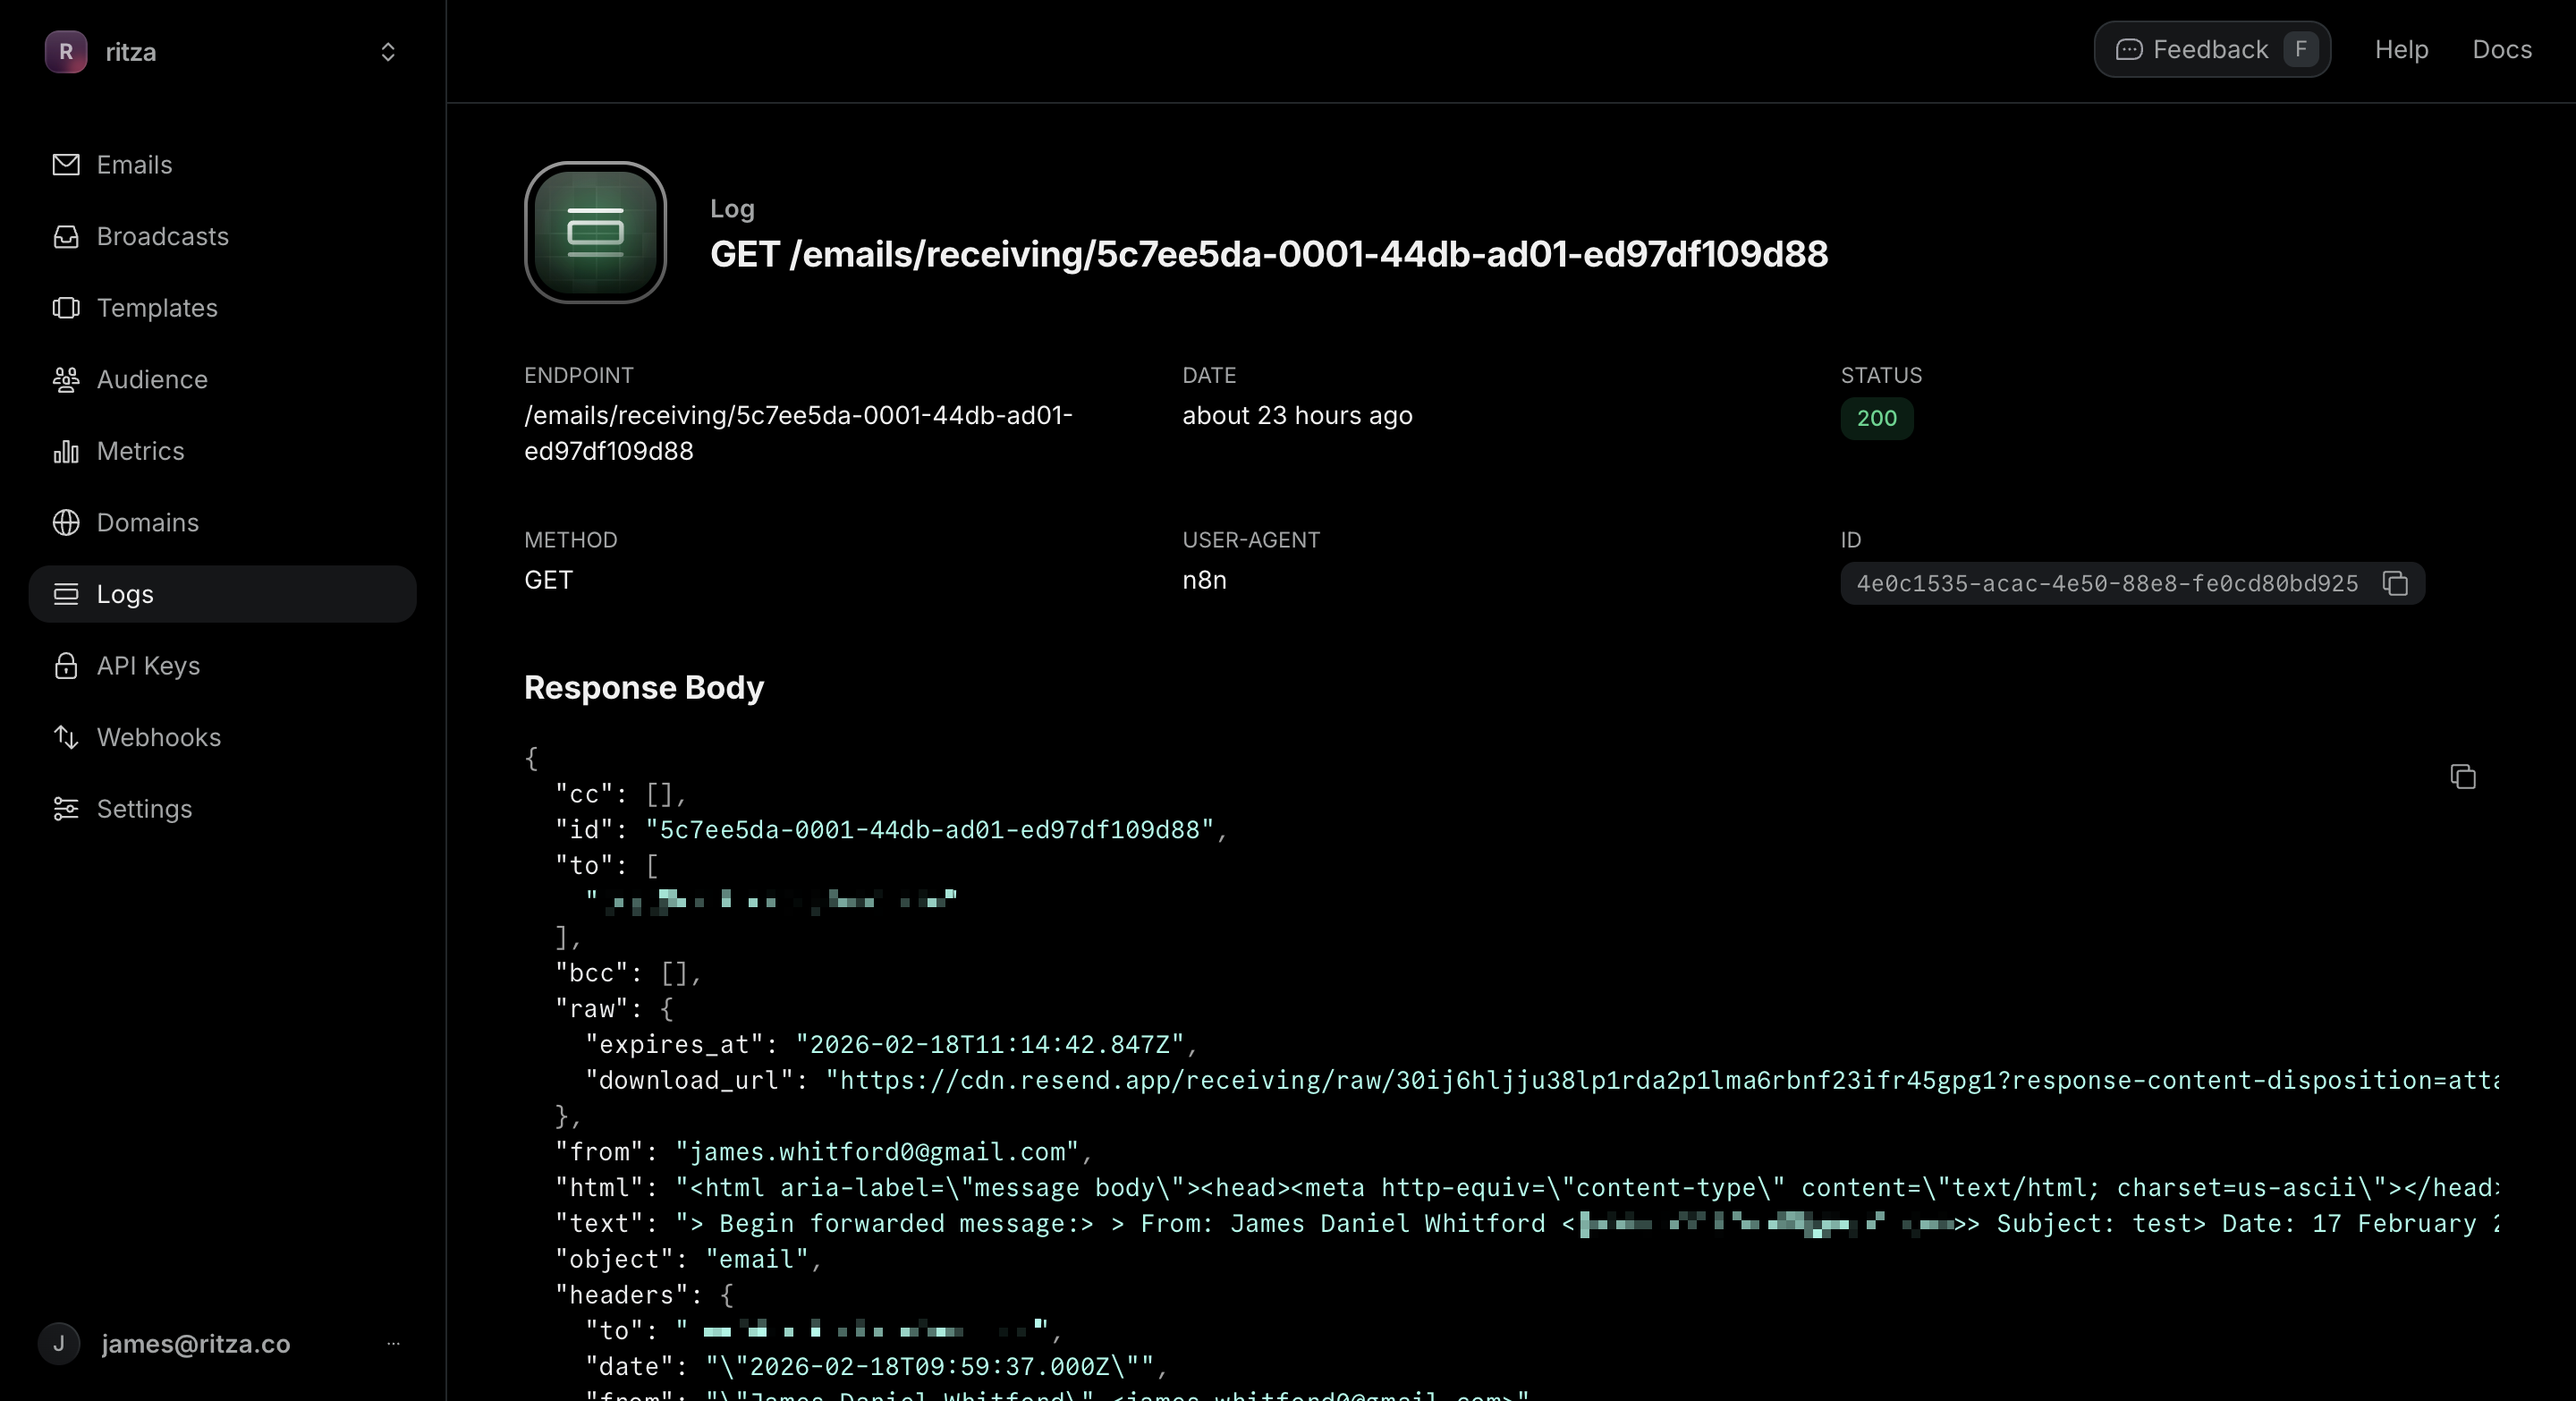
- A new execution appear in the Executions tab in n8n
- A reply land in the original sender's inbox, drafted by Jeeves
- A CCed copy in your own inbox
Open the execution in n8n to see the data that flowed through each node:
- The Parse Email node shows the information the code extracted from the forwarded email.
- The HTTP Request node shows the full Letta response, including any internal reasoning messages.
- The Extract Response node shows the final
to,subject, andemailBodyvalues sent to Resend.
Check the agent's memory
After processing a few emails, go to app.letta.com and open your Jeeves agent. Open the Core Memory panel to see the active_threads and sender_relationships blocks updating as Jeeves processes each email. Forward another email from the same sender and Jeeves will reference this history in its reply.

Next steps
As built, the workflow covers the core case of one forwarder and one Jeeves address sending replies with CC. You can extend the workflow by:
-
Parsing the forwarder from email headers dynamically: Right now, the CC address is hardcoded in the Send Reply node, and the primary address is hardcoded in the Check Allow List node. Resend includes the original
Toheader in the email data, which is the Jeeves address the email was forwarded to. You could extract the forwarder from theReply-ToorFromheaders instead of hardcoding it, making the workflow work for any forwarder without changes. -
Adding error handling nodes: n8n lets you connect an error branch to any node. If the Letta API call fails or the email parsing produces null values, you can route to a notification node (such as Slack or email), rather than letting the execution fail silently.
-
Deploying it to a cloud host: Replace ngrok with a permanent deployment on Railway, Render, or a VPS. This removes the ngrok dependency and means the workflow keeps running without a laptop open. Update the webhook URL in Resend after deploying.
-
Adding routing logic: The Letta response can include more than a draft reply. You could prompt the agent to also classify the email (for example, as urgent, FYI, or action required) and add a Switch node after the Extract Response step to route to different actions based on the classification.
-
Giving Jeeves more context upfront: The
sender_relationshipsmemory block starts empty and fills over time. You can pre-populate it with known contacts by editing the block directly in the Letta ADE before the first email arrives.
Troubleshooting
If you encounter any issues while setting up or testing your workflow, consult the following common problems and solutions.
Webhook not firing
Check that ngrok is still running:
ngrok http 5678
Then check that the URL in your Resend webhook matches the current ngrok URL. The free tier URL changes on each restart.
Confirm that you published (not just saved) the workflow, as the production webhook only fires when the workflow is active.
HTTP Request node returning 401 or 422
A 401 means you've entered the wrong Letta API key, or left out the Bearer prefix in the Authorization header value.
A 422 usually means the request body is malformed. Check that the messages field is mapped correctly from the Code node output and that each message object has a role and content field (not text).
Extract Response node returning null values
The Letta response format can vary. If to and subject are null, the agent didn't format its draft with the expected **To:** and **Subject:** markdown headers. Open the HTTP Request node output in the execution log to see the raw Letta response and adjust the regex patterns in Node 5 to match the actual format.
Email sending but arriving blank or malformatted
The emailBody field is plain text. If Jeeves includes markdown formatting in the reply (for example, asterisks or headers), the formatting appears as literal characters in a plain text email. Either strip the markdown in the Extract Response node before sending, or switch the Send Reply node from Text to HTML and have Letta format its responses as HTML.
Resend domain not receiving email
Check that all four DNS records (MX, DKIM, SPF, and DMARC) are verified in the Resend dashboard. MX records route inbound emails to Resend. If the MX record is missing or pointing elsewhere, emails won't reach Resend at all. DNS changes can take up to 24 hours to propagate.